This Instructable is about:
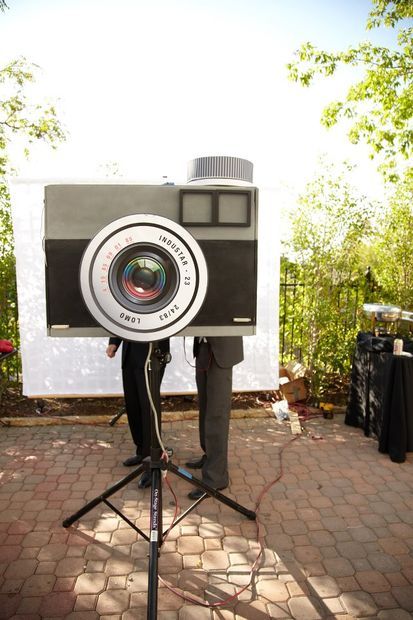
building an automated photo booth. The total build cost was around $150 as I re-used a lot of the components and materials I already had in my garage – in addition to what I could salvage from scrap yards.
Why? – I decided to build my own photo booth after trying to rent one from local photography studios. The going rate for a rented photo booth is around $600 in addition to the hourly rate of the attendent to watch over the equipment. As this was not in my wedding budget, and I did not want to deal with an additional vendor, I decided to build my own for under $200.

My Goal – Build an automated photo booth for under $200 – that could be easily operated by anyone at a party – and is durable and compact enough to fit into a compact car.
(Note* this photo booth does not print pictures. I have been working on a script that automatically uploaded the photo to flickr, but I did not finish it in time for the wedding. I’ll try and include that in a future post )
Step 1: How it works
The photo booth operation is simple. Users walk up to the back side of the camera – See themselves on the screen – Press a button and strike a pose.
The mechanics of the photo booth are a little bit more complicated, but ideally, the user never has to know what is going on under the hood.
The guts behind this photo booth are based on OSX lion. With Lion, the photobooth application can be extended to full screen and it can be set to use an external camera. So I connect a logitech web cam and an external monitor to a laptop running OSX Lion. The only thing i needed to build in addition to this hardware setup was an array of lights and a button (mapped to the enter key) to trigger the photobooth application to take a picture.
The “business end” of the photo booth can be seen in this step.
Step 2: Software and Trigger Button
As previously mentioned, this photobooth uses the OSX Photobooth application. The OSX Photobooth application was chosen because it was the most stable software i could find – and it comes with every MAC computer. Like most applications, users can trigger features and functions with mouse clicks and keyboard commands.Triggering the Photobooth Application
With OSX Photobooth, pressing the Enter Key triggers the program to take a photo. I didn’t want to expose my computer to people hammering on the keyboard (espeically if they had been drinking). This is why i decided to use an external button, connected to an arduino microcontroller, to trigger the photobooth application.
This is how it works:
The button is pressed – A Staples Easy button was modified to act as a regular button. It’s really durable, so people can beat on it without breaking it.
An Arduino registers the button press – When it registers a button press, it sends a serial command to the computer. In this case, it sends the [enter] serial command.
AAC Keys listens to the serial port for serial commands – AAC keys is a free application which litens for serial commands and emulates mouse and keboard events. You can download it here. In this case, when AAC keys receives the [enter] serial command, it tells the computer (and the photobooth application) that someone has just pressed the enter key on the keyboard.
When the photobooth application registers the enter key being pressed, it takes a photo.
Wiring the circuit – If you do not know how to make a button circuit for an arduino, read this tutorial – http://www.arduino.cc/en/Tutorial/button
Be sure to connect the button to pin 10 on your arduino. If you choose to wire your button to a different pin, be sure to change [int buttonPin = 10] in the arduino code to match the pin number you selected.
Writing the code – Here is the code i wrote to send an [enter] serial command to the AAC Keys. If you are not familiar with writing arduino code, use this tutorial here. It’s pretty easy once you get the hang of it. http://arduino.cc/en/Guide/HomePageconst int buttonPin = 10; // the number of the pushbutton pin
int buttonState = 0; // variable for reading the pushbutton status
void setup() {
pinMode(buttonPin, INPUT);
Serial.begin(9600); // open the serial port at 9600 bps:
}
void loop(){
buttonState = digitalRead(buttonPin);
if (buttonState == HIGH) {
Serial.println();
}
else {
// nothing
}
}
Installing AAC keys – As previously mentioned, AAC keys is a free program. “That receives commands through your computer’s serial port and translates them into keystrokes and mouse movements, giving you full control of your computer from another device such as an [arduino]”. You can download the program here: http://www.oatsoft.org/Software/aac-keys

Using AAC Keys is quite simple. Make sure you have an arduino plugged in via usb, running the code seen above. Open AAC keys application and access the applications preferences. When the dialogue appears, check to see that you have selected the serial port associated with the connected arduino (generally it’s selected by default, but it is good practice to check), and that it is running at 9600 bps.
If you’ve done this, AAC keys should be interpreting the button press from the arduino as an [enter] command on the keyboard. open a text editor and give it a shot. Type a few lines of text and press the button attached to your arduino instead of using the enter key. You can also open photobooth at this time and see that pressing the button triggers the program to take a picture.
For more detail: A Makers Wedding – Photo booth
