
Summary of StorageBot – voice controlled robotic parts finder using arduino
StorageBot is a voice-controlled robot that locates and delivers specific storage bins from a master database, solving the common maker problem of finding scattered parts. It utilizes an Arduino for electronics, stepper motors for movement, and Visual Basic software for voice recognition. The project emphasizes learning skills in electronics, mechanics, and 3D modeling using accessible components like pine wood, pocket door rails, and 123D CAD software to inspire future innovation.
Parts used in the StorageBot:
- Pine wood
- Plastic storage bins
- Arduino
- Stepper motors
- Visual Basic voice recognition software
- Pocket door hardware
- Belt drive system
- Drive pulley
- Idler pulley
- Aluminum spacers
- Nylon spacers
Introduction
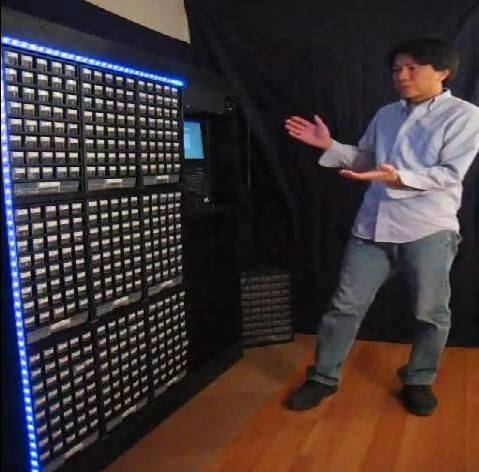
I created the StorageBot to help solve a problem experienced by most Makers. After many years of accumulating thousands of parts stored in storage bins, I began to go crazy looking for parts scattered between so many of these bins. The hardest parts to find were always those rare miscellaneous parts that were thrown somewhere into a “junk” bin. StorageBot solves the location problem by listening to my voice commands, processing the location of parts from a master database and then delivering the matching bins in a manner that only a robot can do!
StorageBot does have a bigger picture when it comes to purpose. I explain in my video that it’s not about building a StorageBot that’s important, but rather it’s the skills we can learn from such projects that help to enrich our knowledge and inspire us to build the next great thing or start the next cool business.
In this Instructable you’ll gain insights into the electronics, mechanics and software systems used to create useful projects by utilizing commonly available components such as the Arduino and stepper motors.
I’ve included a bazillion pictures and files. Source code for the Aduino program, source code for the Visual Basic voice recognition software, DXF files for the ABS parts, schematics for the electronics, 3D files drawn in the free Autodesk 123D program, parts list, etc… It’s all here!
If you find this project inspirational and helpful then don’t forget to vote for it in the ShopBot contest. I would use a ShopBot to create the ABS parts, aluminum parts and vaccuum form molds for my next generation home robots.
Step 1: Secret Exposed & Project Outline
The video above gives you a glimpse into the frame and mechanisms required to physically push out each bin based on the voice commands.
I’ll describe the system by breaking it into the basic components. Here’s an outline:
– Building the pine frame
– Building the x-axis
– Building the z-axis
– Building the y-axis
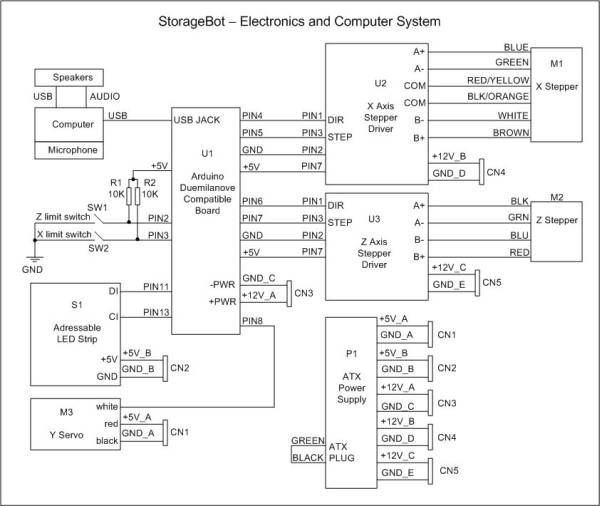
– Buldling the electronics
– Voice recognition software
Step 2: Autodesk 123D & Pine Frame
The StorageBot frame is constructed out of pine wood. All of the materials can be purchased at Home Depot. The plastic storage bins can be purchased from Harbor Freight. See the attached bill of materials for quantity and pricing.
When buying pine wood from Home Depot make sure you spend time selecting the best pieces of straight wood. I found the wood at the top of the stack is typically the most crooked pieces. Some of this lumber may be returned items and obviously people would return the worst of the pieces. Here’s a trick to help determine the straight pieces. Place the piece of wood on the flat concrete floor and use the floor as a straight edge. Stay away from wood that is twisted along the length. Long pieces of wood that bow slightly in the middle can be ok if a later process such as screwing into the final framing straightens them out.
I modeled the pine frame using the free 3D CAD program from Autodesk called 123D. You can download the program here:
The cool thing about this program is that you model the components of your systems and then connect them together using something called constraints. In 123D constraints are under the Design Intent \ Assemble Icon. With constraints I can tell 123D to take 2 separate pieces of pine wood and align the edges to each other. Another useful feature of 123D is the Browser history along the left side of the screen. With this browser I can easily turn components on and off by just clicking an “eye” icon for each component. I used this feature in order to generate the step by step images for the frame construction.
The 123D model of the pine frame is attached below as a zip file. Have fun playing with 123D and be sure to watch the tutorial videos on YouTube.
Step 3: Building the x-axis
X is the axis that moves between the left and right side of the StorageBot. This axis also has to support the weight of the other axes, Z and Y.
Like many Makers I sometimes struggle coming up with the best design approach. My first attempt at prototyping the X axis was unsuccessful due to binding issues. When building any rail system mounted to a wooden frame one has to compensate for wide build tolerances. For example: the wood isn’t always straight, there may be warpage with temperature and humidity, cut lengths are slightly different, etc. The final solution I came up with was inspired by a rail system that was already used in my house. It so happens I have pocket doors and the rail system used on those doors can also be adapted to the StorageBot.
Pocket door hardware is an inexpensive and simple system for producing linear motion while hanging a lot of weight such as a door (or equivalent on the StorageBot). See the attached pictures on how I adapted this simple system. This is a great example of how being observant to the world around you can provide insights into solving problems.
Step 4: Building the z-axis
I already determined the z-axis would be belt driven and there would be a drive pulley and an idler pulley creating the ends of the belt system. When the belt moved it would have to move a carriage up and down in the vertical direction.
The challenge was coming up with a low cost way to guide the z-axis carriage along the vertical direction. There was already a vertical frame made out of wood so I wanted to use that as a guide. Using wood as a linear guide can be tricky due to sticking from friction. I finally came up with a solution based on some past tinkering with a bin full of spacers. Once again, curiosity paid off.
In the attached pictures you’ll see how I used two different sized spacers, one made out of aluminum and one made out of nylon to form a low cost roller guide. Who ever knew playing with a bin full of spacers and noticing how some fit within others would pay off!
For more detail: StorageBot – voice controlled robotic parts finder
- What problem does StorageBot solve?
It solves the problem of locating rare miscellaneous parts scattered across many storage bins by delivering matching bins via voice command. - How is the StorageBot frame constructed?
The frame is constructed out of pine wood selected for straightness and modeled using the Autodesk 123D program. - What inspired the design of the x-axis?
The x-axis design was inspired by the rail system used on pocket doors in the author's house to handle weight and linear motion. - How is the z-axis guided vertically?
The z-axis carriage is guided using two different sized spacers made of aluminum and nylon to form a low cost roller guide. - Can I get the source code for the project?
Yes, the article includes source code for the Arduino program and the Visual Basic voice recognition software. - What software was used to model the parts?
The free Autodesk 123D program was used to model the pine frame and other components. - Where can I purchase the materials?
Pine wood can be purchased at Home Depot and plastic storage bins can be purchased from Harbor Freight. - Does the project use a belt drive system?
Yes, the z-axis uses a belt driven system with a drive pulley and an idler pulley.