
Summary of Two ways to reset arduino in software
This article explains two methods to reset an Arduino programmatically without a physical button. The first method uses a single wire connecting a digital output pin (Pin 12) to the RESET pin, initializing it HIGH in setup to prevent boot failure. The second method employs a software-only approach by declaring a function pointer to address 0 and invoking it within the loop to trigger a restart instantly.
Parts used in the Arduino Reset Project:
- Arduino Board
- Digital Output Pin (Pin 12)
- RESET Pin
- Digital LED (Pin 13)
If you want to RESET Arduino from the beginning without manually pressing the RESET button, there are a few ways. Here are two ways, using minimal wiring / circuitry.
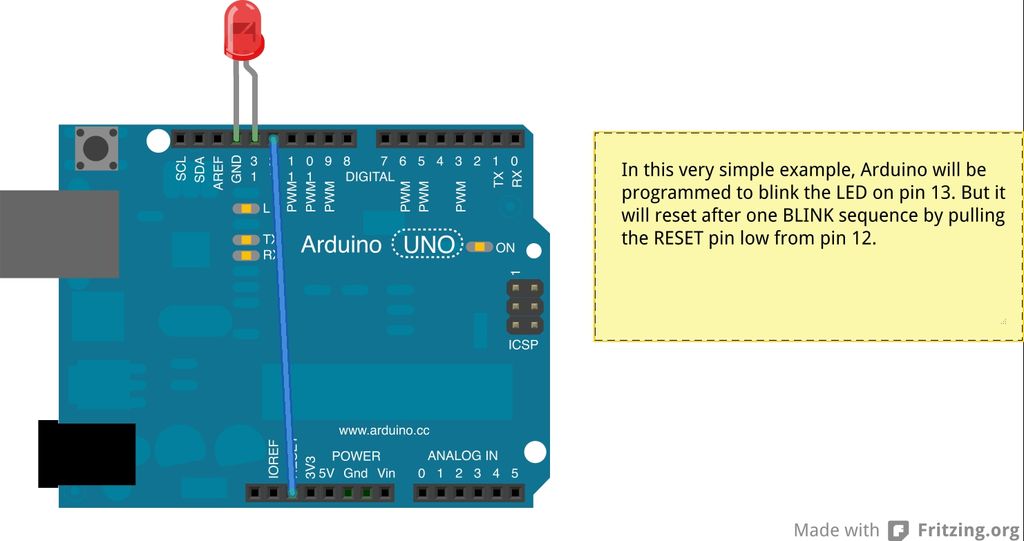
Step 1: Using 1 wire connected to the RESET pin
1. electronically, using only 1 wire connecting an OUTPUT pin (12 in this example) to the RESET pin. (see the circuit)
In this example, pin 13, connected to the internal LED pin 13 is blinking. Pin 12 gets connected to the RESET pin by one wire.
-Typically, this would be a problem because when the application starts up, all pins get pulled LOW. This would therefore disable Arduino from every running. BUT, the trick is: in setup() function, the FIRST thing that happens is we write HIGH to the pin 12, which is called our reset pin (digitalWrite(resetPin, HIGH), thereby pulling the Arduino RESET pin HIGH.
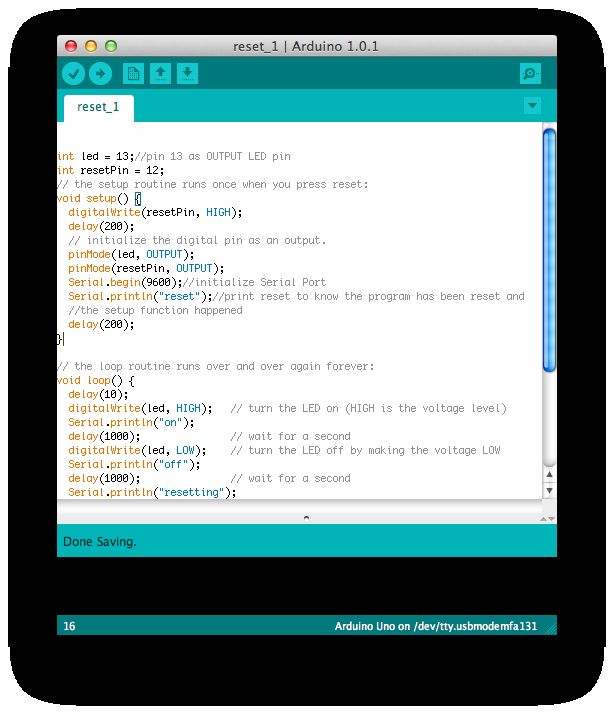
int led = 13;//pin 13 as OUTPUT LED pin
int resetPin = 12;
// the setup routine runs once when you press reset:
void setup() {
  digitalWrite(resetPin, HIGH);
  delay(200);
  // initialize the digital pin as an output.
  pinMode(led, OUTPUT);
  pinMode(resetPin, OUTPUT);
  Serial.begin(9600);//initialize Serial Port
  Serial.println("reset");//print reset to know the program has been reset and
  //the setup function happened
  delay(200);
}

// the loop routine runs over and over again forever:
void loop() {
  delay(10);
  digitalWrite(led, HIGH);   // turn the LED on (HIGH is the voltage level)
  Serial.println("on");
  delay(1000);               // wait for a second
  digitalWrite(led, LOW);    // turn the LED off by making the voltage LOW
  Serial.println("off");
  delay(1000);               // wait for a second
  Serial.println("resetting");
  delay(10);
  digitalWrite(resetPin, LOW);
  Serial.println("this never happens");
  //this never happens because Arduino resets

}
Step 2: Using just software
In this example, you do not need any extra wiring. We initialize the reset function, then call reset.
void(* resetFunc) (void) = 0;//declare reset function at address 0
…
resetFunc(); //call reset
int led = 13;
// the setup routine runs once when you press reset:
void setup() {
// initialize the digital pin as an output.
pinMode(led, OUTPUT);
Serial.begin(9600);//initialize the serial port
}
void(* resetFunc) (void) = 0; //declare reset function @ address 0
// the loop routine runs over and over again forever:
void loop() {
digitalWrite(led, HIGH); // turn the LED on (HIGH is the voltage level)
Serial.println(“on”);
delay(1000); // wait for a second
digitalWrite(led, LOW); // turn the LED off by making the voltage LOW
Serial.println(“off”);
delay(1000); // wait for a second
Serial.println(“resetting”);
resetFunc(); //call reset
delay(100);
Serial.println(“never happens”);
}
Source: Two ways to reset arduino in software
- How can I reset Arduino from the beginning without manually pressing the RESET button?
You can use either a single wire connected to the RESET pin or a pure software method using a function pointer. - What is the trick to prevent the Arduino from disabling when all pins pull LOW at startup?
The trick is to write HIGH to the designated reset pin inside the setup function immediately after power up. - Does the software only method require extra wiring?
No, this method requires no extra wiring as it relies solely on code to initialize and call the reset function. - How do you declare the reset function in the software method?
You declare it by assigning a void function pointer to address 0 using the syntax void(* resetFunc) (void) = 0; - Can you reset the Arduino by writing LOW to the reset pin in the loop?
Yes, writing LOW to the reset pin triggers the reset, causing the subsequent code like Serial.println never happens. - What happens if you try to execute code after calling the reset function?
The code following the reset call will not execute because the Arduino restarts immediately. - Is it possible to blink an internal LED while resetting the board?
Yes, the examples show using Pin 13 to blink an internal LED before and during the reset process. - What is the best way to verify that the program has been reset?
You can use Serial.println to print messages like reset or on/off to confirm the setup function ran again.