Summary of Programming an Arduino via WiFi with the ESP8266
RoDI is a low-cost wireless robot designed for educational purposes, updated to use WiFi via the ESP8266 module instead of Bluetooth. This modification allows users to flash the ATmega328 microcontroller wirelessly without a USB-to-Serial converter. The author modified the firmware to enable transparent mode in server mode and discusses security considerations like connection limits and passwords for the access point.
Parts used in the RoDI:
- ATmega328 microcontroller
- ESP8266 WiFi module
- Arduino board (3.3V version)
A (not so) brief introduction.
I’ve been working on a new robot called RoDI for a summer course at my Alma mater. RoDI is a low cost wireless robot to teach robotics and programming I started developing last year (reminder to self: I still need to post about it), but it wasn’t until a month ago that I started to work on it more often.
The first version used a HC-06 Bluetooth module to communicate with the computer. I wanted to to use WiFi, but the cost of the WiFi modules was a problem, since the idea was that the entire robot would cost less than 30 USD.
Then, I read about the ESP8266 WiFi modules on Hackaday, and started working on a new version of RoDI, this time with WiFi :D. I wanted to be able to flash the atmega328 inside the robot via WiFi because the robot doesn’t have a USB to Serial converter.
I found (again on HaD) a blog that showed how to flash an Arduino via WiFi with these modules, but it uses the ESP8266 to connect to a router, as we’re planning to have a few of this robots, and the student will take these robot and it doesn’t have another way of flashing the chip unless they have a programmer, so this method wouldn’t work for the robots. One thing that I learn from the blog was that I was going to need to use the transparent mode and, of course, use the module as an AP. Bad news, transparent mode is not available when using the module in server mode with the at_v0.20_on_SDKv0.9.3 version of the at command example. Time for hacking it!
After reading through the source code for the AT commands firmware I was able to enable transparent mode when using the module as a server. One security issue for this is that it supports up to 5 connections, so is not completely secure. I asked and got this response but wasn’t able to find that method (or variable?). I found another method that consist on configuring the AP using the wifi_softap_get_config method from the SDK, which lets us set the max_connection parameter. Yet another option is to add a password to the AP. But… we plan to use it only for robots in a summer course, so the security isn’t really important for now.
Let’s get to work…
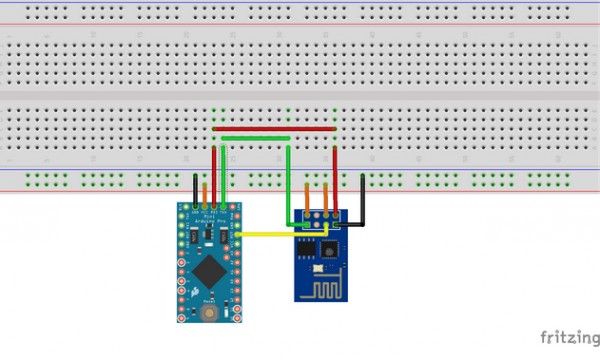
Connecting all together
CAUTION: This assumes you’re using a 3.3V Arduino. I’m not responsible for any broken Arduino or ESP8266 modules.
For more detail: Programming an Arduino via WiFi with the ESP8266
- Why was the ESP8266 chosen over other WiFi modules?
The cost of standard WiFi modules was too high, as the goal was to keep the entire robot under 30 USD. - How does the new RoDI version handle flashing the microcontroller?
The robot can now be flashed via WiFi because it lacks a USB to Serial converter. - What specific firmware mode was required for this project?
The author needed to enable transparent mode while using the module as a server. - Is the default configuration secure for multiple connections?
No, the default setup supports up to 5 connections and is not completely secure. - How can the maximum connection limit be configured?
The max_connection parameter can be set using the wifi_softap_get_config method from the SDK. - Can a password be added to the access point?
Yes, adding a password to the AP is another option mentioned for securing the connection. - Does the original blog tutorial work directly for this student robot scenario?
No, that method requires connecting to a router, which is not suitable since students take the robots away.