Summary of 3D Printed Timelapse/3D Scanning Turntable
This article details an affordable, intermediate-level Arduino turntable designed for time-lapse photography, photogrammetry, and video. The project utilizes 3D-printed components and standard electronics to create a "move shoot move" system triggered via sync cable. Users can opt for a basic 28BYJ-48 motor setup or upgrade to a NEMA 17 motor with a CNC shield for enhanced control and power.
Parts used in the Arduino Turntable:
- 3D printed parts set
- 3x M8x8mm Hex bolts
- 2x M3x4mm Hex bolts
- 28BYJ-48 Stepper motor
- ULN2003 stepper motor driver
- Arduino microcontroller
- PC817 Optocoupler
- 2x 470 Ohm resistors
- Camera trigger cable
- Small breadboard or solderboard
- Female header pins
- Screw or plug terminals
- Power supply 5-12V
- NEMA 17 motor (optional mod)
- CNC shield with A4988 drivers
- Pine R motion controller (optional)
An affordable Arduino Turntable designed for Time lapse photography. Changing the gearing and code it can also be used for Photogrammetry/3D scanning or Video.
The turntable operates on the move shoot move principle in the Timelapse and Photogrammetry modes where the camera is triggered via the sync cable.
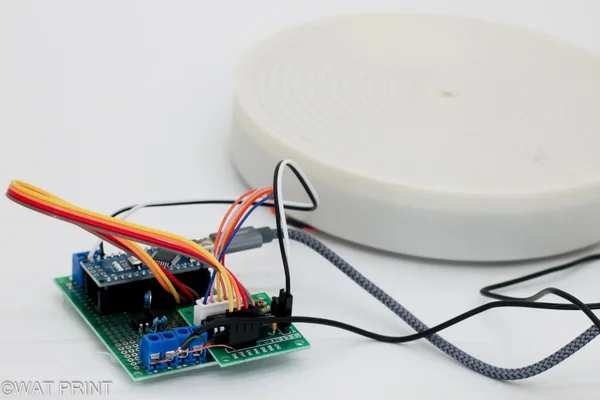
The electronics can be adjusted based on personal needs, I for example opted for 2xOptocouplers to simultaneously trigger two separate cameras.
I would describe this as an intermediate level project,basic experience with Arduino and 3D printing as well as the ability to solder are required.
If you have any questions or suggestions please leave a comment and thanks for visiting my Instructables!
Note: Some links are affiliate which means I earn a small amount when you use them at no extra cost to you.
Supplies
Hardware
- 3D printed parts set, about 18 hours and 210g of material.
- 3xM8x8mm Hex bolts
- 2xM3x4mm Hex bolts
Electronics
- 28BYJ-48 Stepper motor with
- ULN2003 stepper motor driver
- Arduino (or other microcontroller)
Camera trigger:
- PC817 Optocoupler
- 2×470 Ohm resistors
- Camera trigger cable
Misc
- Small breadboard or solderboard
- Female header pins for microcontroller
- Screw or plug terminals
- Power supply 5-12V
Tools
- Soldering iron
- 2.5mm Hex wrench
Step 1: 3D Print Turntable Parts
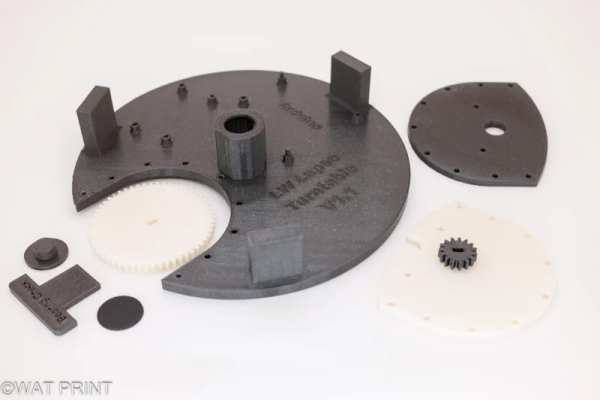
Print the parts and clean up. Pay particular attention to the gear teeth, aim to do a better job than I did here at ensuring they are free from excess material.
All print files are available here: Printables
Or buy the set (Europe only) here: Ebay
Step 2: Assemble Turntable
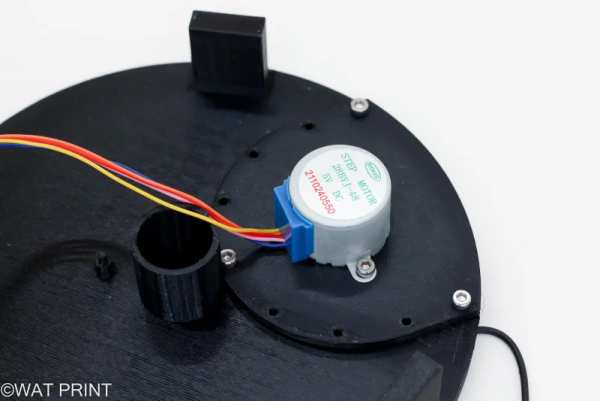
Attach the motor to the gear cover with the 4mm bolts.
Attach the gear cover to the turntable base with 3x8mm bolts as pictured. The additional holes are spare and can be used if the holes become damaged.
Pictured in white is the gear to be used for Photogrammetry or video, the grey gear and gear cover are used for Timelapse (it turns much slower).
Step 3: Electronics
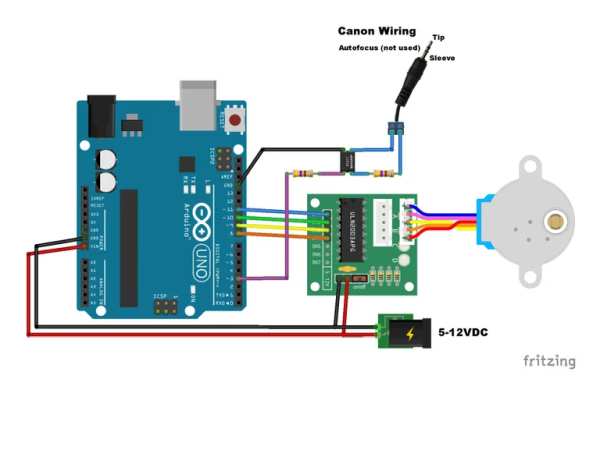
Wire the electronics as pictured.
Note: I have only tested with Canon but should work with all camera systems.
Connect the tip and sleeve wires from the camera trigger cable to the output of the optocoupler, polarity doesn’t matter. The third wire is for autofocus and remains unused.
All the electronics can alternatively be housed in the body although I recommend using an external power supply for longer timelapses. Pictured here are 2×18650 lithium batteries.
Step 4: Upload the Code
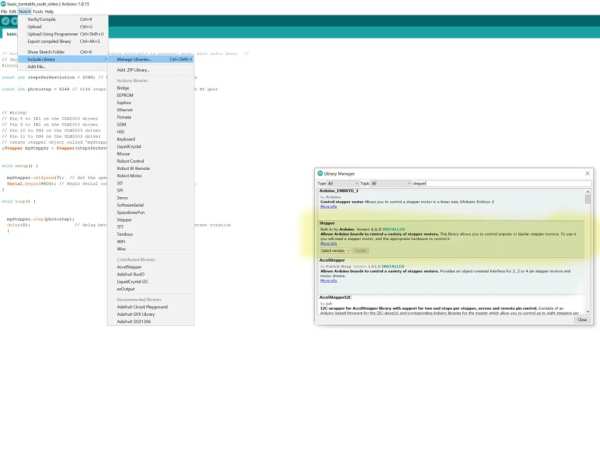
- Ensure Arduino Stepper library installed and up to date.
- Upload code to Arduino
All code available here: GitHub
Step 5: Final Thoughts
As I designed this Turntable to be as cheap and simple to build as possible it has some limitations. I will update soon with a few changes, at the moment I’m working on:
The supplied code is also very basic, suggested improvements are the incorporation of display and rotary encoder or push buttons to edit variables and changes modes without the need to connect to a computer.
Step 6: Nema 17 Mod
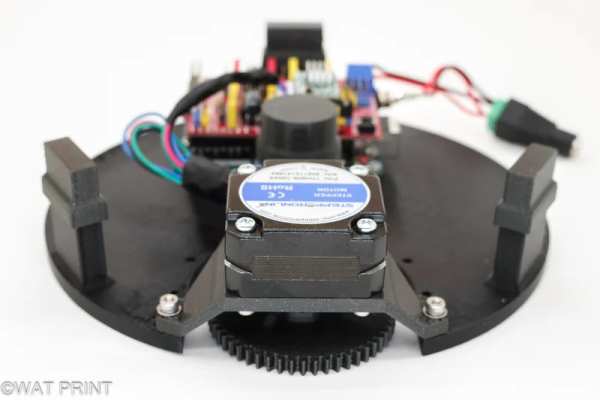
This step only if you want to use a NEMA 17 motor.
Using a Nema 17 provides a lot more flexibility with control options as well as more power and speed.
I recommend using the finest microstepping your driver allows, I’m using 1/16 with the A4988 driver but there are better options such as the DRV8825 this allows 1/32 microsteps for example. Note the jumper caps used on the CNC shield, these are used to adjust the microstepping (photo 3)
I use and recommend the Pine R motion controller from Black Forest Motion, they can be picked up for about 150€ second hand.
Pictured is a CNC shield with A4988 drivers and 20mm pancake Nema 17
The print files can be found in the Nema 17 mod folder at Printables, use the 14mm feet extenders for a Stepper motor up to about 23mm thick, for a larger motor use the 40mm foot extensions, they allow a motor of about 48mm in length to be used. The legs can also be stacked if required. There are two versions of the gear, one for a motor with a D-Shaft and the other without.
Steps:
- Print the files, I recommend PLA with 0.15mm layer height with supports for the Motor Bracket only.
- Attach motor to bracket with 8mm M3 screws.
- Attach the bracket to the turntable base with 8mm M3 screws, washers recommended. Do not fully tighten yet.
- Slide the gear onto the shaft ensuring it doesn’t protrude above the turntable base, secure in place with a M3 screw if required (min 6mm length)
- Place the turntable top on ensuring the gears mesh correctly, now with the assembly upside down adjust the motor bracket to ensure smooth meshing without too much play then tighten the 3 screws on the motor bracket.
Important note with the stepper motor drivers: Ensure the motor is connected before adding power to the shield otherwise you will instantly fry the driver module! I highly recommend watching this video if unfamiliar with stepper motors.
Using the CNC shield as well as arduino programming are outside the scope of this project, there are a lot of great resources online, alternatively the motor can be connected directly to the Pine R controller and controlled via app.
Source: 3D Printed Timelapse/3D Scanning Turntable
- What is the primary purpose of this Arduino turntable?
The turntable is designed for time-lapse photography, photogrammetry/3D scanning, and video. - How does the camera get triggered during operation?
The camera is triggered via a sync cable using the move shoot move principle. - Can I use this design to trigger multiple cameras at once?
Yes, you can adjust the electronics by adding 2x Optocouplers to trigger two separate cameras simultaneously. - What level of experience is required to build this project?
This is an intermediate level project requiring basic Arduino experience, 3D printing skills, and the ability to solder. - What are the limitations of the supplied code?
The supplied code is very basic and lacks features like a display, rotary encoder, or push buttons for editing variables. - How can I increase the flexibility and speed of the motor?
You can upgrade to a NEMA 17 motor which provides more power, speed, and control options compared to the standard motor. - What is a critical safety warning when using the CNC shield?
You must ensure the motor is connected before adding power to the shield to avoid instantly frying the driver module. - Where can I find the print files for the NEMA 17 modification?
The print files for the NEMA 17 mod are located in the Nema 17 mod folder on Printables.