Summary of 3D-Printed Prank Vibrating Cup
3D-Printed Prank Vibrating Cup Summary: A two-piece 3D-printed cup hides removable electronics that detect a sudden light increase via a phototransistor and activate vibration motors using small switching transistors. The removable electronics allow washing the mug; higher infill and small layer heights improve waterproofness. No motor driver IC is required; do not connect motors directly to microcontroller pins.
Parts used in the 3D-Printed Prank Vibrating Cup:
- base.stl (3D-printed base)
- cup.stl (3D-printed cup)
- Phototransistor
- Vibration motors (small)
- Small switching transistors (to drive motors)
- Microcontroller (unspecified)
- Wiring/connectors
- Power source (battery or supply for motors and microcontroller)
3D-Printed Prank Vibrating Cup
Picture the following: you have an nice white cup in front of you. It’s filled to the brim with sparkling, cool, and refreshing H20. Your fingers curl around the nicely curved handle, and you bring the cup to your lips. Suddenly, a strong vibration assaults the nerves in your hand, causing you to drop the cup and spill water all over every surrounding surface, including yourself. This might not sound too fun for the participant, but I can personally guarantee you that it will elicit much more than a chuckle from any bystanders. Let’s get started making it!
Step One: Print it!
In the attachments section of this build are two .stl files: base.stl and cup.stl. You’re going to have to print both of these out on some type of 3D printer. I have had success with higher infills and small layer heights to maintain the waterproofness of the mug, but you can experiment. Infills around 50% or above give the cup a nice solid feel as well. To print it out really quickly but have some leaks you can use about 20% infill and a layer height of 0.3mm. Don’t use any supports!
Note the orientation of the parts in the screenshot above – this is how they should be printed. The attached files may not default to this.
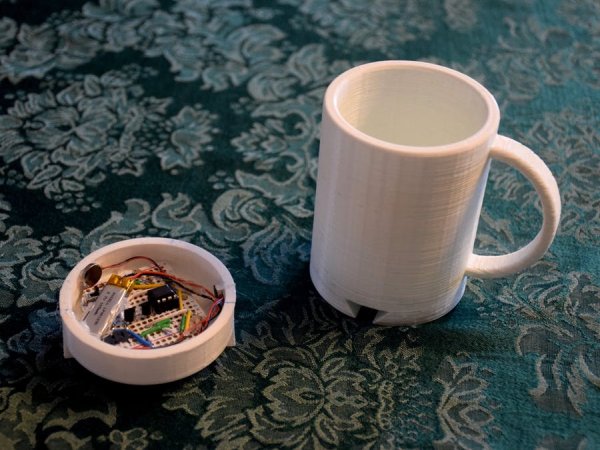
The reason the mug is in two pieces is so that the electronics can be removed, allowing you to wash it.
Step Two: The Circuit Board
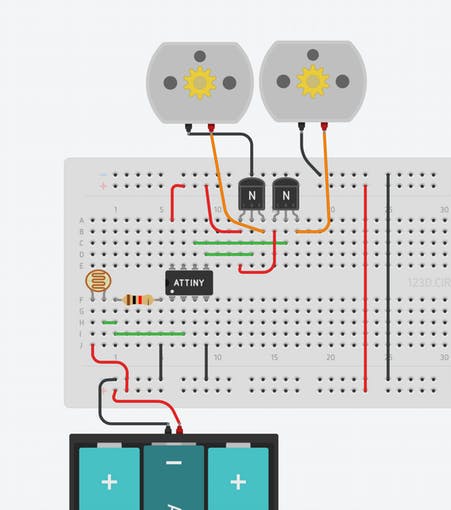
Now you’re going to need to construct the circuit that makes this whole thing fun. It’s actually pretty simple! The way the cup detects if it’s picked up is by measuring ambient light. When there’s a sudden spike in light, it’s safe to assume that the mug has been lifted, and the motors should start vibrating! This light measuring is done through a phototransistor. The motors are driven using small transistors as switches. They are pretty small, so there’s not really any need for a dedicated motor driver chip or circuit; the transistors will do quite nicely. Just don’t connect the motors directly to the pins on your microcontroller!
For more detail: 3D-Printed Prank Vibrating Cup
- How many STL files do I need to print?
Two STL files: base.stl and cup.stl. - How should the parts be oriented for printing?
Print them in the orientation shown in the build screenshot; attached files may not default to this orientation. - Do I need supports when printing the cup pieces?
No, do not use any supports. - What print settings improve waterproofness?
Use higher infill (around 50% or above) and small layer heights to maintain waterproofness. - Can I print faster with lower infill?
Yes; about 20% infill and 0.3mm layer height prints faster but may have leaks. - How does the cup detect that it has been picked up?
By measuring ambient light with a phototransistor; a sudden spike indicates the mug has been lifted. - What drives the vibration motors?
Small switching transistors are used as switches to drive the motors. - Do I need a dedicated motor driver chip?
No, the small transistors are sufficient; a dedicated motor driver chip is not necessary. - Can I connect the motors directly to microcontroller pins?
No, do not connect the motors directly to microcontroller pins; use transistors as switches. - Why is the mug made in two pieces?
So the electronics can be removed, allowing you to wash the mug.