
Summary of 3D PRINT YOUR WAY TO A GLASS COCKPIT SIMULATOR
This article describes a highly modern, full-featured desktop flight simulator built by [FlightSimMaker] using over 200 3D-printed components to replicate the Garmin G1000 avionics system. The project is compatible with X-Plane 11 and utilizes an Arduino Mega 2560 running SimVim firmware for control. Key features include advanced wiring management via multiplexers and a unique 3D printing technique for creating high-contrast labels on panels.
Parts used in the Garmin G1000 Desktop Simulator:
- Arduino Mega 2560
- SimVim firmware
- Five CD74HC4067 16-channel multiplexers
- Dozens of buttons, toggle switches, and rotary encoders
- 12.1 inch 1024 x 768 LCD panel with integrated driver
- Over 200 individual 3D-printed components including parking brake lever and display bezels
Today’s commercial aircraft are packed to the elevators with sensors, computers, and miles and miles of wiring. Inside the cockpit you’re more than likely to see banks of LCDs and push buttons than analog gauges. So what’s that mean for the intrepid home simulator builder? Modern problems require modern solutions, and this 3D printed simulator is about as modern as it gets.
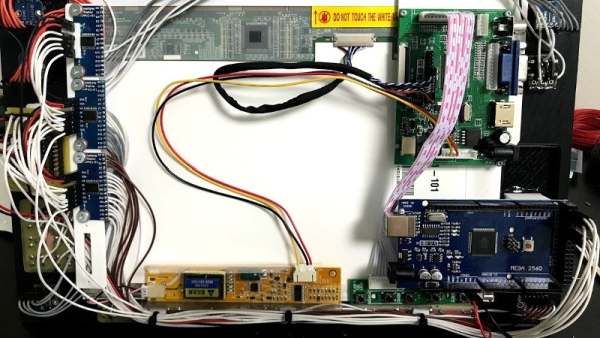
Published to Thingiverse by the aptly named [FlightSimMaker], this project consists of a dizzying number of 3D-printed components that combine into a full-featured desktop simulator for the Garmin G1000 avionics system. Everything from the parking brake lever to the push buttons in the display bezels was designed and printed: over 200 individual parts in all. Everything in this X-Plane 11 compatible simulator is controlled by an Arduino Mega 2560 with the SimVim firmware.
To help with connecting dozens of buttons, toggle switches, and rotary encoders to the Arduino, [FlightSimMaker] uses five CD74HC4067 16-channel multiplexers. The display is a 12.1 inch 1024 x 768 LCD panel with integrated driver, and comes in at the second most expensive part of the build behind the rotary encoders. All told, the estimated cost per display is around $250 USD.
Even if you aren’t looking to build yourself a high-tech flight simulator, there’s plenty of ideas and tips here that could be useful for building front panels. We particularly like the technique used for doing 3D-printed lettering: the part is printed in white, spray painted a darker color, and then the paint is sanded off the faces of the letters to reveal the plastic. Even with a standard 0.4 mm nozzle, this results in clean high-contrast labels on the panel with minimal fuss.
Of course, while impressive, these panels are just the beginning. There’s still plenty more work to do if you want to build an immersive simulation experience. Including, in the most extreme cases, buying a Boeing 737 cockpit.
Source: 3D PRINT YOUR WAY TO A GLASS COCKPIT SIMULATOR
-
What software controls this simulator?
The entire simulator is controlled by an Arduino Mega 2560 running the SimVim firmware. -
Which flight simulation platform is this build compatible with?
This simulator is fully compatible with X-Plane 11. -
How does the builder connect dozens of inputs to the microcontroller?
The builder uses five CD74HC4067 16-channel multiplexers to manage connections for buttons, switches, and encoders. -
What is the estimated cost for the display unit?
The 12.1 inch LCD panel is the second most expensive part, costing around $250 USD per display. -
How is clean lettering achieved on the 3D printed parts?
The method involves printing the part in white, spray painting it a darker color, and sanding the paint off the faces of the letters. -
Does the project use analog gauges or digital displays?
The simulator uses banks of LCDs and push buttons rather than traditional analog gauges. -
How many individual parts were designed and printed for this project?
Over 200 individual parts were designed and printed, ranging from levers to display bezel buttons.
