Wish you were bat? Want to Experience Echolocation? Want to try to “see” with your ears?
For my first Instructable, I will show you how to build your own ultrasonic Batgoggles using an Arduino microcontroller clone, Devantech ultrasonic sensor and welding goggles for around $60 or less if you already have standard electronics components. You could also skip the electronics and make a simple bat-mask perfect to wear to the next Batman movie. In that case, the cost would only be about $15.
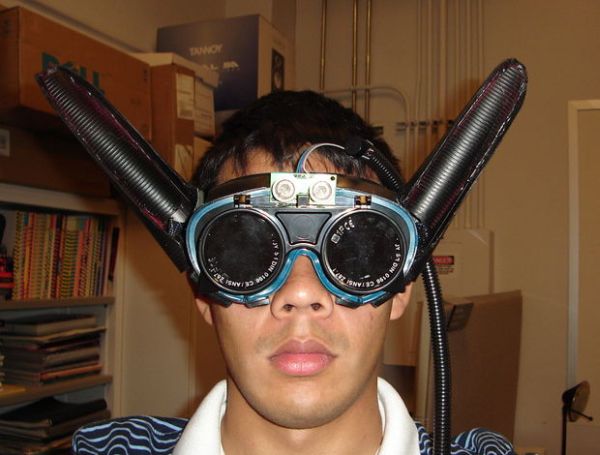
These goggles allow you to experience what it is like to use auditory cues like a bat and is intended for children in a science center setting to learn about echolocation. The goal was to keep costs as low as possible, avoid making the form of the interaction to be generic or unrelated to its educational purpose and to ensure that the physical form of device embodies the subject matter. For a more thorough discussion of its design, please see the project webpage.
To keeps costs and size low, an Arduino clone is built used however, but this project works just as well with pre-built Arduino microcontrollers.
These goggles were built for “Dynamic User-centered Research and Design” course in the Arts, Media & Engineering program at Arizona State University.
Step 1: Necessary Materials
-Arduino or comparable microcontroller* (if you have the money you can buy the Arduino mini/nano or use a boarduino, otherwise I will show you how to make a small and cheap Arduino clone for this project.)
-Welding goggles (Mine are “Neiko” brand and are easily found on eBay as “Flip up welding goggles” for 3-10 dollars shipped, this specific type works really well)
-Devantech SRF05 Ultrasonic Sensor (or other comparable sensor — however, the SRF05 has a very low power consumption of 4mA and great resolution from 3 cm to 4 meters, it is about $30)
-something to make ears out of (I used plastic cones, see also: “How to build a better bat costume”)
-some type of enclosure for electronics
-3/8″ split seam flexible black convoluted tubing (to hide connecting wires)
-piezo buzzer that can run on 5v-9v
-assorted wires
-plasti-dip spray can (black)
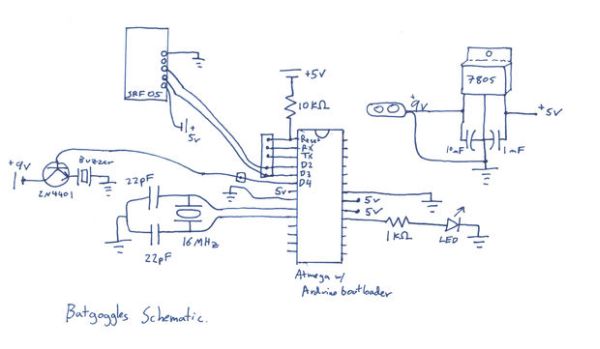
Microcontroller Electronics (these components can be skipped if using a pre-built controller)
– Arduino programmed Atmega8 or 168 DIP chip.
– a spare Arduino board or Arduino Mini USB programmer
– Small PC board (available at Radioshack)
– 9V battery connector (available at Radioshack)
– 7805 5v voltage regulator
– 16 MHz crystal (available @ sparkfun)
– two 22pF capacitors (available @ sparkfun)
– 10 microF electrolytic capacitor
– 1 microF electrolytic capacitor
– 1k resistor and 1 LED (optional but highly recommended)
– 2N4401 transistor (optional)
– female and male headers (optional)
– 28 pin DIP socket or two 14 pin DIP socket s(optional)
– small breadboard for prototyping (optional)
The electronics components can also be obtained from www.digikey.com or www.mouser.com
Tools and supplies you may need
-soldering iron
-hot glue gun
-Dremel
-news paper
-masking tape
-sandpaper
-wire strippers etc.
Step 2: Design some ears
You are free to use your imagination to build your ears. No bat-goggles should be the same!
I used plastic cones that are used for physical therapy, which we happened to have a large supply of in our lab. But this tutorial gives another nice option for bat ears.
I first drew an oval with a sharpie and cut it out with a Dremel. I saved the cutoff piece to use for the inside of the ear.
Step 3: Cut ears
I trimmed the cut-off pieces of the cone with the Dremel, so that they were smaller and hot glued them to the inside of the larger cone pieces. They did not fit exactly but after holding them in place by hand the hot glue held it in place quite well. If you leave yourself enough space under the ears, you could easily embed the electronics inside the ear, one ear for the controller, and one for the battery. Unfortunately, I did not leave enough space and had to use an external enclosure.
Please take care not to burn yourself while using a hot glue gun!!! You can also easily melt the plastic cones by accident.
For more detail: How To Build Your Own Ultrasonic Batgoggles using an Arduino