Today we are going to examine the Maxim MAX7219 LED display driver IC. The reason for doing so is to show you how something that used to be quite complex can be made very simple – and that is what all this technology is for, isn’t it?
If you have ever tried to control lots of LEDs, or more than two or three 7-segment displays, or even an LED matrix, you realise that there is quite a lot of work to do on the software and hardware side of things. It usually involves lots of shift registers, switching transistors, and some nifty coding to get everything working. And then your code is too large, so the resulting display scans slow enough to see it flicker, etc.
 Not any more! The MAX7219 combined with a great library (well for Arduino anyway) solves all the headaches in no time. After using it for the first time today I was briefly angry for not finding out about it sooner… better late than never.
Yes, at first glance you may think that it takes a lot of real estate, but it saves some as well. This chip can completely control 64 individual LEDs, including maintaining equal brightness, and allowing you to adjust the brightness of the LEDs either with hardware or software (or both). It can refresh the LEDs at around 800 Hz, so no more flickering, uneven LED displays. You can even switch the display off for power saving mode, and still send it data while it is off. And another good thing – when powered up, it keeps the LEDs off, so no wacky displays for the first seconds of operation.
Interfacing the MAX7219 is also very simple, you only need three digital output pins from a microncontroller, 5 volts and ground. Up to eight ICs can be cascaded to control up to 512 LEDs at once – from only three data pins. Wow. However, controlling all these LEDs will require a power supply that can allow 330 mA just for the IC, so you can’t just run this off your Ardiuino – you will need external power. Nothing an LM7805 regulator cannot fix.
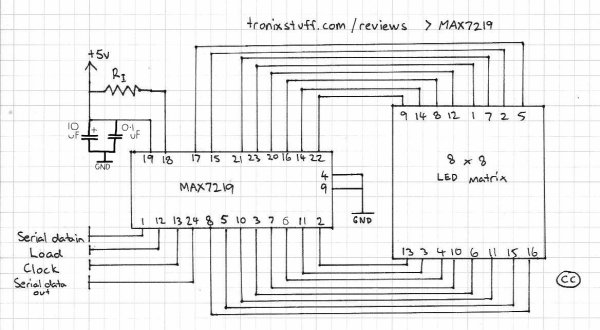
For more technical information, here is the data sheet: MAX7219.pdf. Now to put it to work for us – this article will demonstrate using an 8 x 8 LED matrix, as well as 8 digits of 7-segment LED numbers. First of all, let’s examine the hardware side of things.
Normally you would have to program to switch on individual rows and columns, and repeat those commands in software, as well as using switching transistors or a 74HC4066 to control the cathodes.
Another example is a multi-digit 7-segment LED module – current flows in through the anode pins, and each digit is illuminated only when its cathode is connected to ground.
It has input pins for each of the eight LED elements, and four cathode pins, one for each digit. We can use two of these displays with the MAX7219 very easily, as you will see below.
When using with (for example) an arduino-type board, you would connect serial data in, clock, and load to three digital pins. The resistor is the hardware control via limiting current to the LEDs. My examples use a 1k0 1/4-watt value. If you are going to experiment with this value, refer to page 10 of the data sheet first. Furthermore, ensure the ground of the MAX7219 is connected to the ground of the microcontroller. The capacitors are used to reduce supply current ripple. And here is the demonstration circuit on the breadboard:
In the above photo, the five wires on the left are connected to the Arduino board (5V, GND, load, clock, data). The two wires from the terminal block head to my DIY 5v power supply.
Now it is time to examine the software aspect, or how to control the MAX7219. My knowledge of microcontrollers is currently only Arduino, so we will use that for this review. Thankfully there is an excellent library that has been specifically written for the MAX7219 – the LedControl library. You will need to download and install the library from the LedControl page. If you need guidance on installing a library, please visit here.
The author has done a marvellous job of documenting his library, so I will briefly describe the basic functions you need to get things blinking. Here is a very basic demonstration sketch:
#include "LedControl.h" // need the library
LedControl lc=LedControl(12,11,10,1); // lc is our object
// pin 12 is connected to the MAX7219 pin 1
// pin 11 is connected to the CLK pin 13
// pin 10 is connected to LOAD pin 12
// 1 as we are only using 1 MAX7219
void setup()
{
// the zero refers to the MAX7219 number, it is zero for 1 chip
lc.shutdown(0,false);// turn off power saving, enables display
lc.setIntensity(0,8);// sets brightness (0~15 possible values)
lc.clearDisplay(0);// clear screen
}
void loop()
{
for (int row=0; row<8; row++)
{
for (int col=0; col<8; col++)
{
lc.setLed(0,col,row,true); // turns on LED at col, row
delay(10);
lc.setLed(0,col,row,false); // turns off LED at col, row
delay(10);
}
}
}
Using the lc.setLed() saves a lot of code, as the chip will hold the display on until it is told otherwise, you don’t need to program in a delay loop. You can just enter X and Y coordinates for the LED to switch on.
To switch off the display to save power, use lc.shutdown(0, true); – replace true with false to switch it back on again.
The video clip below is more of a detailed demonstration, using the schematic above, and this sketch:
Notice how altering the brightness up and down causes a nice “breathing” affect. However, don’t run that type of thing for too long, the MAX7219 does warm up nicely after about ten minutes of running all LEDs at once at full brightness…
For more detail: Review – Maxim MAX7219 LED Display Driver IC