This instructable will tell you how to make and connect a soft potentiometer to a microcontroller, in particular we will connect it to a Lilypad Arduino. In our case soft potentiometer means a potentiometer made of a textile conductive ribbon.

What you need:
1. soft conductive textile ribbon. The important thing here is that the tape must have some resistance along its leght. So if you apply a multimeter you should be able to measure a value like 3 Kohm per 10 inches of lenght or something similar. You can make your own tape, or buy it on www.plugandwear.com. You can also buy the complete kit on www.plugandwear.com.
2. One metal necklace toggle clasp (we will use only the ring). Check if it is conductive before using it. We will call this item ‘cursor’. A cursor is the sliding part of a potentiometer.
3. A lilypad Arduino, or another type of microcontroller.
Step 1: Assembling the soft potentiometer
Cut a 5″ (12 cm) piece of resistive tape. If you want your cursor (the toggle clasp) to travel longer, cut a longer piece. Insert one end of the smaller piece of tape it into the larger ring of the toggle clasp and wind it twice around the ring.
Sew very tight, for best conductivity.
Now insert one end of the longer piece of tape into the smaller ring of the toggle clasp. The tape surface must touch the inside of the ring.
Your potentiometer is now ready to be connected to a microcontroller!
Step 2: Connecting the potentiometer to a Lilypad Arduino
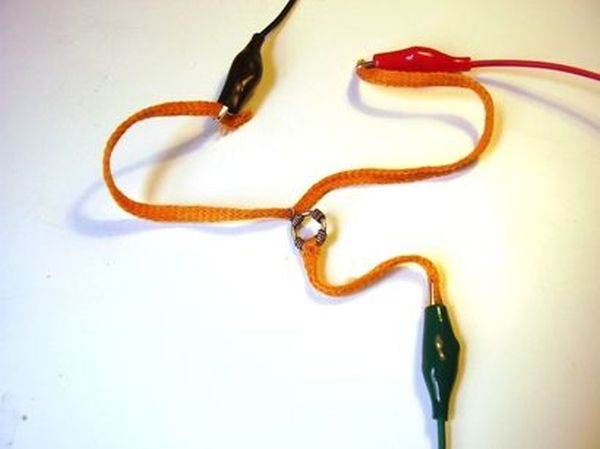
Now connect three aligator clip cables to the potentiometer as shown in the picture. It is better if you’ll use three cables of three different colors. At least one red, one black and one of a different colour for the cursor of the potentiometer. Connect one end of red and black cables to the extremities of the long piece, and one end of the other one to the end of the short piece going to the cursor.
Connect the other aligator end to the Lilypad as indicated in the picture: the red on the + pin of the Lilypad, the black one on the – pin of the Lilypad and the other cable, to the input pin of the program you will be running on the Lilypad (a0 in our case).
We used this configuration so that the Lilypad will ‘see’ a resistor between pin a0 and ground and another resistor between a0 and +5V. By sliding the cursor the values of the resistors will change and you will generate a voltage on a0 pin from 0V to +5V. You can use this input to change the flashing of an LED, or to control the sound of a loudspeaker. Watch a video here
See Arduino tutorials for more information on how to connect potentiometers.
For more detail: How to make (and connect) a soft potentiometer