Humidity and Temperature are very common parameters for measuring at many places like farm, green house, medical, industries home and offices. We have already covered Humidity and Temperature Measurement using Arduino and displayed the data on LCD.
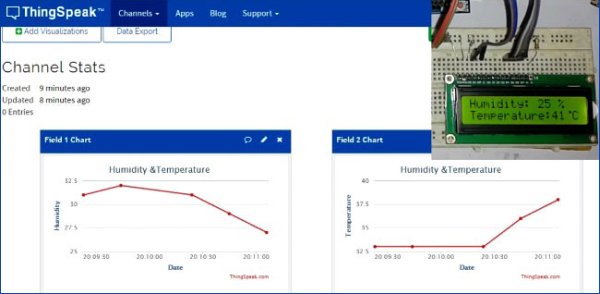
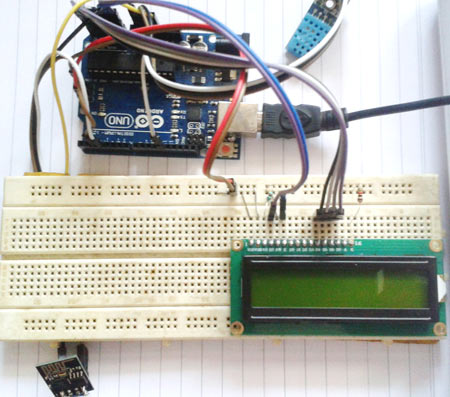
In this IoT project we are going to Monitor Humidity and Temperature over the internet using ThingSpeak where we will show the current Humidity & Temperature data over the Internet using the ThingSpeak server. It is accomplished by the data communications between Arduino, DHT11 Sensor Module, ESP8266 WIFI module and LCD. Celsius scale thermometer and percentage scale humidity meter displays the ambient temperature and humidity through a LCD display and also sends it to ThingSpeak server for live monitoring from anywhere in the world.
Working and ThingSpeak Setup:
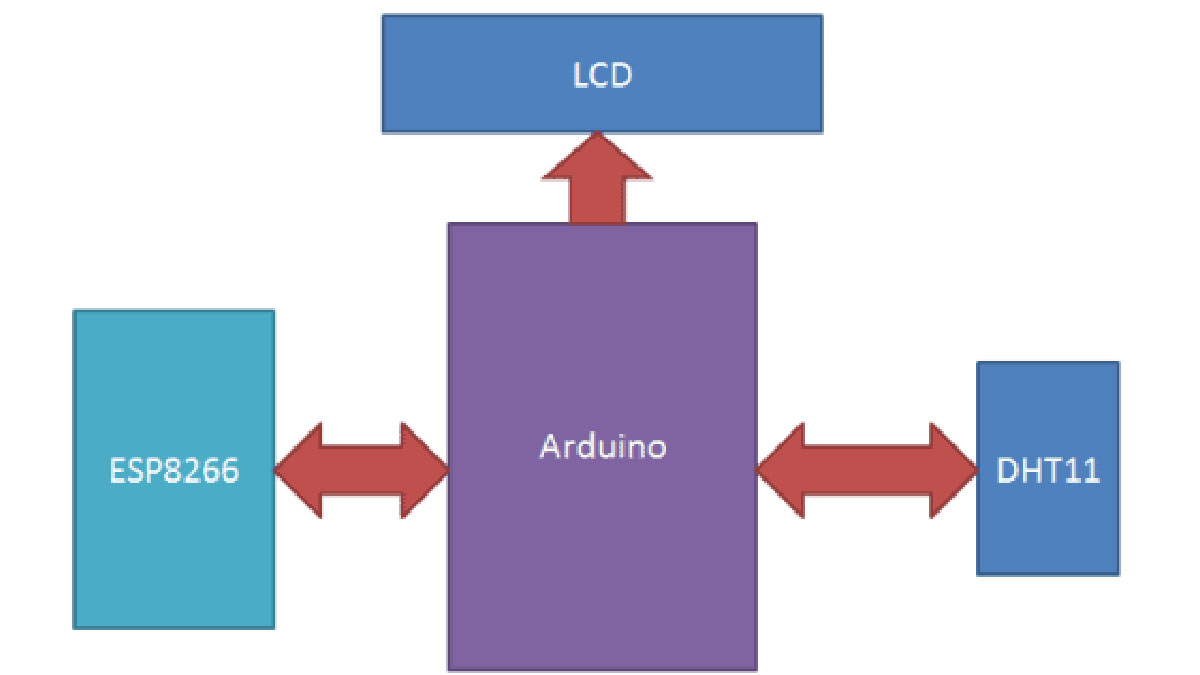
This IoT based project having four sections, firstly Humidity and Temperature Sensor DHT11 senses the Humidity and Temperature Data. Secondly Arduino Uno extracts the DHT11 sensor’s data as suitable number in percentage and Celsius scale, and sends it to Wi-Fi Module. Thirdly Wi-Fi Module ESP8266 sends the data to ThingSpeak’s Sever. And finally ThingSpeak analyses the data and shows it in a Graph form. Optional LCD is also used to display the Temperature and Humidity.
ThingSpeak provides very good tool for IoT based projects for Arduino. By using ThingSpeak site, we can monitor our data over the Internet from anywhere, and we can also control our system over the Internet, using the Channels and webpages provided by ThingSpeak. ThingSpeak ‘Collects’ the data from the sensors, ‘Analyze and Visualize’ the data and ‘Acts’ by triggering a reaction. Here we are explaining about How to send Data to ThingSpeak server by using ESP8266 WIFI Module:
1. First of all, user needs to Create a Account on ThingSpeak.com, then Sign In and click on Get Started.

2. Now go to the ‘Channels’ menu and click on New Channel option on the same page for further process.
3. Now you will see a form for creating the channel, fill in the Name and Description as per your choice. Then fill ‘Humidity’ and ‘Temperature’ in Field 1 and Field 2 labels, tick the checkboxes for both Fields. Also tick the check box for ‘Make Public’ option below in the form and finally Save the Channel. Now your new channel has been created.
4. Now click on ‘API keys’ tab and save the Write and Read API keys, here we are only using Write key. You need to Copy this key in char *api_key in the Code.
Read More: Live Temperature and Humidity Monitoring over Internet using Arduino and ThingSpeak