INTRODUCTION
This manual will show you how to use each of the components in the kit, and give you software Sketch examples for each one. Then you can combine some components to make examples of Automatic Systems such as a lighting controller.
You’re probably here because you’re interested in MAKING things with Arduino. The first questions:
- What can you do with a MicroComputer like Arduino?
- How do you get started?
What Can You Do with Arduino?? See this link (To be Updated!)
To get started, we think you need 3 things:
- Clear Information
- Practical, Low-Cost hardware to learn with
- Detailed How-To DO IT.
Making things with Electronics and MicroComputers is different than Woodworking or Metalworking. There are a couple of little problems: Uh Oh!
Not to worry! We will show you the ways to make these powerful tools Visible so you can use them.
LESSON 1: GETTING STARTED
The Arduino “IDE” software looks virtually the same on Windows, MAC or Linux, but the Installation procedures are different. Below, you can pick which one you need.
Oh.. “What’s this IDE thing all about anyway” ?? The Arduino Integrated Development Environment
(WikiPedia) is the software you use on your computer to write software Sketches and then upload and run them on the YourDuino hardware. The IDE is like a word processor for writing software.
Now, go to the official Arduino site to download and install the software for your operating system:
After Installation, or if your board is already installed, continue here:
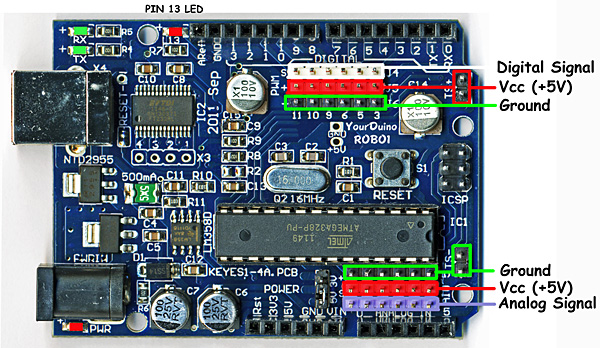
CHECK OUT THE YourDuinoRobo1:
On the right, let’s look at some of the features of the Robo1 board as used in these Starter Sets. At the lower left is the PWR LED which should light up whenever the board is plugged into a USB connection, or has power from an external power supply.
At the upper left there are two green LEDs which will blink when a software sketch is being downloaded to the board, or other data is being transferred over USB.
At the top is a red LED which is internally connected to pin 13 through a current-limiting resistor. It should blink after you load the example BLINK software sketch. The colored 3-pin connectors make it easy to connect many input and output devices. The Vcc(+5V) pins at upper right and the (Ground) pins at the lower right are good for connections to breadboard etc.
(FOR ALL OF US, NOW: MAC, WINDOWS, LINUX):
RUN THE ARDUINO “IDE” SOFTWARE:
You should have followed the IDE Installation for your PC/MAC Operating System and now you’ve got your YourDuino plugged in and running. The POWER “ON” LED is on, right? And the “13” LED is blinking? (This may be a little different for the various YourDuino versions and the ’13’ LED may or may not blink now).
Soon we’ll start connecting the things in the Starter Set, but first we’ll use that built-in Pin 13 LED to get started.
LESSON 2: SOFTWARE TIME & WRITING ARDUINO SKETCHES
Let’s take a little while to get used to writing Arduino Software, then we’ll come back and start connecting your Starter kit parts and making more interesting things. We will give you software examples for each of the devices in the Starter Set.
On your desktop you should now have the Arduino ICON like this:
 |
| external image Arduino-Icon1-68.jpg |
Click on it, if you haven’t already, and you should see the “Arduino IDE Window” pop up like this:
You’ll use this IDE (Integrated Development Environment) to make Software VISIBLE! With it you will develop your own software to make Arduino into what you want it to be.

FIRST, YOU MUST SET THE CORRECT BOARD TYPE AND SERIAL PORT
BOARD: In the Arduino IDE top menu click <Tools> and then <Board>. You will see a drop-down menu that looks like this (left). For the YourDuinoRobo1 click Arduino Duemilanove. (Same for PC and MAC)
SERIAL PORT: Now click <Tools> and then <Serial Port>. On the PC There will usually be only one choice.
For more detail: LEARN! ARDUINO – A HANDS-ON APPROACH