To connect a 12V relay to the Arduino you need the following things:
– 1 Arduino
– 1 diode for example 1N4007
– 1 NPN transistor for example 2N2222 (in the US) or BC548 (in Europe)
– 1 relay for example one with coil voltage 12V and switching voltage 125VAC/10 A
– 1 multimeter
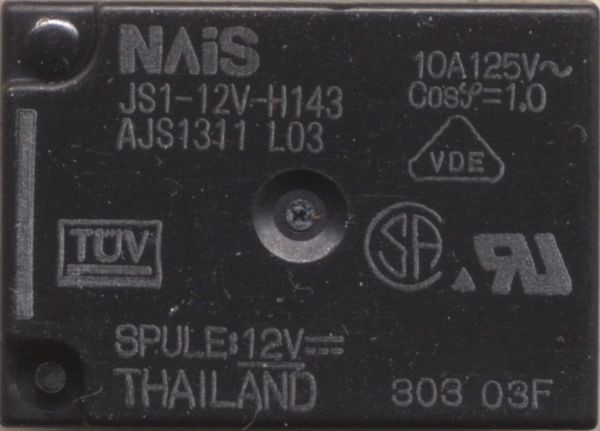
Step 1: Measure the coil resistance
We are going to measure the coil resistance to calculate the current.
First we must find the coil:
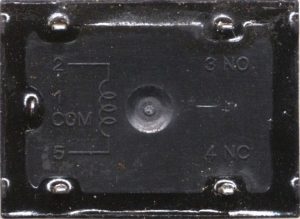
On some relays the pins are labeled so you can just measure at pin 2 & 5.
Otherwise you have to measure at every pin:
Between two pins you should have between 100 and 10 000 Ohm. Remember that value. That are the two terminals of the coil. The coil is not polarized so its not important which one goes to V+ or GND.
If you have found those there are only three left. Between two should be a connection (if you measure a few Ohm its okay but everything above 50Ohm is too much). One of them is NC and one is COM. To find out which is which let one probe connected and connect the other to the pin that’s left over. If you connect the coil to 12V DC it should make a clicking noise. If your multimeter now shows a low resistance you have found COM and NO. The one probe you didn’t move is COM the other is NO.
Step 2: Calculate how much current will flow
The formula you need is a simple one:
(maybe people in England or the US know the Voltage as “V” but I will refer to it as “U” as we call it in here)
U = R * I
OK, but we want the current “I” right ? So just divide through the Resistance “R”.
U = R * I / :R
I = U/R
For my relay that would be:
I = 12V / 400Ohm
I = 0.03 A => 30 mA (That is Ic)
The Arduino can handle up to 20mA but its better to use a transistor even if your current is only 20mA. So for 30mA you definitely need one.
Step 3: Choose your transistor
First find the Datasheet of your transistor. For example search for “2N2222 datasheet”.
Your transistor should comply to the following things:
– It has to be NPN not PNP !!
– Ic should be bigger than the value you calculated in step 2
– Vceo should be bigger than the supply voltage
Step 4: Calculating R1
You can find the value of hfe in your datasheet:
Mine says for BC548 its 75 at 10mA at 10V. Its not very precise cause its very difficult to build transistor with a accurate hfe.
hfe = Ic / Ib
We know hfe and Ic so lets calculate Ib:
Ib = Ic / hfe
For BC548:
Ib = 0.03 A / 75
Ib = 0.0004 A => 0.4 mA
Due to Ohms Law:
R1 = U / Ib
R1 = 5V / 0.0004 A
R1 = 12500 Ohm
This is not very accurate to so we use 10kOhm.
– 1 diode for example 1N4007
– 1 NPN transistor
Step 5: Choosing Your Diode
The diode is needed cause the voltage will rise high if you suddenly change the voltage at the inductor. The formula for the voltage is:
U_L = – L * delta i/delta t
So theoretically if delta t equals zero U will be infinite.
But due to the minus in front you can add a diode in the “false direction” parallel to the relay. So the current can flow till its zero so the voltage is also zero.
Step 6: The Schematic
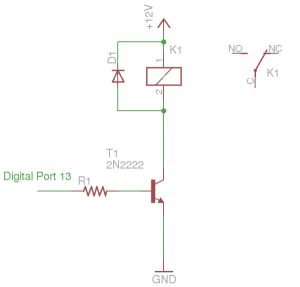
Finally here is the schematic:
Step 7: Assembling the Circuit
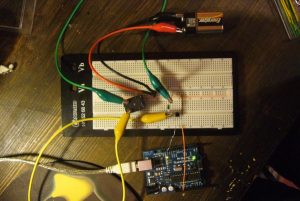
Your datasheet says which pins are E, B and C.
Before you connect your Arduino connect a 4.5V Batteries negative terminal to GND and its positive terminal to R1. The relay should make a clicking noise if not, check your circuit.
Step 8: The Program
The test program is just an edited version of the “Blink” example:
/*————————————————————————————
- relaytest |
- Author: gandalfsz |
- Date: 18 Jan 2009 |
- Function: Toggles Pin 13 every 10 Seconds |
*/———————————————————————————–
int outPin = 13;
void setup()
{
pinMode(outPin, OUTPUT);
}
void loop()
{
digitalWrite(outPin, HIGH);
delay(10000);
digitalWrite(outPin, LOW);
delay(10000);
}
Source: Connecting a 12V relay to Arduino