Introduction
In recent years, portable sensor devices have gained a lot of popularity due to their ability to give you instant, accurate information about your local environment. Some of these devices include the Sensordrone, Smart Citizen, and the Storm Tag. These devices combine portability and accessibility in such a way that they’re easy to use and convenient to carry around. However, they can be expensive, as they’re required to pack quite a bit of advanced technology into a very small package.
This Instructable is for my Bluetooth Low Energy Go-Anywhere Sensor Pack (BLEGASP, if you will). It’s a device that I built from an Arduino and various environment sensors. Since environmental concerns differ from person to person, I wanted to create a device that maximizes sensor modularity. And so were born the objectives for this project:
- To create a sensor pack that:
- is portable
- has reasonable battery life
- measures useful data about the environment
- communicates with a custom Android app
- is customizable
- To create an Android app that:
- communicates with the sensor pack
- can control the sensor pack
- displays sensor data
- is easy to use
- is aesthetically pleasing
In order to accomplish these objectives, I decided that the communication should take place via Bluetooth Low Energy (Bluetooth LE, or BLE). Bluetooth LE, also known as Bluetooth Smart, is a wireless technology that’s designed to allow effective communication between compatible devices while providing a significant reduction in the power consumption of those devices as compared to Classic Bluetooth.
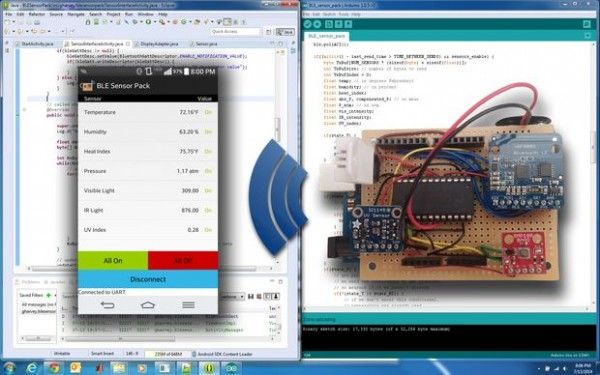
The sensor pack that I built can report seven different quantities about the environment. These are temperature, relative humidity, heat index, barometric pressure, visible light intensity, infrared (IR) light intensity, and ultraviolet (UV) index. In this Instructable, I’ll show you how to build the sensor pack that I built, program the Arduino with the sketch that I wrote to control it, and use the Android app that I wrote to communicate with it.
Contributions
Thanks to master of digital image creation and modification burstolava
Step 1: Get Materials
Materials
- Adafruit nRF8001 breakout board
- Adafruit Si1145 breakout board
- SparkFun BMP180 breakout board
- DHT22 Temperature/Humidity sensor
- 10kΩ resistor
- Arduino Uno Rev. 3 (any Arduino should work)
- Adafruit DIY Shield for Arduino
- female pin headers
- 9 volt battery
- 9 volt battery connector
- wire
- Android device (Android 4.3 or later)
Optional Materials
- TI LM2825 Buck Converter
- 0.1μF capacitor
- 24-pin IC socket for the LM2825
Tools
- solder-less breadboard
- soldering iron
- solder
Step 2: Connect the Bluetooth Low Energy Module
Connect the BLE Module Breakout Board
Using your breadboard, connect the nRF8001 breakout board to the Arduino as shown in the schematic. This board is made by Adafruit Industries, and I used Adafruit’s Arduino library for controlling it. The library is in the lib/ directory of my GitHub repository. Copy this library into your Arduino sketchbook/libraries/ directory so that the Arduino software can find it.
BLE Testing
At this point, you can already test out your Bluetooth LE connection! Here’s how:
- Upload one of the example sketches inside the library onto your Arduino. There are two examples there, and both will work, but they work slightly differently. I used the callbackEcho demo.
- Install Nordic Semiconductor’s nRF UART 2.0 app onto your Android device. If you’re wondering, Nordic Semiconductor is the company that makes the nRF8001 chip.
- Make sure your Arduino is plugged into your computer, and use the serial monitor on the Arduino software to see what’s happening.
- Run the app on your Android device.
- Send text from the Android to the Arduino or from the Arduino to the Android. If you see the same thing sent back, it works!
Learn More
If you’re interested in learning more about Bluetooth Low Energy, Adafruit has a useful introduction to the technology. You can also check out the official Bluetooth Developer Portal and Android’s BLE guide.
The breakout board for this Bluetooth LE module simulates a UART device to make it easy to send and receive data. There’s plenty of information about UART and how it works on the UART Wikipedia page.
The nRF8001 breakout board uses a SPI bus to communicate with the Arduino. If you’re not familiar with this bus, the Wikipedia page is a useful resource.
Step 3: Connect the Temperature and Pressure Sensor
Connect the BMP180 Breakout Board
Connect the BMP180 breakout board as shown in the schematic. The board is made by SparkFun Electronics. I used their Arduino library to make measurements. Copy this library from the lib/ directory of my GitHub repository to your sketchbook/libraries/ directory.
Programming Note
The BMP180 sensor can function as either a barometric pressure sensor or as an altimeter, to measure altitude. I used it as a pressure sensor. When measuring pressure, though, you need to first measure temperature, and the sensor returns the absolute pressure. Absolute pressure varies with elevation, so we need to compensate for its effects. SparkFun’s library includes a way to do this, but it requires that the Arduino knows our elevation. You’ll need to change the ALTITUDE constant defined in the code you’re using.
Test the Temperature and Pressure Readings
Testing this sensor is straightforward enough. Here are the steps:
- Open one of the examples from the library. I suggest using the SFE_BMP180_example, because that’s the one I used for reference.
- Go to line 71 of SFE_BMP180_example.ino and change the ALTITUDE constant to be your elevation. You can find your elevation at veloroutes.org/elevation/. Be sure to enter your elevation in meters here.
- Upload the sketch to your Arduino.
- Use the Arduino Serial Monitor to see if it works.
Learn More
This board uses an I2C bus to communicate with the Arduino. If you’re not familiar with this bus and want to learn about it, check out learn.sparkfun.com/tutorials/i2c/all and www.i2c-bus.org. There is also a good introduction to both I2C and SPI interfaces here.
Step 4: Connect the Relative Humidity Sensor
Connect the DHT22 Humidity Sensor
Connect the DHT22 humidity sensor as shown in the schematic. This sensor can also function as a temperature sensor. It can take both temperature and humidity readings every 2 seconds. Since I already had a temperature sensor on the BMP180 from Step 3, I didn’t use the temperature sensor functionality here.
Test the Humidity Readings and Heat Index Calculations
The Adafruit library for the DHT22 sensor provides an easy way to read both temperature and relative humidity. The library can also perform a calculation of heat index. Heat index is a measure of how hot it feels due to the effects of both temperature and humidity. You can test these three values with the example sketch provided in the library directory. Here’s how:
- Upload the DHTtester example sketch from the library onto your Arduino.
- Look at the Serial Monitor to see if it works. You should see a relative humidity reading, temperature in both °C and °F, and the result of a heat index calculation in °F.
Step 5: Connect the Light Sensor
Connect the Si1145 Light Sensor
Connect the Si1145 breakout board as shown in the schematic. The board is made by Adafruit, and I used their Arduino library for controlling it. This board uses the I2C bus to communicate with the Arduino, just like the BMP180 barometric pressure sensor from Step 3.
Measurement Notes
When measuring visible light intensity and infrared light intensity, the library is written to provide relative values. You’ll get an idea of how much light there is hitting each photodiode, but you won’t get measurements in lux.
UV index is a measurement of the strength of UV radiation. It provides an easy way to tell how much exposure you are getting to UV radiation at a specific place and time.
For more detail: Bluetooth LE Go-Anywhere Sensor Pack