Summary of Arduino Weather Station Part2
The article describes adding a weather vane with wind direction measurement to an Arduino-based wind chill weather station. It explains designing a balanced aluminum weather vane using a No Trespassing sign, modifying a continuous-turn potentiometer to measure direction, mounting it on a PVC T fitting alongside an anemometer, and wiring it to an Arduino with a data logging shield to record wind data without needing a computer. The project emphasizes practical use for local wind patterns and smoke detection from wildfires.
Parts used in the Arduino Wind Chill Machine:
- USB Freeduino (Arduino-clone)
- Adafruit Data Logging Shield
- SD Card
- Aluminum No Trespassing Sign
- Continuous-turn Potentiometer (6639S-1-103-ND)
- 2 Mending plates (2” x 1/2”)
- 100ft Ethernet Cat5 cable
- 2 Ethernet Couplers
- 8-32 Mounting hardware
- Half-inch PVC T fitting
- Bracket (made from leftover aluminum sign)
So my last project was a Arduino wind chill machine.
http://www.instructables.com/id/Arduino-Wind-Chill-Machine/
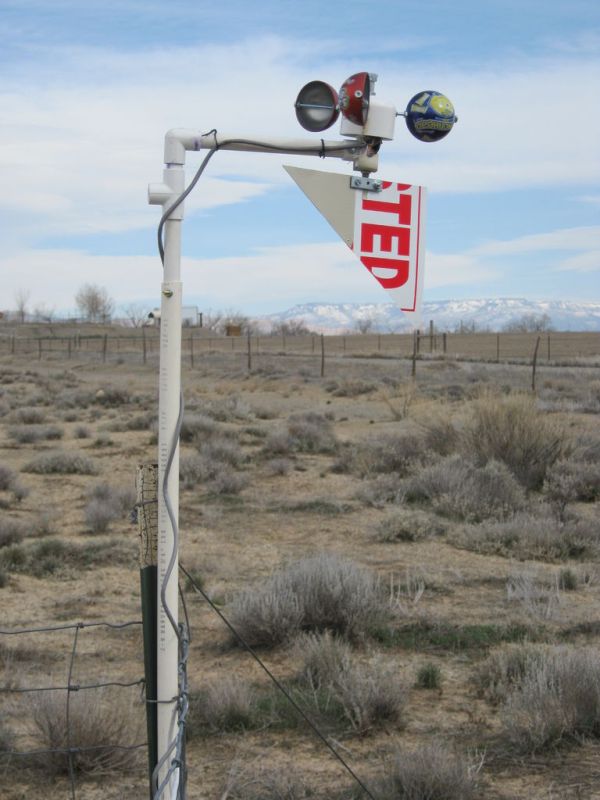
Naturally, this Lazy Old Geek wanted to add a weather vane (wind direction) to my weather station. Who cares, you may ask? Well, I am a Geek. Actually, wind direction has some importance. Here in the high desert, the winds are usually from the west. But sometimes we get some wrap around and the wind comes from the North or East which usually means it’s coming off the mountains and is probably colder. Also sometimes we actually get smoke blowing in from wildfires in Utah, Nevada and even California.
Example: Outdoor burning by permit is allowed in my county. Just the other day, there was some burning nearby and I could tell by my weather station that it was not going to be blowing in my direction so I could keep my window open.
Step 1: Parts List
USB Freeduino (Arduino-clone) $ 22.50
Adafruit Data logging shield $19.50
http://www.adafruit.com/index.php?main_page=product_info&cPath=17_21&products_id=243
SD Card $ 6
Aluminum NoTrespassing Sign $ 2
Potentiometer 6639S-1-103-ND $12 (Digikey)
2 2”x 1/2” Mending plates $ 1
100ft Ethernet Cat5 cable $ 8 (Amazon)
2 Ethernet Couplers $1.40 (ebay.com)
Prices US dollars March 2011
Any USB Arduino should work but it is easier to wire it up to an Arduino shield so the clone would have to be shield compatible. There are some good deals on ebay for Arduino Duemilanove 2009 for about $18.
So why did I add the Adafruit Data Logging Shield, you may ask? Well, if I want to collect long term weather data say overnight, then I have to leave my computer on. With the data logger, I can record the data to an SD card and don’t have to keep the computer on all night.
So why did I add the Adafruit Data Logging Shield, you may ask? Well, if I want to collect long term weather data say overnight, then I have to leave my computer on. With the data logger, I can record the data to an SD card and don’t have to keep the computer on all night.
The potentiometer is special in that it’s called continuous turn. Most potentiometers rotate about 350 degrees and stop. Those wouldn’t work for a weather vane. This one will keep rotating no matter what direction the wind comes from.
Step 2: Weather Vane Design
Problem: How to design a weather vane.
Solution: So I did some research on weather vanes. How they work is that the weight is distributed evenly so that the ½ is on one side and ½ is on the other side but that it is also balanced like a teeter-totter, for those older people who remember those. For wind motion the surface area of the ‘tail’ has to be much greater than the head.
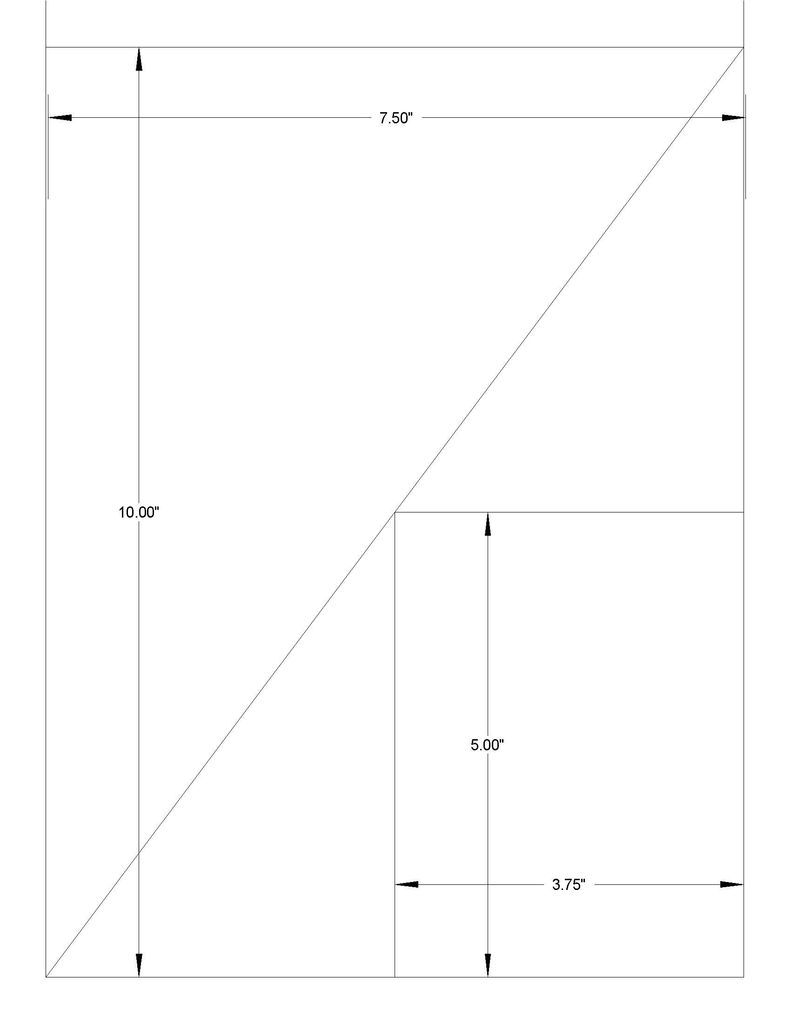
So I had a pretty clever design for an Old Geek. I took an aluminum ‘NoTrespassing’ sign. The piece I had was 10” x 7.5”. I cut it in half on the diagonal with a pair of scissors. From one side, I cut two triangles out of it as per the drawing. Now these two triangles match up to the point of the big triangle. Using some spray adhesive, I glued the smaller triangles one on each side of the big triangle.
Using some trigonometry, that means that the weight of each ½ of vane is equal.
Problem: However, the weight is not distributed equal. The tail piece has more weight farther out and the point has more weight in the center.
Solution: So I took a pencil and stuck it under the weather vane perpendicular to the triangle and shifted it until it was balanced. It was about 5.5” from the point. This isn’t really too critical. At this point, I cut a 3/8” slot about 1/2” to clear the potentiometer. Center one of the mending plates over the slot and drill holes for 8-32 mounting hardware.
Step 3: Potentiometer modification and installation
Problem: The potentiometer had a cylindrical shaft (see picture). It would be difficult to attach the weather vane securely to this.
Solution: I decided to flatten part of the shaft so that it would be easier to attach.
I used the mending plates and built a clamp to hold the potentiometer (see picture). Then I clamped the assembly in a vise and used a cut off wheel in my drill press to flatten a spot on the shaft (see picture). I apologize, I didn’t take a picture of the results but it was about 1/8 of an inch ground off.
Problem: I decided to mount the weather vane potentiometer on the bottom of the same ½” PVC T used for the anemometer (See Arduino wind chill machine). Unfortunately, the width of the potentiometer is 0.875” and the inside diameter of the T is about 0.84”.
Solution: I would not recommend this method but this is what I did. First I disassembled the wind chill assembly except for the bearing. Then I clamped the T in a vise. All I had was a 7/8” spade bit. I would recommend you use what’s called a 7/8” Deming bit but I didn’t have one and didn’t want to spend the money for a one time usage. So I put the spade bit in my drill press and ‘centered’ the spade bit so that it was in the middle of the T opening. Then I clamped the vise so it couldn’t move and carefully drilled out the opening to a depth of about 0.45”. The hole wasn’t very neat but it did accept the potentiometer
Step 4: Wiring and assembly
Next I built a little bracket for the potentiometer (see picture). I used part of the left over piece of the aluminum sign doubled up. I cut a strip about 7/8” x 3.5”. In the middle, I drilled a 3/8” hole for the potentiometer. Then I attached the potentiometer using the nut. To make it a little easier to calibrate, I adjusted the potentiometer to 0 ohms between pins 1 and 2 then rotated the potentiometer so the flat part of the shaft was along the length of the bracket, then tightened the nut. (This isn’t necessary to do at this point but it makes it easier later) Using the PVC T as a guide I bent the sides of the bracket up and drilled holes in the bracket and through the PVC T for 8-32 hardware. Make sure the holes clear the lugs on the potentiometer.
Aluminum NoTrespassing
Potentiometer
Mending plates
Ethernet Cat5 cable
For more detail: Arduino Weather Station Part2