Over the last few years my family has been keeping ex-battery hens – they are about 18 months old and have had a horrendous life kept cooped up in small cages in large warehouses. As much as we love these little bundles of joys and eggs it can be a drudge getting up in the early morning letting them out to roam the garden because the sun is up and bright at 5.00am!!
It would be great if we could have an automated door that could open just after sun rise and close half an hour after sunset where hopefully they are all cosying up to each other in the coop. Sadly there have been times we have forgotten to lock them safely away and discover the horrible consequences when a fox has attacked and killed some of them.
This instructable brings together a number of ideas I have seen on the web to create an Arduino Chicken Coop Controller (ACCC) to automate a chicken coop door and where possible I will give direct credit to those people designs/code I have adapted to create this personal sleep saving device. Many thanks to those who have shared their great ideas which has spawned this device.
The main features of the ACCC:
- Based on the Arduino architecture for easy prototyping and adaptation to your coop requirements
- Uses common parts easily found at you local DIY/hardware store/shop such as cheap electric screw drivers
- Uses a real time clock to maintain time even when the device is temporary disconnected from power
- Adjusts the opening and closing times of the door according to the current month – you can set it to your own timezones
- Provides a manual override just in case one of your lovely darlings misses sunset!
- Provides a min and max temperature reading inside the coop from midnight so you can keep an eye on your brood’s welll-being
- A display which can be switched on and off to read out the current ACCC status and will not disturb your feathered friends sleep at night
Most of the electronic components were sourced from eBay and I estimate the whole device excluding the wood was under £30
Step 1: Building the door
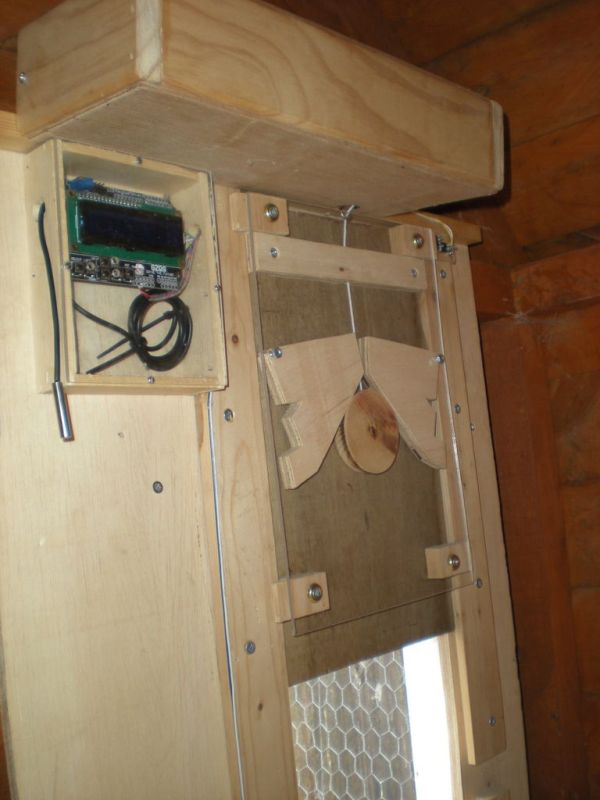
The door is based around a design by Clint Fisher which I discovered on YouTube. This is a brilliant design as it actually locks in your precious darlings regardless how scrupulous the local fox or other vermin are in trying to prise open the door. You could use a simpler design of just a sliding up and down sheet of ply. It is up to you on how complicated you want the door – just don’t make it out of solid steel as the motor will struggle to lift it.
Clint didn’t actually provide the plans on his YouTube link so I set about to recreate them and I have attached a PDF file which you can scale to your needs. I hope from the series of pictures and my video file you can see how the door assembles and works.
- I would advise using the acrylic sheet facing plate rather than plywood as it provides a frictionless face for the pieces to move freely
- You really need to see it moving to make sure it works freely and you know where to make any tweaks
- It really looks cool and you should show off your handy work
Most of the pieces can be cut from 3/8″ (10mm) ply using standard tools such as cooping saw, jig saw or a small band saw if you are fortunate to have one. I have included the plans and templates. If you print them on A4 paper the door levers and round are to scale. You can always use a PC print driver scaling function to make sure they come out as the correct size.
Use brass screws/stainless steel bolts where possible and treat the ply with a suitable wood preserve – I wouldn’t use a vanish as this might over time cause the workings to foul. When fixing the perspex cover use brass screw cups to spread the load and will hopefully stop the cover from shattering.
I found loosely fitting the door lock levers ensured they worked even if they were damp from the outside weather. I made two doors to test. One has been in manual use to see how it would stand the damp and cold english weather – which it did! So hats off to you Clint it is a very practical design.
I have taken loads of pictures so you can see from all angles the design and how it is constructed and assembled. I haven’t commented on every picture as I think it is reasonably self explanatory – well I hope!
Step 2: Motor Assembly
I have seen many people do some extraordinary things with electric drills and screw drivers as kinetic power sources and wondered if I could go one step further to make them less bulky when incorporating them into the door assembly.
I wanted to source a motor and gear assembly that was under £10-15 which isn’t easy. I came across a cheap electric screw driver for less than £6 and when I stripped it discovered I had all the components I needed. Including a:
- 3.5v-4.5v Motor which could be hot wired to a chunky 6v battery
- planetary plastic gear box which was going to provide enough torc to raise the plywood door
- chuck and screw driver bit to attached a wooden real pulling the door opening cord
- rechargeable battery pack to test the door assembly
- plug transformer to trickle charge the motor battery – eventually substituted it for a 9 volt plug PSU so I could trickle charge the 6 volt lead acid battery and the 5 volt arduino regulator.
I am sure most DIY stores have similar ranges of value priced tools that make great sources for strong, robust and cheap motor assemblies.

I mounted my motor on some formed wooden support pieces and left plenty of space for the motor controller and regulators. I housed the motor assembly so no moving parts would be pecked by my feathered friends – my coop isn’t a tall shed. The pulley is an old wooden cotton real but any real would suffice – make sure you can drill a hole through it for the chord. As the real would only be moving for a few seconds up and down I didn’t go overboard on bearings and tried to keep things simple.
I attached the real to the motor via a screw bit and some very strong double bubble glue- it goes rock hard when cured.
Step 3: Testing The Door
Do use the battery pack to test the up and down movement and that everything is working fine without binding the gearbox or motor. I only used 2.4 volts (2 batteries) so the movement was slow enough for you to see. When you use 6 volts it certainly opens a lot quicker!!
I am sure there are better ways to mount everything but I must say the assembly has been working now for over 3 months and seems to be holding up well.
Power – Arduino,
Motor
and Battery
For more detail: Arduino Chicken Coop Controller