Last week, we learnt about the basic structure of an Arduino program and took a closer look at the ‘blink’ example. Hopefully you took the opportunity to experiment with code, adjusting the timings. This time, we’ll be writing something from scratch. In fact, let’s make a traffic light.
Apart from the basic Arduino, you’ll need:
- A red, yellow and green LED.
- A breadboard.
- 3 x suitable resistors for the LEDs you have ( probably 220 Ohms is fine).
- Connecting wires.
- A pushbutton switch.
- A high value resistor (10k).
Note: This is the latest in a series of beginner level tutorials for Arduino, the open source electronics prototyping platform. Here’s a list of the previous articles in the series:

- What Is Arduino & What Can You Do With It?
- What Is An Arduino Starter Kit & What Does It Contain?
- More Cool Components To Buy With Your Starter Kit
- Getting Started With Your Arduino Starter Kit – Installing Drivers & Setting Up The Board & Port
- A Closer Look At The Structure Of An Arduino App & The Example Blink Program
You may also want to download and install Fritzing, the tool I used to draw the wiring diagrams for these projects.
Wiring
Here’s a quick schematic I made up in Fritzing. It’s very simple – just the three LEDs wired with resistors to three separate input pins, and all connected to the ground.
Programming
We’ll start by defining variables so that we can address the lights by name rather than a number. Start a new Arduino project, and begin with these lines:
int red = 13; int yellow = 12; int green = 11
void setup(){ pinMode(red,OUTPUT); pinMode(yellow,OUTPUT); pinMode(green,OUTPUT); }
That was easy. Now for the difficult part – the actual logic of a traffic light. I’m going to create a separate function for changing the lights, and you’ll see why later.
When you first begin programming, the code itself is very rudimentary – it’s figuring out the minute logic details that presents the biggest problem. The key to being a good programmer is to be able to look at any process, and break it down into its fundamental steps.
void loop(){ changeLights(); delay(15000); } void changeLights(){ // green off, yellow for 3 seconds digitalWrite(green,HIGH); digitalWrite(yellow,LOW); delay(3000); // turn off yellow, then turn red on for 5 seconds digitalWrite(yellow,LOW); digitalWrite(red,HIGH); delay(5000); // red and yellow on for 2 seconds (red is already on though) digitalWrite(yellow,HIGH); delay(2000); // turn off red and yellow, then turn on green digitalWrite(yellow,LOW); digitalWrite(red,LOW); digitalWrite(green,HIGH); }
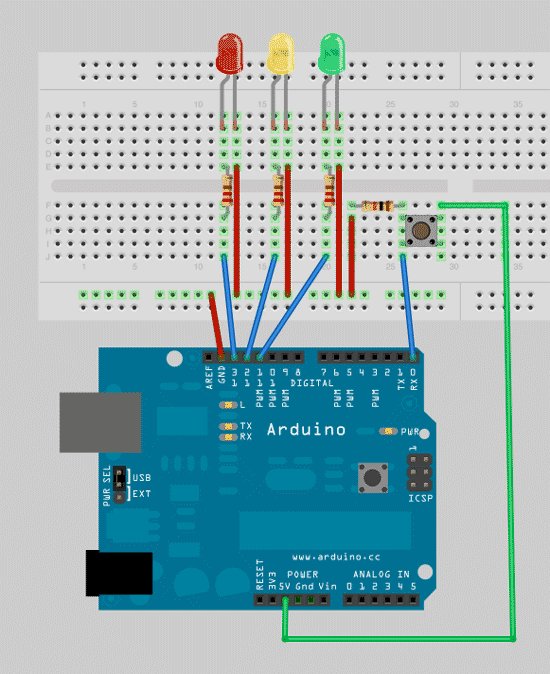
Done! Now, upload and run. You should have a working traffic light that changes every 15 seconds. However, I think it’s a little basic right now, so let’s add in a pushbutton for pedestrians to change the light whenever they like. Refer to the updated circuit diagram below:
You’ll notice that the switch has a high-impedance 10k resistor attached to it, and may be wondering why. This is called a pull down resistor. It’s a difficult concept to grasp at first, but bear with me.
A switch either lets the current flow, or doesn’t. This seems simple enough, but in a logic circuit, the current should be always flowing in either a high or low state (remember – 0 or 1, high or low). You might assume that a pushbutton switch that isn’t actually being pushed would be defined as being in a low state, but in fact it’s said to be ‘floating’, because no current is being drawn at all.
 In this floating state, it’s possible that a false reading will occur as it fluctuates with electrical interference. In other words, a floating switch is giving neither a reliable high, nor low state reading. A pull down resistor keeps a small amount of current flowing when the switch is closed, thereby ensuring an accurate low state reading. In other logic circuits, you may find a pull-up resistor instead – this works on the same principle, but in reverse, making sure that particular logic gate defaults to high.
Now, in the loop part of the code, instead of changing the lights every 15 seconds, we’re going to read the state of the pushbutton switch instead, and only change the lights when it’s activated.
Start by adding some new variables to the start of the app:
int button = 2; // switch is on pin 2 int buttonValue = 0; // switch defaults to 0 or LOW
For more detail: Arduino Programming For Beginners: The Traffic Light Controller