Summary of Wireless Communication of Multiple Variables Between 2 Arduinos Using HC-12
This tutorial shows how to wirelessly transmit multiple variables between two Arduinos using HC-12 433.4–473 MHz modules. The transmitter reads analog inputs, concatenates values separated by commas, and sends them via SoftwareSerial to the HC-12; the receiver reads the incoming string, parses by comma indices, and assigns values to variables for use in a project. Wiring, code modifications, housing STL, and a demo video are included. The method suits RC and remote-control projects and uses 9600 baud and 100 ms send intervals by default.
Parts used in the Wireless Communication of Multiple Variables Between 2 Arduinos Using HC-12:
- 2 HC-12 modules
- 2 Arduino boards (any compatible Arduino, e.g., Nano)
- Wires
- Power source for Arduinos (e.g., 3.3V or 5V supply; remote example uses 9V battery for Nano)
- Potentiometers (example remote uses 2)
- Joystick (example remote housing accommodates one)
- Remote housing STL file (remote and lid)
In this tutorial, I will show you how to achieve wireless communication of variables between 2 Arduinos using the HC-12 module, that operates from 433,4-473 Mhz.
HC-12s are wireless modules for arduino to arduino communication, because they can send multiple variables over long distances-ones up to 1km-using only 2 digital pins, not even PWM pins, which is much better than the NRF24 pinout, making them ideal for wireless projects.
I couldn’t find any tutorials out there showing this, so I decided to make one.
My inspiration for the code is this project by RootSaid, but I have modified it to make it easy to understand and to integrate into any project.
Supplies
-2 HC 12 modules
-2 Arduino boards of your choice
-Wires
-Whatever else you want to add to your wireless project
Step 1: Understand and Upload These Codes to Your Arduinos
Here is the code for the transmitter:
#include <SoftwareSerial.h>
#include <Wire.h>
SoftwareSerial HC12(12, 13);//tx,rx


int variable1;//variables that will get sent
int variable2;
int variable3;
int variable4;
int variable5;


void setup() {
  HC12.begin(9600);//Sets the hc 12 communication to 9600 baud, which is their factory default
  Serial.begin(9600);
  pinMode(A0, INPUT);
  pinMode(A1, INPUT);
  pinMode(A2, INPUT);
  pinMode(A3, INPUT);
  pinMode(A4, INPUT);
}
void loop() {
  variable1 = analogRead(A0);//assigns the variables that will be sent the value read on the analog pins
  variable2 = analogRead(A1);//you can change this to other data, such as a digital pin's read
  variable3 = analogRead(A2);
  variable4 = analogRead(A3);
  variable5 = analogRead(A4);
  //Uncomment the following lines if you want the remote to also send the analog input data to the serial monitor, to check if the data is being read properly
  //If you do, It will look the same as it should on the other end's serial monitor
  //Serial.print(variable1);
  //Serial.print(",");
  //Serial.print(variable2);
  //Serial.print(",");
  //Serial.print(variable3);
  //Serial.print(",");
  //Serial.print(variable4);
  //Serial.print(",");
  //Serial.print(variable5);
  //Serial.println("");
  HC12.print(variable1);//sends the variables
  HC12.print(",");
  HC12.print(variable2);
  HC12.print(",");
  HC12.print(variable3);//if you just need to send 2 variables,simply change this value and the following to 0
  HC12.print(",");
  HC12.print(variable4);//if you just need to send 3 variables,simply change this value and the next to 0
  HC12.print(",");
  HC12.print(variable5);//if you just need to send 4 variables,simply change this value to 0
//if you need 5 or less variables, disregard comments below, but keep the next line of code, it is essential
  HC12.println("");//you can add even numbers of variables, ex add 2, 4, 6 ...(so 3, 5, 7, 9... variables in total) before this line by adding a variable line, then a comma line, another variable line then a second comma line under the 5th variable line but before the println.
//for the purpose of simplicity, it is easier to add in groups of 2, so that less modification is necessary on the
other end
//if you have more variables than you are using, change the variable to 0, as above explained, again for the
purpose of simplicity
// This change must be reflected on receiver end: see below
  delay(100);
}
Here is the code for the Receiver:
#include <SoftwareSerial.h>
#include <Wire.h>

SoftwareSerial HC12(12, 13);//tx,rx

int variable1=0;
int variable2=0;
int variable3=0;
int variable4=0;
int variable5;
String input;
int boundLow;
int boundHigh;
const char delimiter = ',';


void setup() {
  Serial.begin(9600);
  HC12.begin(9600);
}


void loop() {
  if(HC12.available())
  {
  input = HC12.readStringUntil('\n');
  if (input.length() > 0)
      {
        Serial.println(input);

       boundLow = input.indexOf(delimiter);
        variable1 = input.substring(0, boundLow).toInt();

        boundHigh = input.indexOf(delimiter, boundLow+1);
        variable2 = input.substring(boundLow+1, boundHigh).toInt();


        boundLow = input.indexOf(delimiter);//you can add 2 variables, or 4... by adding these 4 lines
        variable3 = input.substring(0, boundLow).toInt();//you can add 2 variables, or 4... by adding these 4 lines

        boundHigh = input.indexOf(delimiter, boundLow+1);//you can add 2 variables, or 4... by adding these 4 lines
        variable4 = input.substring(boundLow+1, boundHigh).toInt();//     under this line

        variable5 = input.substring(boundHigh+1).toInt();//but before this one
//if you change the number of variables, follow instructions in comments above
//duplicating the lines as explained adds 2 variables, then you can duplicate them again, and then change the variable names so they are in the right order

delay(10);
      }//after this you can choose what to do with each variable, which will now have the same value as it's value on the transmitter end
  }
}
Basically, the way it works is that the first transmitter sends the variables in order, with commas in between, forming a string, and the receiver knows the order(because you program it with the order in mind), and takes apart the string to assign the values to their corresponding variables.
So, the first number/variable sent will be the first one in the string that gets received, and the second, the second…
Step 2: Modify the Codes to Your Liking to Fit With Your Project
Now that you have both Arduinos communicating, modify the codes so the receiver can use the variables to control lights, motors and more, specific to your project.
I used this for an RC boat, but it can be used for many things.
Step 3: Demonstration of the Code Working
This video shows this code working: The remote sends the variables, and then the HC-12 on the receiver end receives the string, and prints it on the arduino serial monitor. It does not process the code, but the codes are saved into variables on the receiving arduino.
Step 4: Wire Everything for Your Project
Now that the code is uploaded, start to wire your project:
On the transmitter side, attach your analog inputs to A0-A4, and then attach the TX pin of HC 12 to pin12, and RX to pin 13. Then connect the VCC to 3.3volts(or 5v, but 3.3 is safer) and the GND to GND.
On the Receiver, attach the TX pin of HC 12 to pin12, and RX to pin 13. Then connect the VCC to 3.3volts(or 5v, but 3.3 is safer) and the GND to GND, exactly the same way as for the transmitter. Then attach the other components of you project that will function based on the variables the HC 12 receives.
Step 5: Make a Housing for the Remote
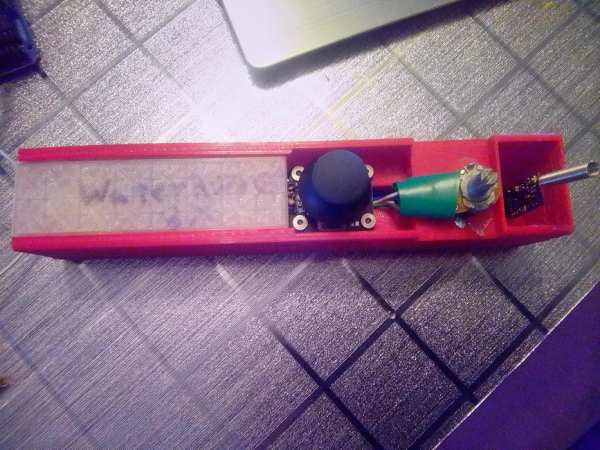
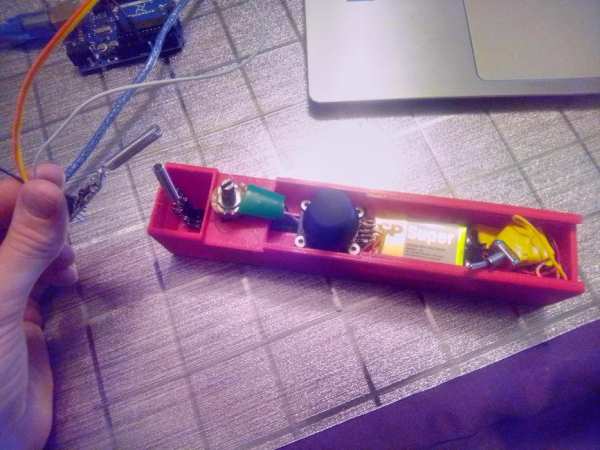
Attached is an .stl file of a remote housing and it’s lid, which fits an Arduino Nano, a 9v battery to power it, an HC 12 at the end, 2 potentiometers and a joystick, which has holes for screwing it in.
Step 6: Explanation of the Functioning of This System, for Personal Understanding or If Used As Science Fair Project
First, one arduino sends the value of x number of variables(in the above example 5), through serial transmission, to an HC-12 wireless module. This module emits these variables, spaced by commas in a string, in the form of a radio waves, not to be confused with sound waves. Then, the second HC-12 picks up these strings, from the radio waves it receives, which are sent every 100ms, and sends them to the receiving arduino through serial, that decodes these strings and can then process them.
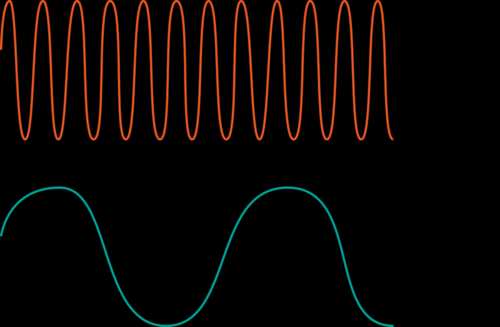
HC-12 uses 433.4 Mhz frequency on factory default, which means that the signal contains 433 400 000 waves every second. One wave goes from the middle of the bottom wave, to the middle of the next bottom wave(see illustration). Frequency is the number of waves per second. It is also used in AC electricity: 60Hz means that the current switches from positive to negative 60 times per second.
The wavelength of this signal is 691 mm, because the Frequency(Hz)=Velocity(m/s)/wavelength, and radio waves move at the speed of light, so
Wavelength = Velocity/Frequency
Wavelength = 299 792 458/433 400 000
Wavelength(m) = 0.691 = 691 mm
Radio waves can travel through space, contrary to sound waves, with can only travel through matter.
Source: Wireless Communication of Multiple Variables Between 2 Arduinos Using HC-12
- How does the transmitter send multiple variables?
The transmitter reads analog inputs, concatenates the values separated by commas, and sends the string via HC-12 using SoftwareSerial at 9600 baud. - How does the receiver parse the incoming data?
The receiver reads the incoming string until newline, finds comma positions with indexOf, and extracts substrings toInt to assign to variables. - What pins are used for HC-12 communication in the example?
SoftwareSerial uses Arduino pins 12 (TX) and 13 (RX) for HC-12 communication on both transmitter and receiver. - What baud rate should HC-12 use as shown?
The code sets HC-12 to 9600 baud, which is the HC-12 factory default used in this tutorial. - Can I change the number of variables sent?
Yes; adjust the transmitter prints and corresponding receiver parsing lines, setting unused variables to 0 as instructed in the code comments. - What power voltage is recommended for HC-12 modules?
VCC can be 3.3V or 5V, but 3.3V is recommended as safer in the tutorial. - How often are variables transmitted in the example?
The transmitter sends the variable string every 100 ms using delay(100). - Does the receiver automatically process variables into actions?
No; the received values are saved into variables and can then be used in the receiver code to control lights, motors, or other components as desired. - What frequency do HC-12 modules use by default?
HC-12 uses 433.4 MHz by factory default as stated in the tutorial.