I have worked most of my adult life with patients with vision problems in Alaska and pondered building a helpful device that would enable a more defined way of metering out fluids in a kitchen if users had no central vision. There are devices already for defining the limits of a cup with two wires that form a circuit at a set level but none actually measure different fluid levels. Most people just end up putting a finger into a hot liquid as its poured.
The sensors in these devices turn on with a button push and immediately read a baseline atmospheric pressure in a thin measuring tube. The sensor tube is then placed in the liquid whose depth you want to read and algorithms calculate how deep the tube is. All design considerations are based on size including the ATTiny85 for the microcontroller, small PCB, and a coin cell battery for power. The beeping sensor transmits its information by modulating its call for each inch of depth and the “smart” funnel slowly increases its yodeling as the tip goes deeper into the liquid. I designed these two little guys for fun but the inherent applicability of the design can be used for a variety of circumstances where fluid level cannot be well visualized and a tiny brain could help you.
The devices are made with silicon tubing and food level stainless steel straws at their sense apertures but the maker is left to his own devices for of food safety.
Step 1: Gather Your Materials
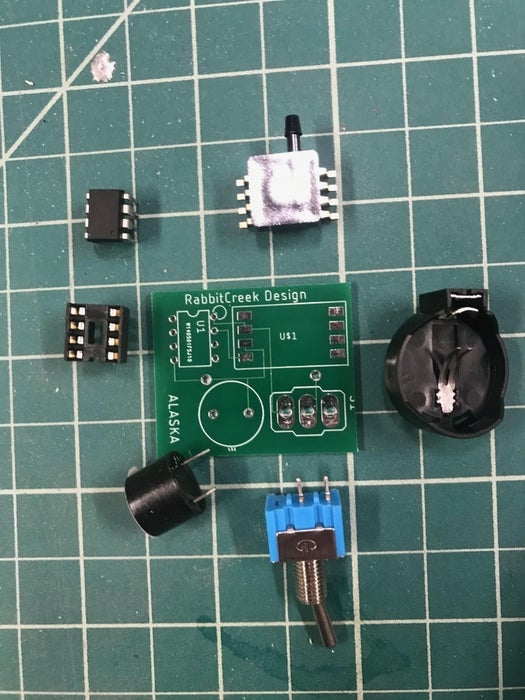
There are just a couple components that are needed for this build. The heart is the MP3V5004GP-ND sensor that costs about $13. It is great for measuring small volume changes in water height and have found it to be an adequate analog sensor even for AD convertor inside the ATTiny. The buzzer is generic –you just want something with a low current as there is no transistor in this circuit and the tiny must provide all the power. The demands of this circuit are small—only being on when needed with the pushbutton and the output signal will be turned off right away so the coin cell battery is appropriate. The circuit design can be easily modified to include other power supplies or switching–even solar.
1. MP3V5004GP-ND get at Digikey for $13
2. Push button — generic $0
3. Battery holder CR2025 –WMYCONGCONG 30 PCS CR2032 CR2025 Coin Button Cell Battery Amazon $0
4. ATTiny85–Original Atmel Dip-8 ATTINY85-20PU Tiny85-20Pu Ic Chip Pack Of 5Pcs $2
5. Dip 8 Socket — for ATTiny $0
6. Silicon tubing 2mm inside diameter $1
7. Stainless Drinking Straws — $0
8. Battery coin cell CR2025 — $1
9. Buzzer –BNYZWOT Electromagnetic Active Buzzer Long Continous Beep Tone Alarm Ringer for Arduino $0
Step 2: Wire It
The above is a screen shot from Eagle design file. It is the companion PCB design system that works with Fusion 360. I have included the files necessary for ordering your own boards that make this project so tiny. It was the easiest thing to order this summer–$5 for 10 boards and they came in about 5 days from China…it still amazes me. (PCBWAY–I don’t make $ from anyone I mention).
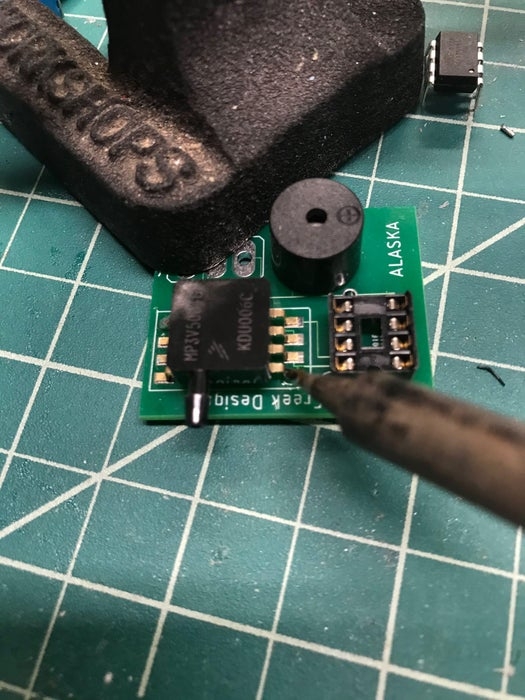
The wiring is totally simple. Power from the battery goes to the switch and from there to both the ATTiny and the sensor. The sensor analog wire goes to the AD convertor on the ATTiny (A1) and the output from the ATTiny (0) goes to the + lead of the buzzer and the ground in the system goes to ATTiny, Sensor, and Buzzer.
You can easily build this unit without the need for a PCB by dead-bug wiring. Most of the early testing was done this way. The PCB just makes it a lot neater for inclusion in the case. When wiring the PCB make sure you add all the components before you place the battery holder on the back as it covers up some of the solder spots–a consequence of making it smaller in size. You might still want to place the sensor on a PCB of its own just for stability sake.
Step 3: Print It
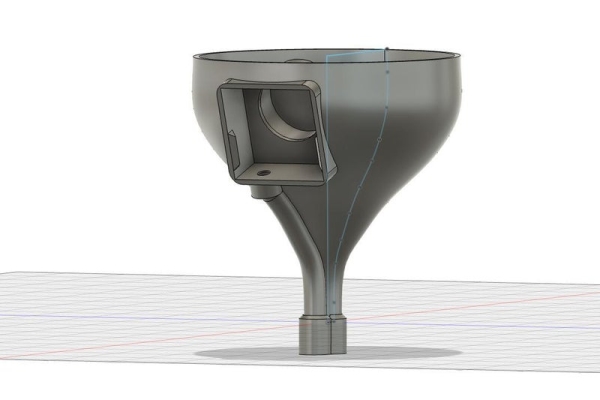
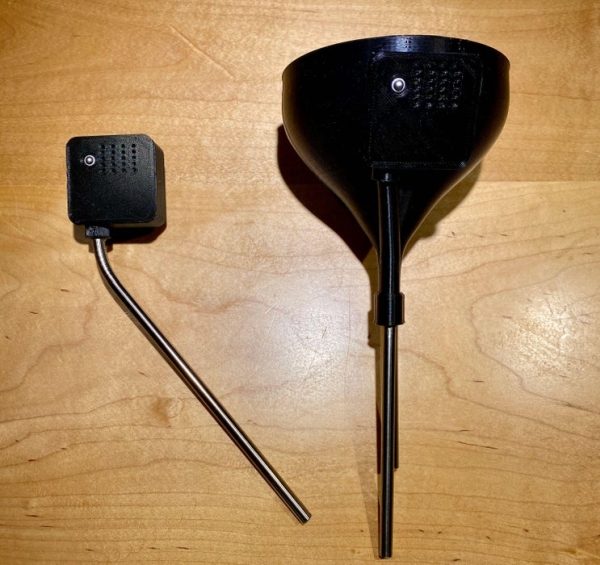
All design work is done in Fusion 360. Both designs use the same box framework that have identical matching front plates. The frontispiece can be changed to accommodate larger buttons and On/Off switches. It is held on by snap fit attachments and is designed for easy replacement of the CR2025 battery. The smart funnel has an extruded tube that is contiguous with the funnel drain and allows the silicon tube of the sensor to be parallel to it. The funnel has three printable parts: Body, frontispiece and collar at bottom that allows attachment of the two stainless straws–one for the sensor and one for the fluid. The measuring stick has just the body and the frontispiece. The stainless straw fits in the collar printed in the body below. All pieces needed support and were easily printed in PLA. No special accommodations were made in the designs to make them waterproof other than their inherent resistance to splashing.
Step 4: Build It
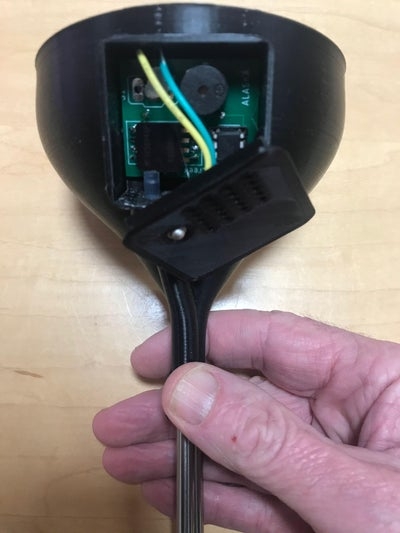
The units are very easily assembled. Once the circuit boards are built they both slip into the box holder with the outlet of the sensor with attached silicon tubing placed either through the hole or into the designed tube in the funnel. The collar in the smart funnel is superglued into place and the two stainless straws are cut and superglued into position. The larger diameter straw (8 mm) is cut to any desired length and the sensor tube(6 mm) with the silicon tube inside should be cut one inch longer–this is the needed depth difference to activate the machine when the fluid level gets to the height of the 8mm main tube. The measuring stick can also be any length of stainless (6 mm) but I designed it to measure in one-inch increments up to 6 inches. If you desire a longer range of measurements you will need to change the software and lengthen the tubes. The pressure measuring tube can be of any length and will only measure the pressure change at the tip. Trim the silicon tube at the end of the stainless tube. The push buttons are superglued into the hole in the frontispiece and wired to the board underneath.
Step 5: Program It
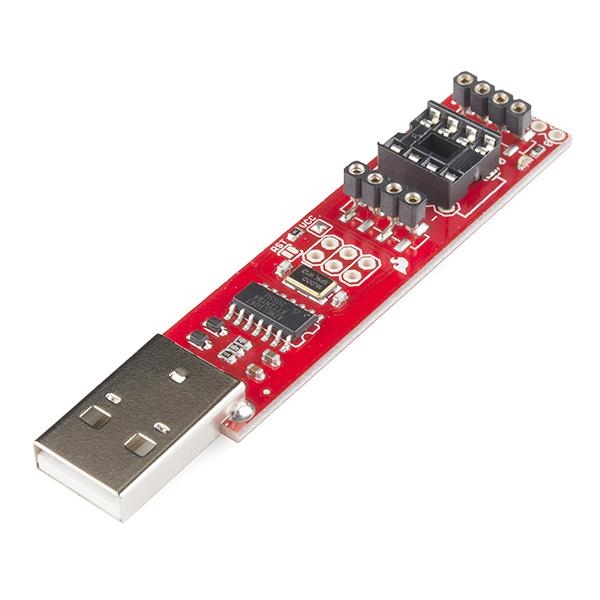
A SparkFun tiny programing stick makes uploading code very easy. Just plug it into the USB port and use the Arduino IDE. There are separate programs for the funnel and the measuring stick. They each use analog A1 for taking measurements. The setup() function initializes both the A1 pin for input and the 0 pin for output to the buzzer. An initial reading of the pressure at the tube mouth is done before it is submerged and the buzzer is activated to indicate this initialization is complete with a triple or quadruple beep. The loop() function in the measuring stick maps the pressure to inch increments of height of the stainless tube and makes consecutive beeps in groups of one to five to designate inches and 6 inches as a continuance tone. The loop() function in the smart funnel maps pressure depth to a decrease in the delay() function between beeps thus accelerating a cadence as the measuring tube is covered by higher level of fluid.
Step 6: Using It
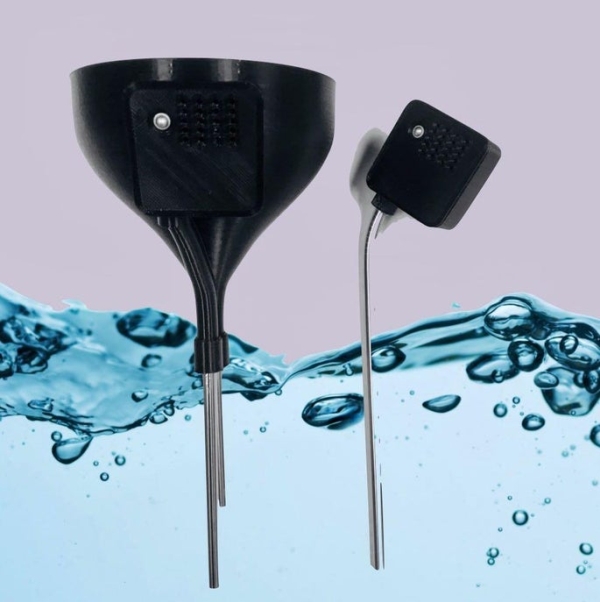
The difference between the ability to build something and finding that the device could be useful is a measure of achievement in any design. I cannot comprehend the number of engineering hours that have gone into the beautiful O2 sensor at the back of the Apple watch–a sensor with no real practical sense! I designed these two devices still unsure if they would be of any benefit to someone with a visual disability working in a kitchen or some other location. In practice the measuring stick would be placed in any container and it would accurately tell you the depth in inches of the fluid if it was less than 7 inches in depth. Just about all fluids used in a kitchen would cause an approximate pressure change within reason. The device is resistant to heat having a silicon inner tube. Design flaws involve not having a waterproof external housing for the electronics–so it cannot be submerged for cleaning. The measuring tube can be thoroughly cleaned and replaced easily if necessary. It would not work well with any materials that would gum up the end of the silicon opening although this could be redesigned to have a larger opening and easier to clean as long as it provided a closed pressure system. The smart funnel has the same limitations in terms of sensor tube maintenance. The inside of the funnel may require a coating of epoxy to make it resistant to multiple fluids. The multiple uses of a funnel with a designated end-point may be of benefit to the sighted in those instances where filling in an odd location makes watching for overflow difficult and dangerous. A measuring cup could be easily modified to accommodate this system only with the software changed for ounces or cups. Even a small mp3 player could be added to make it more user friendly.
Source: WetRuler–Kitchen Helpers for the Visually Impaired