A PC application that talks to the Walabot PRO, Arduino and NeoPixels!
Story
Welcome to my Walabot project
I will split this project in different parts.
- 1. Get to know the Walabot and a setup. This includes data readout and send it to an Arduino.
- 2. Gather the data that is needed for the calculations and create an image with this data
- 3. Convert the data to an object
Getting started with the Walabot
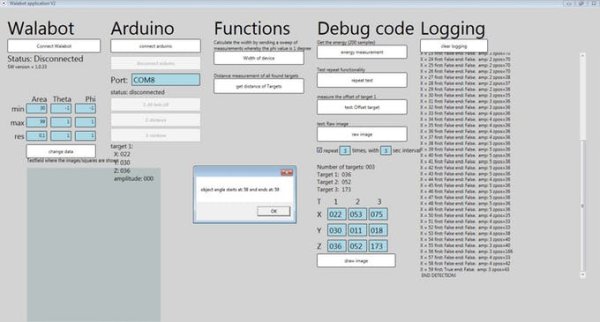
I’ve made a Windows WPF application to easily configure, setup and read data of the Walabot. Also for testing purpose I connected an Arduino through a serial connection. In this way I can control the Arduino’s GPIO with the input from the Walabot. This data is send with the WPF application..
As documented in the Walabot API webpage and the useful comments of the Walabot examples, the following flow is needed to get data of the Walabot:
- 1 ) Connect
- 2 ) Configure
- 3 ) Calibrate
- 4 ) Start
- 5 ) Trigger
- 6 ) Get action
- 7 ) Stop/Disconnect
In my Arduino example, I determine the found targets:
// Find the targets
SensorTarget[] targets = walabot.GetSensorTargets();
// Get the total number of found targets
int numTargets = targets.Length;
With the targets found, each target has it’s own data, to find the distance between each target and the Walabot, the Z-poss variable will be used. This is found by:
// Get the distance for the target
double distanceTarget = targets[targetIdx].zPosCm;
// targets[]  = the array with the found targets.
// targetIdx  = the selected target
// .zPosCM    = the Z position of the target.
If you place this in a loop for each found target, all the data can be found. Always make sure that you specify the TargetIdx in the right configuration, so no null references will be made.
To make the data more readable, and change it so the data can directly be send to the Arduino:
String distanceTargetString = Math.Round(targets[targetIdx].zPosCm).ToString("00");
// distanceTargetString = Z position in a string
// Math.Round = used for rounding the data of the double
// .toString("00") = used for changing the rounded int to a String,
// the "00" in the toString() is used to change the format of the measurement
// which easily can be used to send the data and use it inside the application.
This data will be send to the Arduino by a serial connection. Simply register the COM port of the Arduino and send serial data to it. Multiple tutorials are available online to setup this connection.
I setup a predefined string to split to send only one data package to the Arduino. The Arduino will split this data and execute the right function.
sting sendData = C0_022_#FF00FF // data string to be send to Arduino, with:
// C       - the function
// 0       - the selected target (if needed)
// _       - a sepperator
// 022     - Data from the Walabot
// _       - a seperator
// #FF00FF - A color preference
– Walabot setup
Since I found the Walabot Filters and Profiles a little difficult, I made a summary below. This was found from the walabot api pages. Links are found below.
Walabot filters:
FILTER_TYPE filterType = mtiMode ?
FILTER_TYPE.FILTER_TYPE_MTI : //Moving Target Identification: standard dynamic-imaging filter
FILTER_TYPE.FILTER_TYPE_NONE;
walabot.SetDynamicImageFilter(filterType);
Dynamic Filtering
For applications that require tracking movement, Walabot can apply a dynamic-imaging filter that removes static signals, leaving only changing signals. In addition to the Moving Target Identification (MTI) filter, the Derivative filter is available for the specific frequencies typical of breathing. Here’s an example display of Derivative-filtered image energy from sensor-narrow scanning (breathing):
Walabot Profiles
Sensor
walabot.SetProfile(APP_PROFILE.PROF_SENSOR);
- distance stanning through air,
- high resolution images
- slower capture range
Sensor narrow
walabot.SetProfile(APP_PROFILE.PROF_SENSOR_NARROW );
- lower-resolution images
- fast capture
- useful for tracking quick movement
Short-range (imaging)
walabot.SetProfile(APP_PROFILE.PROF_SHORT_RANGE_IMAGING );
- Short range
- penetrative scanning inside dielectric materials
Short-range (singe line)
walabot.SetProfile(APP_PROFILE.PROF_SHORT_RANGE_SINGLE_LINE );
- Short range
- Small number of antennas pairs
– Arduino Setup
The Arduino will be used to receive the imput of the Walabot and use this data as input for the Neopixels. I use the Arduino (Genuino) MKR1000, but every board can be used in this scenario.
Read more: Walabot Object Detection


