
Summary of Voltage indicator transitions between colours
This article presents two low-cost battery discharge indicator circuits using a dual-color LED. The first version uses four components to create a gradual color shift from green to red as voltage drops, while the second replaces a resistor with a Zener diode for a sharper transition point. Both designs minimize parts count and cost compared to complex alternatives.
Parts used in Battery Discharge Indicator:
- Dual-color LED
- Transistor (Q1)
- Diode (D1)
- Diode (D2)
- Resistor (R1)
- Resistor (R2)
- Zener diode (for Figure 2)
This Design Idea gives two versions of an indicator light that changes from green to red as a battery discharges. There are many circuits that do this sort of thing, but all the ones I have seen are too complex and costly for my taste. This DI shows a method that uses an absolute minimum of low cost parts: a dual-color LED and four other parts.
Figure 1 shows the simplest version. With 9V on B+ only the green LED is lit because the voltage at the base of Q1 is 1.58V and the voltage at the emitter is the diode voltage VD (1.8V typ.), keeping Q1 off. As the battery voltage drops, the voltage across D2 stays nearly constant, but the voltage at the base drops to the point where Q1 starts conducting. This starts shunting current into D1, the red LED, which receives an increasing portion until all the current goes to the red LED.
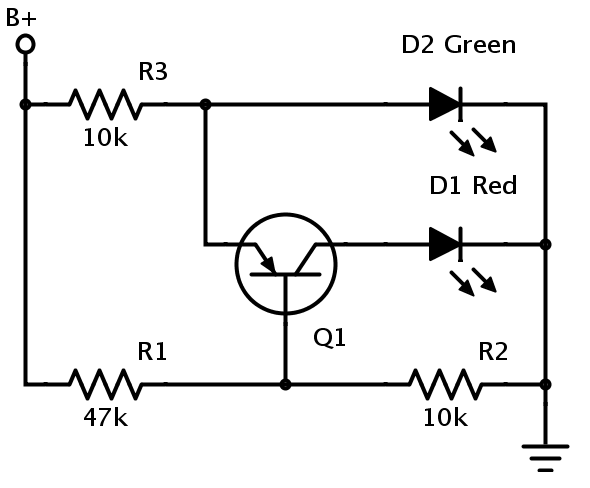
For the typical dual-color LED, the difference in forward voltages is 0.25V, which is also the transition voltage from green to red. The change on B+ that causes a complete color change is 0.25V times the divider of R1 and R2:
0.25V•[1+(R1/R2)]
This transition is centered around a voltage that is VD minus VBE; about 1.2V (most of the change in VD with temperature is also subtracted out). Taken together, a change on B+ from 7.1V to 5.8V will cause a change from green to red.
Different LED combinations will have different voltage differences, which may not be large enough to effect a complete color transition, but you can still use this design by putting a diode in series with D2.
Figure 2 replaces R1 with a Zener diode, creating a circuit with a much narrower transition. There is no longer a divider effect; a change of 0.25V on B+ will change color. The transition point will be 1.2V + VZ (about 7.2V for the parts shown).
For More Details: Voltage indicator transitions between colours
-
How does the circuit indicate battery discharge?
The circuit changes the LED color from green to red as the battery voltage drops and the transistor Q1 begins conducting. -
What is the minimum number of parts required for this design?
The simplest version uses only five parts: a dual-color LED and four other components. -
Can different LED combinations be used if the voltage difference is small?
Yes, you can add a diode in series with D2 to ensure a complete color transition even with different LED voltage differences. -
What causes the transition from green to red in the first version?
The transition occurs when the base voltage of Q1 drops enough to start conducting, shunting current from the green LED to the red LED. -
How does replacing R1 with a Zener diode affect the circuit?
Replacing R1 with a Zener diode creates a much narrower transition range where a change of only 0.25V on B+ changes the color. -
What voltage range causes the full color change in the typical setup?
A change on B+ from 7.1V down to 5.8V will cause the light to shift completely from green to red.
