
Summary of Visual / Aural Guitar Tuner “The Tune Trainer” using arduino
"The Tune Trainer" is a DIY strobe tuner and tone generator designed to teach ear training by combining visual strobe effects with audible beats. The device flashes an LED at the frequency of a musical note while simultaneously generating a matching tone, allowing users to tune instruments like guitars by observing slowed string vibrations or listening for diminishing interference beats.
Parts used in the Tune Trainer:
- Arduino prototyping board
- 9v battery
- 9v battery clip
- 9v battery connector
- Barrel-type power connector for Arduino
- 6 normally open momentary pushbuttons
- 3 SPST switches
- High Powered LED and associated resistor for a 5v load
- LED mounting bracket
- Piezo speaker for a 5v load
- 1uF Capacitor (optional)
- project box
Build a strobe tuner with an integrated tone generator to teach tuning by ear.
-=Background=-
I have always dabbled in instruments. Over the course of my life, I’ve attempted (with varying success) Piano, Guitar, Banjo, Penny Whistle, Ocarina, Panpipes, Great Highland Bagpipes, Smallpipes, and Didgeridoo (don’t ask, It was late, and I was a bit tipsy). In the process, I have continually hit one major hurdle. I am absolute rubbish at tuning by ear. I cannot tell if a guitar is out of tune in the least, unless it is so far off that you can play “The Bells of Saint Mary” without fretting at all. I was up late one night, experimenting with some PWM code for the Arduino when I suddenly had an epiphany. “Beat” tuning is very similar to measuring speed with a strobe. I thought that perhaps combining the obvious visual input of a strobe with the auditory input of a tone, could help me to better grasp tuning by ear. Thus an idea was born
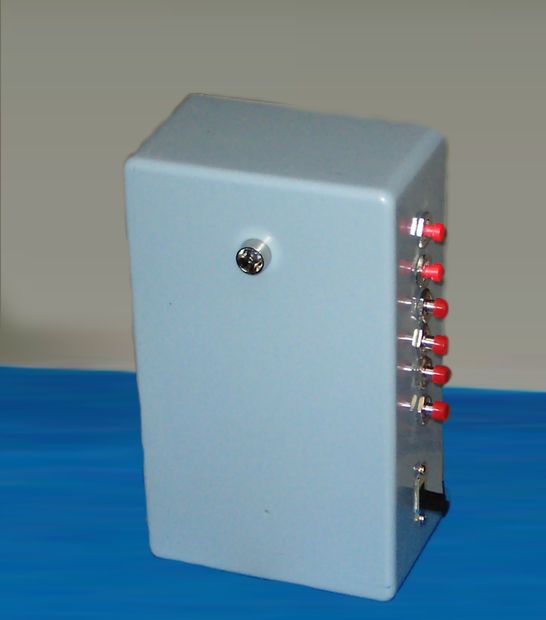
“The Tune Trainer” is a combination of two devices. One is a strobe that flashes at the frequency of a tuned string. The other is a tone generator. together they give the user two methods of tuning
1) Strobe – The musician sets the tuner for a string and strums said string while aiming the strobe at it. The strobe causes the apparent speed of motion of the string to decrease as the user approaches the correct frequency. as the the string gets closer to tuned, the string’s vibration will happen in visible pulses of speed and apparent lethargy, which slow as the tuning improves. These variations in speed should coincide with the frequency of audible “beats” when beat tuning.
2) Tone – The musician sets the tuner for a string and strums said string while listening carefully. If the string is very far from true, he’ll hear discord. once he is close enough that the discord disappears, he will begin to hear “beats” in the combined sound of the two tones, caused by constructive and destructive interference between the waves. The beats should decrease in tempo and amplitude as you approach a perfect tuning. (in theory)
The user can chose Both or either method to tune, hopefully allowing the combined methods to train the ear in the aural method of tuning.
The other neat thing about this project is strobe tuning itself, which looks AWESOME!!!1!
Step 1: Materials
you will need the following materials (or similar) to build the tuner:
-Arduino prototyping board with the IDE installed on a computer
-9v battery
-9v battery clip
-9v battery connector
-Barrel-type power connector for Arduino
-6 normally open momentary pushbuttons (RS has LOTS of NC switches in similar packages, beware)
-3 SPST switches
–High Powered LED and associated resistor for a 5v load (the brighter the better, min 40,000 mcd)
-LED mounting bracket
-Piezo speaker (for a 5v load)
-1uF Capacitor (optional, run in parallel with speaker, to improve tone.)
-project box
Step 2: Programming
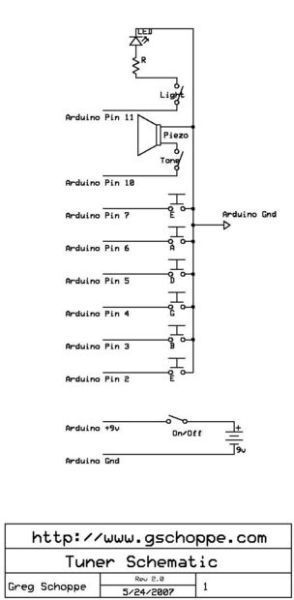
The program for the arduino takes in button commands from the 6 pushbuttons on pins 2-7 and outputs the selected frequency in light and sound via pins 10 and 11 (two of the PWM pins) these outputs are pulsed high and low at the frequency of the selected note to drive the Peizo and the LED respectively
here’s the basic flow of the program (in pseudo-code):
loop
-check for buttons
-if button
–set “frequency”
–loop
— -set led HIGH
— -set piezo HIGH
— -wait “led pulse length”
— -set led LOW
— -wait “frequency”/2 – “led pulse length”
— -set piezo LOW
— -wait “frequency”/2
— -check for buttons
— -if button
— –break
— -end if
–end loop
-end if
end loop
I saved a bit of time in the inner loop with some hacked together bit operations, but overall the coding is pretty basic. Its also a bit of a hack, so please don’t nag me about rogue style syntax laws. I know what they are, but when I’m rushing, I ignore them…
you can change the frequencies of each button by altering the declarations at the top.
For more detail: Visual / Aural Guitar Tuner “The Tune Trainer”
- How does the strobe method help with tuning?
The strobe causes the apparent speed of motion of the string to decrease as the user approaches the correct frequency, showing visible pulses that slow as tuning improves. - What is the purpose of the tone generator in this project?
The tone generator allows the musician to listen for discord when far from true and hear beats caused by constructive and destructive interference as they approach perfect tuning. - Can I use both tuning methods simultaneously?
Yes, the user can choose both or either method to tune, hopefully allowing the combined methods to train the ear in the aural method of tuning. - Which pins are used for output on the Arduino?
The program outputs the selected frequency in light and sound via pins 10 and 11, which are two of the PWM pins. - How many buttons are required for the interface?
The project requires 6 normally open momentary pushbuttons connected to pins 2-7 to select different frequencies. - What happens if the string is very far from true?
If the string is very far from true, the musician will hear discord before the beats become audible. - Is the capacitor mandatory for the piezo speaker?
No, the 1uF capacitor is optional and runs in parallel with the speaker to improve tone. - How does the program handle button inputs during operation?
The loop checks for buttons; if a button is pressed, it sets the frequency and continues looping until another button press breaks the inner loop.
