This project goes through converting a hammock into a VR flying machine. We will use a VR app that is running the WRLD SDK in Unity so you can input whatever GPS coordinates you want and fly around that area in VR! This VR app will also run on IOS or Android. The hammock has an ESP8266 running Arduino code that goes on the cross bar of the hammock so when you lean left or right you turn in the game. Also there is a small fan running another Arduino board that blows faster or slower based on your speed in the game. So this project will go over how to interface Arduino with Unity, wirelessly over WIFI and also how to control a variable speed fan.

Unity VR Project:
https://github.com/MatthewHallberg/flyVR
Parts:
ESP-8266 Node MCU (comes with 2): https://amzn.to/2tAyNsu
MPU-6050: https://amzn.to/2yD5dbD
4 Channel Relay: https://amzn.to/2MmCqKi
Hammock: https://amzn.to/2KkR1FP
VR headset I used: https://amzn.to/2MRAURw
Power Bank (need 2): https://amzn.to/2tp3l16
Arduino Buttons: https://amzn.to/2tzJxHM
Assorted Arduino Wires: https://amzn.to/2tyjPTS
Step 1: Setting Up the Fan.
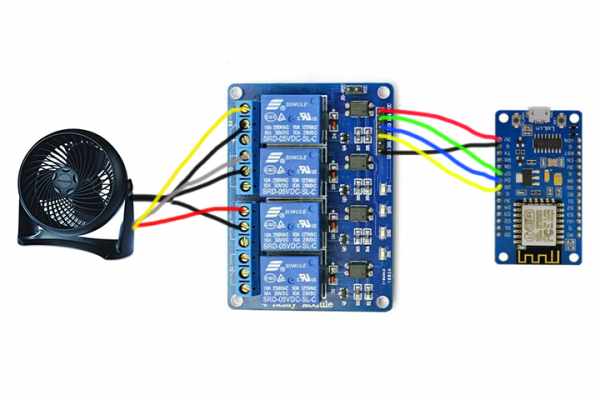
Let’s first get the fan set up.
Take apart all the screws that hold on the fan shroud with a long Phillips-head screwdriver.
Remove the 4 screws holding down the fan and motor to the base.
Unbolt the small relay from the base as well so you have some slack to work with.
Pull off the fan speed knob from the outside and take apart the switch from the inside. Inside the switch you will see 4 wires. The hot wire will need to be split into 3 separate wires, one for each fan speed.
Grab your ESP-8266 and hook that up to your fan as shown in the image above.
Plug in the board to your computer and fire up the Arduino IDE.
Step 2: Upload Fan Code.
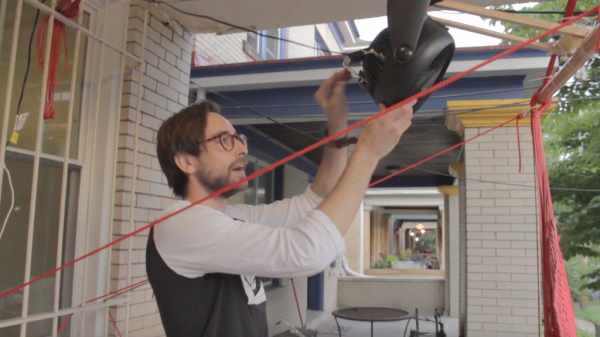
Put the fan back together and zip-tie the 4 channel relay to the back of the fan. Make sure the fan can spin freely.
Add your WIFI network name and password to the code below and upload it to your Arduino board. Plug it into the wall. The fan will default to low power. If you open up the serial monitor at 115200 you can type in 1-4 to access the different fan speeds. This code listens for packets being sent by another Arduino board so let’s get that one set up next.
#include <ESP8266WiFi.h>
#include <WiFiUdp.h>

int pin5 = 14;
int pin6 = 12;
int pin7 = 13;

int incomingByte = 0;

//wifi stuff
const char* ssid     = "****************"; // wifi network name
const char* password = "*************"; // wifi network password

WiFiUDP Udp;
unsigned int localUdpPort = 1999;
char incomingPacket[255];

void setup(void) {
  Serial.begin(115200);
  delay(10);

// We start by connecting to a WiFi network
  Serial.print("Connecting to ");
  Serial.println(ssid);
  WiFi.begin(ssid, password);
  while (WiFi.status() != WL_CONNECTED) {
      delay(500);
      Serial.print(".");
  }
  Serial.println("WiFi connected");
  Serial.println("IP address: ");
  Serial.println(WiFi.localIP());
  Serial.println("Starting UDP");
  Udp.begin(localUdpPort);

//set pin modes
  pinMode(pin5, OUTPUT);//0
  pinMode(pin6, OUTPUT);//1
  pinMode(pin7, OUTPUT);//2
  delay(100);
  //set default state
  low();
}

void off(){
  Serial.println("OFF");
  digitalWrite(pin5,HIGH);
  digitalWrite(pin6,HIGH);
  digitalWrite(pin7,HIGH);
}

void low(){
  Serial.println("LOW");
  digitalWrite(pin5,HIGH);
  digitalWrite(pin6,LOW);
  digitalWrite(pin7,HIGH);
}

void medium(){
  Serial.println("MEDIUM");
  digitalWrite(pin5,HIGH);
  digitalWrite(pin6,HIGH);
  digitalWrite(pin7,LOW);
}

void high(){
  Serial.println("HIGH");
  digitalWrite(pin5,LOW);
  digitalWrite(pin6,HIGH);
  digitalWrite(pin7,HIGH);
}

void loop() {

  //listen for packets
  int packetSize = Udp.parsePacket();
  if (packetSize){
    int len = Udp.read(incomingPacket, 255);
    if (len > 0){
      incomingPacket[len] = 0;
    }
    Serial.printf("UDP packet contents: %s\n", incomingPacket);
    if (incomingPacket[4] == 'H'){
        high();
    } else if (incomingPacket[4] == 'L'){
        low();
    }
  }

  if (Serial.available() > 0) {
    // read the incoming byte:
    incomingByte = Serial.read();
    //set fan based on input
    switch (incomingByte) {
      case '1':
        off();
        break;
      case '2':
        low();
        break;
      case '3':
        medium();
        break;
      case '4':
        high();
        break;
      default:
        off();
    }
  }
}
Step 3: Setting Up the MPU-6050
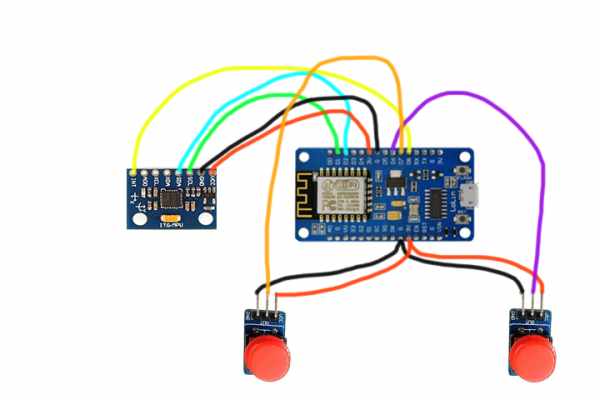
Solder the header pins onto the MPU-6050 and put it on a breadboard with another ESP8266.
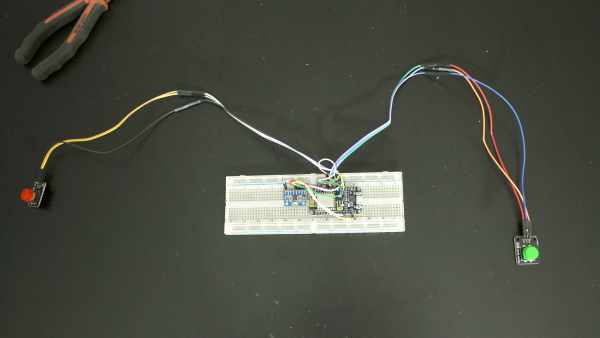
Grab the two buttons and hook everything up according to the diagram above. Connect the buttons to the ESP with 2 wires instead of one because they will need a lot of slack when we attach them to the hammock.
This particular setup will read raw accelerometer and gyro values and convert them to usable x,y,z values. Those values will be sent as a constant stream to any device listening on the WIFI network that you define in the code. Also, the ESP-8266 will send messages to any device listening on the network when either button is pressed in order to increase the fan speed when any button is held down.
In order to use the code for this particular setup we are going to need to download this library:
https://github.com/jrowberg/i2cdevlib
Open up that folder and navigate to Arduino->MPU-6050->Examples->MPU6050_DMP6_ESPWiFi
Replace what is in that script with the code in the following step and upload it to your board. We are doing this so all of our libraries and header files are in the right place without doing any extra work.
Step 4: Code for MPU-6050
/* ============================================
I2Cdev device library code is placed under the MIT license
Copyright (c) 2012 Jeff Rowberg
==============================

  GY-521  NodeMCU
  MPU6050 devkit 1.0
  board   Lolin         Description
  ======= ==========    ====================================================
  VCC     VU (5V USB)   Not available on all boards so use 3.3V if needed.
  GND     G             Ground
  SCL     D1 (GPIO05)   I2C clock
  SDA     D2 (GPIO04)   I2C data
  XDA     not connected
  XCL     not connected
  AD0     not connected
  INT     D8 (GPIO15)   Interrupt pin
*/
// I2Cdev and MPU6050 must be installed as libraries, or else the .cpp/.h files
// for both classes must be in the include path of your project
#include "I2Cdev.h"

#include <ESP8266WiFi.h>
#include <WiFiUdp.h>

#include "MPU6050_6Axis_MotionApps20.h"
//#include "MPU6050.h" // not necessary if using MotionApps include file

// Arduino Wire library is required if I2Cdev I2CDEV_ARDUINO_WIRE implementation
// is used in I2Cdev.h
#if I2CDEV_IMPLEMENTATION == I2CDEV_ARDUINO_WIRE
    #include "Wire.h"
#endif

// class default I2C address is 0x68
// specific I2C addresses may be passed as a parameter here
// AD0 low = 0x68 (default for SparkFun breakout and InvenSense evaluation board)
// AD0 high = 0x69
MPU6050 mpu;
//MPU6050 mpu(0x69); // <-- use for AD0 high

// MPU control/status vars
bool dmpReady = false;  // set true if DMP init was successful
uint8_t mpuIntStatus;   // holds actual interrupt status byte from MPU
uint8_t devStatus;      // return status after each device operation (0 = success, !0 = error)
uint16_t packetSize;    // expected DMP packet size (default is 42 bytes)
uint16_t fifoCount;     // count of all bytes currently in FIFO
uint8_t fifoBuffer[64]; // FIFO storage buffer

#define OUTPUT_READABLE_YAWPITCHROLL

// orientation/motion vars
Quaternion q;           // [w, x, y, z]         quaternion container
VectorInt16 aa;         // [x, y, z]            accel sensor measurements
VectorInt16 aaReal;     // [x, y, z]            gravity-free accel sensor measurements
VectorInt16 aaWorld;    // [x, y, z]            world-frame accel sensor measurements
VectorFloat gravity;    // [x, y, z]            gravity vector

float ypr[3];           // [yaw, pitch, roll]   yaw/pitch/roll container and gravity vector

#define INTERRUPT_PIN 15 // use pin 15 on ESP8266

const char DEVICE_NAME[] = "mpu6050";

// ================================================================
// ===               INTERRUPT DETECTION ROUTINE                ===
// ================================================================

volatile bool mpuInterrupt = false;     // indicates whether MPU interrupt pin has gone high
void dmpDataReady() {
    mpuInterrupt = true;
}

void mpu_setup()
{
  // join I2C bus (I2Cdev library doesn't do this automatically)
#if I2CDEV_IMPLEMENTATION == I2CDEV_ARDUINO_WIRE
  Wire.begin();
  Wire.setClock(400000); // 400kHz I2C clock. Comment this line if having compilation difficulties
#elif I2CDEV_IMPLEMENTATION == I2CDEV_BUILTIN_FASTWIRE
  Fastwire::setup(400, true);
#endif

  // initialize device
  Serial.println(F("Initializing I2C devices..."));
  mpu.initialize();
  pinMode(INTERRUPT_PIN, INPUT);

  // verify connection
  Serial.println(F("Testing device connections..."));
  Serial.println(mpu.testConnection() ? F("MPU6050 connection successful") : F("MPU6050 connection failed"));

  // load and configure the DMP
  Serial.println(F("Initializing DMP..."));
  devStatus = mpu.dmpInitialize();

  // supply your own gyro offsets here, scaled for min sensitivity
  mpu.setXGyroOffset(220);
  mpu.setYGyroOffset(76);
  mpu.setZGyroOffset(-85);
  mpu.setZAccelOffset(1788); // 1688 factory default for my test chip

  // make sure it worked (returns 0 if so)
  if (devStatus == 0) {
    // turn on the DMP, now that it's ready
    Serial.println(F("Enabling DMP..."));
    mpu.setDMPEnabled(true);

    // enable Arduino interrupt detection
    Serial.println(F("Enabling interrupt detection (Arduino external interrupt 0)..."));
    attachInterrupt(digitalPinToInterrupt(INTERRUPT_PIN), dmpDataReady, RISING);
    mpuIntStatus = mpu.getIntStatus();

    // set our DMP Ready flag so the main loop() function knows it's okay to use it
    Serial.println(F("DMP ready! Waiting for first interrupt..."));
    dmpReady = true;

    // get expected DMP packet size for later comparison
    packetSize = mpu.dmpGetFIFOPacketSize();
  } else {
    // ERROR!
    // 1 = initial memory load failed
    // 2 = DMP configuration updates failed
    // (if it's going to break, usually the code will be 1)
    Serial.print(F("DMP Initialization failed (code "));
    Serial.print(devStatus);
    Serial.println(F(")"));
  }
}

//push buttons
int greenButtonPin = 12;//6
int redButtonPin = 13;//7
int greenVal = 0;
int redVal = 0;
bool greenDown = false;
bool redDown = false;

//wifi stuff
const char* ssid     = "**************"; // wifi network name
const char* password = "*********"; // wifi network password

//iIP address of receiving computer or mobile device, set to exact IP or al 255's to send to every device on the network
IPAddress deviceIpBroadCast(255,255,255,255);
IPAddress fanIpBroadCast(255,255,255,255);

unsigned int udpRemotePort=1999;
const int UDP_PACKET_SIZE = 28;
char udpBuffer[ UDP_PACKET_SIZE];
WiFiUDP udp;

void setup(void)
{
  Serial.begin(115200);
  delay(10);

  // We start by connecting to a WiFi network
  Serial.print("Connecting to ");
  Serial.println(ssid);
  WiFi.begin(ssid, password);
  while (WiFi.status() != WL_CONNECTED) {
      delay(500);
      Serial.print(".");
  }
  Serial.println("WiFi connected");
  Serial.println("IP address: ");
  Serial.println(WiFi.localIP());
  Serial.println("Starting UDP");
  //send connected message
  strcpy(udpBuffer, "Connected");
  Serial.println("Connected");
  udp.beginPacket(deviceIpBroadCast, udpRemotePort);
  udp.write(udpBuffer, sizeof(udpBuffer));
  udp.endPacket();

  //set up buttons
  pinMode(greenButtonPin, INPUT);
  pinMode(redButtonPin, INPUT);
  //set up accelerometer
  mpu_setup();
}

void sendVRMessage(String message){
  strcpy(udpBuffer,message.c_str());
  udp.beginPacket(deviceIpBroadCast, udpRemotePort);
  udp.write(udpBuffer, sizeof(udpBuffer));
  udp.endPacket();
}

void sendFanMessage(String message){
  strcpy(udpBuffer,message.c_str());
  udp.beginPacket(fanIpBroadCast, udpRemotePort);
  udp.write(udpBuffer, sizeof(udpBuffer));
  udp.endPacket();
}

void mpu_loop()
{
  // if programming failed, don't try to do anything
  if (!dmpReady) return;

  // wait for MPU interrupt or extra packet(s) available
  if (!mpuInterrupt && fifoCount < packetSize) return;

  // reset interrupt flag and get INT_STATUS byte
  mpuInterrupt = false;
  mpuIntStatus = mpu.getIntStatus();

  // get current FIFO count
  fifoCount = mpu.getFIFOCount();

  // check for overflow (this should never happen unless our code is too inefficient)
  if ((mpuIntStatus & 0x10) || fifoCount == 1024) {
    // reset so we can continue cleanly
    mpu.resetFIFO();
    Serial.println(F("FIFO overflow!"));

    // otherwise, check for DMP data ready interrupt (this should happen frequently)
  } else if (mpuIntStatus & 0x02) {
    // wait for correct available data length, should be a VERY short wait
    while (fifoCount < packetSize) fifoCount = mpu.getFIFOCount();

    // read a packet from FIFO
    mpu.getFIFOBytes(fifoBuffer, packetSize);

    // track FIFO count here in case there is > 1 packet available
    // (this lets us immediately read more without waiting for an interrupt)
    fifoCount -= packetSize;

#ifdef OUTPUT_READABLE_YAWPITCHROLL
    // display Euler angles in degrees
    mpu.dmpGetQuaternion(&q, fifoBuffer);
    mpu.dmpGetGravity(&gravity, &q);
    mpu.dmpGetYawPitchRoll(ypr, &q, &gravity);

    String x = String(ypr[0] * 180/M_PI);
    String y = String(ypr[1] * 180/M_PI);
    String z = String(ypr[2] * 180/M_PI);
    delay(100);
    mpu.resetFIFO();
    String message = x + "," + y + "," + z;
    Serial.println(message);
    sendVRMessage(message);
#endif
  }
}

void buttonLoop(){
  greenVal = digitalRead(greenButtonPin);
  if (greenVal == HIGH && greenDown) {
    greenDown = false;
    Serial.println("GREEN_UP");
    sendVRMessage("GREEN_UP");
    sendFanMessage("FAN_LOW");
  } else if (greenVal == LOW && !greenDown) {
    greenDown = true;
    Serial.println("GREEN_DOWN");
    sendVRMessage("GREEN_DOWN");
    sendFanMessage("FAN_HIGH");
  }
  redVal = digitalRead(redButtonPin);
  if (redVal == HIGH && redDown) {
    redDown = false;
    Serial.println("RED_UP");
    sendVRMessage("RED_UP");
    sendFanMessage("FAN_LOW");
  } else if (redVal == LOW && !redDown) {
    redDown = true;
    Serial.println("RED_DOWN");
    sendVRMessage("RED_DOWN");
    sendFanMessage("FAN_HIGH");
  }
}

void loop(void)
{
  mpu_loop();
  buttonLoop();
}
Step 5: Assembling the Beast
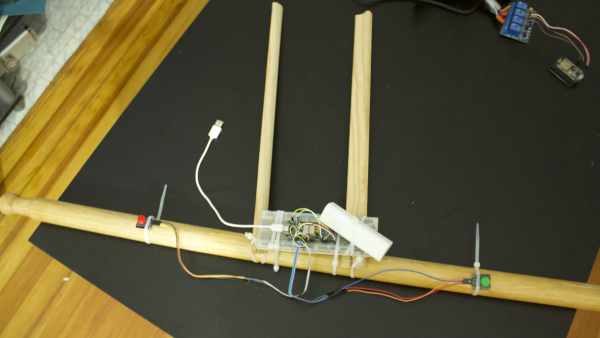
First attach two pieces of wood to the crossbar of the hammock. The pieces I used were approximately 1.5ft.
Screw the wood into the crossbar.
The Arduino board must sit as flat as possible on the crossbars, but if it is not 100% straight that is ok because the Unity app will account for an offset of the device.
Spead the buttons approximately 1ft away from the center of the crossbar.
Add a 5V USB power bank to power the Arduino board.
Ziptie everything down.
Source: Virtual Reality Flying Machine (Arduino)
