Summary of Twitter Physical Client Using Arduino
This project builds a physical Twitter client using an Arduino to notify the user of retweets via a flag. A Java application monitors the Twitter API for new retweets and communicates with the Arduino via serial connection. The Arduino triggers a servo motor to move a flag attached with Lego blocks whenever a retweet is detected, providing a tangible notification system without requiring web browsing.
Parts used in the Physical Twitter Client:
- Flag
- Arduino
- Laptop with a java IDE installed on it
- Yellow Led
- 330 Ohm resistor
- Servo motor
- Lego Blocks
- Twitter Consumer Key / Consumer Secret
In this project I’m building a physical Twitter client using Arduino and a flag, basically an arduino powered retweet indicator, whenever any of my tweets is retweeted some physical action will happen to notify me of that.
You’ll need:
1. Flag.
2. Arduino.
3. Laptop with a java IDE installed on it.
4. Yellow Led
5. 330 Ohm resistor
6. Servo motor (even a weak one would do, you don’t need a lot of torque)
7. Lego Blocks
8. Twitter ( Consumer Key / Consumer Secret) from the website.
This project requires basic Arduino skills and some java development background.
Step 1: Register a Twitter Application
You need to register your application with twitter to get consumer key and consumer secret.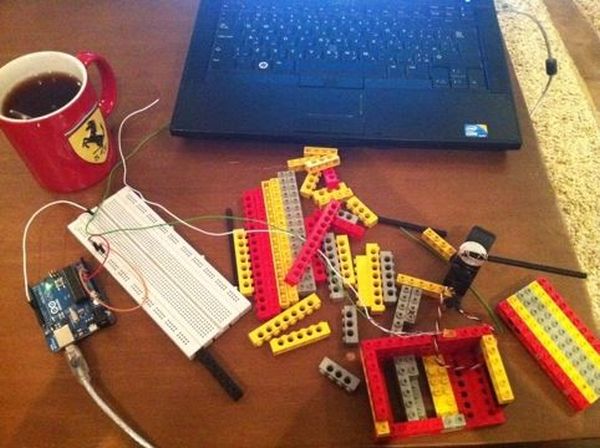
1. Log into dev.twitter.com
2. Sign in using your user name.
3. Click on create an app.
4. Fill in the values, You can put in anything in call back URL or even leave it blank since its not a web app.
5. Copy the consumer key and secret values (you’ll need them later). you’ll find them in the OAuth section.
Step 2: Start by building your java application
The Java code goes in queries for retweets, sets a floor (to avoid listing historical retweets), and starting from that floor every time it queries it returns the number of retweets since the last query, this is done using an index that gets set with every query (rather than saving it to disk or DB).
I’m attaching the code, you’ll need to download it and modify the following classes.
1. Open the project on netbeans.
2. Make sure that the libraries “RXTXcomm.jar” and “twitter4j-core-2.2.2.jar” are imported, if they weren’t import them manually (you’ll find them in the lib folder).
3. Check which port your Arduino is connected to, in my case it was COM10, and so i modified class “serial_test” constructor to reflect that.
a. open serial_test
b. go to static ports array PORT_NAMES and modify the windows entry to match yours (if you are using linux modify the linux value).
4. Open class “Arduino” and change ConsumerKey and ConsumerSecret to match the ones you have from step 1.
5. Clean and compile, now the code is read.
Code Explanation
Built using Twitter4j this requires that you should call the authenticate class first, slightly out of scope here but I’m willing to provide any needed help if required
here is the method that harvests the number of retweets.
public ArrayList get_retweets_from_last(String id)
{
Twitter twitter = new TwitterFactory().getInstance();
ResponseList retweets=null;
ArrayList ret_retweets=new ArrayList();
try{
retweets=twitter.getRetweetsOfMe();
for (Status s: retweets)
{
if(s.getId()<=Long.parseLong(id))
break;
ret_retweets.add(s);
}
System.out.println(“found “+ret_retweets.size()+” retweets”);
}catch(Exception e)
{e.printStackTrace();}
return ret_retweets;
}
I then use the RXTXcomm api to transfer this value to the Arduino, the Arduino keeps track of how many retweets it received since it was reseted, this number is incremented every time it receives a new one from the Java application.
public void write(int s)
{
try{
output.write(s);
}catch(Exception e)
{
e.printStackTrace();
}
}
Finally I manage all of this from a control for loop with a timed delay (the reason here is that you only get a limited number of Twitter API calls per hour, if you exceed that you get blocked),
while(true)
{
// retweets=t.get_retweets_from_last(last_retweet);
retweets=t.get_mentions_from_last(last_retweet);
if (retweets.isEmpty())
{
try{Thread.sleep(60000);}catch(Exception e){}
continue;
}
last_retweet=””+retweets.get(0).getId();
st.write(retweets.size());
try{Thread.sleep(30000);}catch(Exception e){}
}
Step 3: Components Assembly
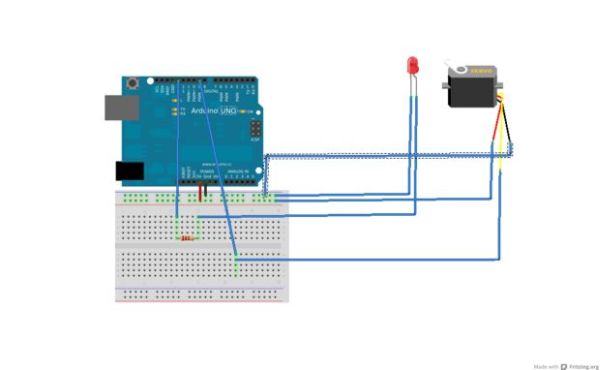
Using the prototyping board connect the following
For more detail: Twitter Physical Client
- What hardware components are required for this project?
You need a flag, Arduino, laptop with a java IDE, yellow led, 330 ohm resistor, servo motor, lego blocks, and twitter consumer key and secret. - How do I register my application with twitter?
Log into dev dot twitter dot com, sign in, click create an app, fill in values leaving callback url blank if not needed, and copy the consumer key and secret from the OAuth section. - Which libraries must be imported for the java application?
You must import RXTXcomm jar and twitter4j core 2 2 2 jar files found in the lib folder. - How does the code handle retweet tracking?
The java code uses an index set with every query to return the number of retweets since the last query rather than saving data to disk or database. - Why is there a timed delay in the control loop?
A timed delay is used because you only get a limited number of twitter api calls per hour and exceeding that will result in being blocked. - Can I use a weak servo motor for this project?
Yes, even a weak servo would work because you do not need a lot of torque for this application. - What skills are necessary to complete this build?
This project requires basic arduino skills and some java development background. - How is the serial port configured in the code?
You must modify the static ports array in the serial test class constructor to match the port your arduino is connected to.