Like the idea of making coffee on the fly? from your bed? While you’re on the bus coming home? Then the Tweet-a-pot is for you!
Tweet-a-pot is the next in fancy twitter enabled devices. This coffee pot enables its owner to make a pot of coffee from anywhere they have cell phone reception, using twitter and an arduino board.
The tweet-a-pot is the easy implementation for remote device control! with a bit of code and some hardware, you can have your very own twitter enabled coffee pot.
Take a look at this quick video, Special thanks to Sam:
Step 2: Setting Up Your Computer
First you need to set up your receiving computer.
To interface between the arduino and twitter, we are going to use python. There is a library that is already put together that enables us to use the twitter API. It’s called python-twitter.
After you have installed python, install the python-twitter library and all its dependencies. If you run into trouble just consult the documentation over on the python-twitter website.
Next, install the Arduino IDE so you can program your arduino and talk to it via serial port.
Once those are set up and working, time to go grab your credentials from twitter.com
Step 3: Setting up Twitter
Interfacing with twitter used to be easy, all you had to do was put your name and password into your code and it would work. Now twitter has taken user info more seriously using oAuth, and as a result now you must register your app with twitter and get an API key.
First, make a twitter account for this project that is separate from your main twitter account. I chose, driptwit.
Then, go to dev.twitter.com and register your app, this will enable you to grab 4 important pieces of information
-Access Token
-Access Token Secret
-Consumer Key
-Consumer Secret
These keys will be needed in the python code later to interface with the twitter API. After you have those 4 codes, you should be able to continue.
Step 4: The Code: Python Side
if found sends the ascii value of 1 to the serial port (and to the arduino), if #driptwitstop is found, it sends an ascii value of 0.
Lastly it loops and checks the twitter account every 15 seconds looking for changes.
As you can see, below is where you enter the keys you got from twitter in the last step.
Here is the actual code:
#******************************************#
# Tweet-a-Pot by Gregg Horton 2011 #
# Please email changes or #
# updates to [email protected] #
# *****************************************#
##Import Libraries
import twitter
import serial
import time
##authenticate yourself with twitter
api = twitter.Api(consumer_key=’consumerkeyhere’, consumer_secret=’consumersecrethere’, access_token_key=’accesskey’, access_token_secret=’accesssecret’)
##set to your serial port
ser = serial.Serial(‘/dev/ttyUSB0’, 19200)
## check serial port
def checkokay():
ser.flushInput()
time.sleep(3)
line=ser.readline()
time.sleep(3)
if line == ‘ ‘:
line=ser.readline()
print ‘here’
## Welcome message
print ‘Welcome To Drip Twit!’
print ‘Making Coffee..’
def driptwit():
status = [ ]
x = 0
status = api.GetUserTimeline(‘X’) ##grab latest statuses
checkIt = [s.text for s in status] ##put status in an array
drip = checkIt[0].split() ##split first tweet into words
## check for match and write to serial if match
if drip[0] == ‘#driptwit’:
print ‘Tweet Recieved, Making Coffee’
ser.write(‘1’)
elif drip[0] == ‘#driptwitstop’: ##break if done
ser.write(‘0’)
print ‘stopped, awaiting instructions.’
else:
ser.write(‘0’)
print ‘Awaiting Tweet’
while 1:
driptwit() ## call driptwit function
time.sleep(15) ## sleep for 15 seconds to avoid rate limiting
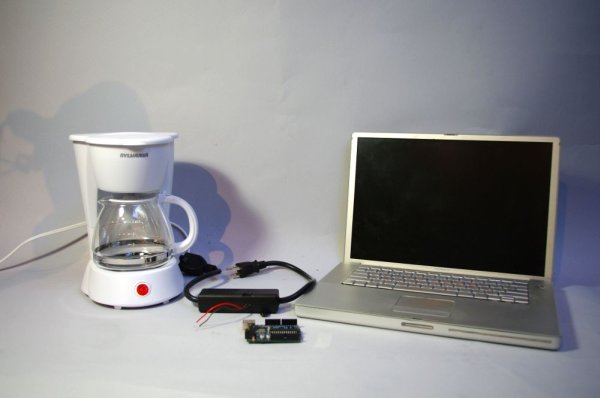
Supplies
To make your very own tweet-a-pot you will need the following
1 Power Switch Tail, this is basically a relay that is used to interface with the AC voltage
1 Arduino Board (any will do)
1 Computer running the arduino IDE and Python
1 Drip Coffee Pot