In this tutorial, the Arduino displays the time and date on a LCD (optional) and in the Arduino IDE serial monitor window. A PCF8563 real time clock (RTC) IC is used to generate the time and date.
The time and date can be set using the Arduino serial monitor window. An optional battery can be used to back up the time and date settings in the real time clock chip so that the time and date are not lost if the Arduino power is unplugged.
Prerequisites
Preferably you should follow all the beginner tutorials in order, but as a minimum: if using a LCD display, complete Tutorial 12: Arduino LCD. You should know how to use an 8 pin IC, e.g. from tutorial 5.
Read about crystals and coin batteries.
Components
Arduino Uno board, USB cable, wire links and a breadboard.
To just build the clock circuit you will need:
| Qty | Part | Designator | Notes | Type |
|---|---|---|---|---|
| 2 | 2k2 resistors (red – red – red) | R1, R2 | 1/4W 5% or better | Resistors |
| 1 | 100n | C1 | Non-polarized | Capacitor |
| 1 | 32.768kHz crystal | X1 | 32.768kHz watch crystal | Crystal |
| 1 | PCF8563P | U1 | Real time clock IC | Semiconductor |
32.768kHz Watch Crystals
To add the battery backup for the real time clock IC, you will need:
| Qty | Part | Designator | Notes | Type |
|---|---|---|---|---|
| 2 | 1N4148 | D1, D2 | 1N4148 diodes | Semiconductor |
| 1 | CR2032 coin battery holder | BT1 | Battery holder | |
| 1 | 3V CR2032 battery | BT1 | Battery |
To use a LCD to display the time and date, you will need:
| Qty | Part | Designator | Notes | Type |
|---|---|---|---|---|
| 1 | 47 ohm resistor (yellow – violet – black) | 1/4W 5% or better | Resistor | |
| 1 | 10k potentiometer | Trimpot or panel mount | Potentiometer | |
| 1 | MSC-C162DYLY-4N (Truly), PC1602LRS-FWA-B (Powertip) or similar HD44780 compatible LCD | 16 character by 2 line LCD display | LCD |
Circuit Diagram
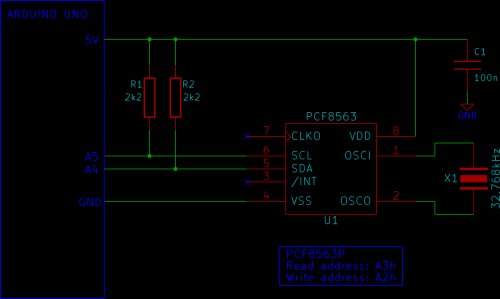
Two circuit diagrams are shown. The first shows only the RTC chip (PCF8563) connected to the Arduino. The second circuit diagram shows the optional battery backup added. To add the LCD, follow tutorial 12
Tutorial 16: Arduino Clock
The time and date can be set using the Arduino serial monitor window. An optional battery can be used to back up the time and date settings in the real time clock chip so that the time and date are not lost if the Arduino power is unplugged.
Prerequisites
Preferably you should follow all the beginner tutorials in order, but as a minimum: if using a LCD display, complete Tutorial 12: Arduino LCD. You should know how to use an 8 pin IC, e.g. from tutorial 5.
Read about crystals and coin batteries.
Components
Arduino Uno board, USB cable, wire links and a breadboard.
To just build the clock circuit you will need:
| Qty | Part | Designator | Notes | Type |
|---|---|---|---|---|
| 2 | 2k2 resistors (red – red – red) | R1, R2 | 1/4W 5% or better | Resistors |
| 1 | 100n | C1 | Non-polarized | Capacitor |
| 1 | 32.768kHz crystal | X1 | 32.768kHz watch crystal | Crystal |
| 1 | PCF8563P | U1 | Real time clock IC | Semiconductor |
From amazon.com:
32.768kHz Watch Crystals
To add the battery backup for the real time clock IC, you will need:
| Qty | Part | Designator | Notes | Type |
|---|---|---|---|---|
| 2 | 1N4148 | D1, D2 | 1N4148 diodes | Semiconductor |
| 1 | CR2032 coin battery holder | BT1 | Battery holder | |
| 1 | 3V CR2032 battery | BT1 | Battery |
To use a LCD to display the time and date, you will need:
| Qty | Part | Designator | Notes | Type |
|---|---|---|---|---|
| 1 | 47 ohm resistor (yellow – violet – black) | 1/4W 5% or better | Resistor | |
| 1 | 10k potentiometer | Trimpot or panel mount | Potentiometer | |
| 1 | MSC-C162DYLY-4N (Truly), PC1602LRS-FWA-B (Powertip) or similar HD44780 compatible LCD | 16 character by 2 line LCD display | LCD |
Circuit Diagram
Two circuit diagrams are shown. The first shows only the RTC chip (PCF8563) connected to the Arduino. The second circuit diagram shows the optional battery backup added. To add the LCD, follow tutorial 12.
Arduino Clock Circuit
Arduino Clock Circuit with Battery Backup
Building the Circuit
First interface the PCF8563 to the Arduino as shown in the first circuit diagram above. The PCF8563 is packaged in an 8 pin DIP (Dual In-line Package). The circuit can then be tested using the Arduino IDE serial monitor window as explained in the sections below.
Interface the LCD next as per Tutorial 12: Arduino LCD. Use the same circuit diagram and connections for the LCD as shown in the tutorial.
The battery backup circuit can be added at any time.
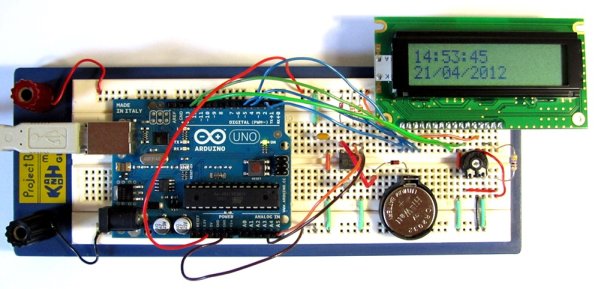
The complete breadboard circuit with LCD and battery backup is shown below. Click the picture for a bigger image.
Programming the Arduino
The clock sketch is too long to list here, so download the clock.zip file that contains the Arduino sketch for this project. Copy the clock folder from the zipped file to your Arduino sketchbook folder. Alternatively, copy the text from the enclosed file and paste it into the Arduino IDE. Verify and upload the clock sketch to the Arduino.
Operating the Circuit
If a LCD is interfaced to the Arduino and the clock sketch is loaded, the time and date should be displayed on the LCD immediately. Open the Arduino serial monitor window to see the time and date displayed and updated every second. The time and date can be set as described below.
Changing the Time and Date
When the Arduino serial monitor window is open, the time and date can be set by sending ‘s’ to the Arduino. The image below shows the menu that is displayed in the serial monitor window after sending the ‘s’ character.
For more detail: Tutorial 16: Arduino Clock

