Don’t worry! First, this is a rebuild out of a movie so it won’t explode for real and it won’t be worn by a real wolf.
However there is fursuiting for which I am a big fan of and my own character (fursona) is a wolf and lives in a world of technology and total military control. This collar will give the image if you would step out of line, you will be severely punished.
(a future nobody wants to be part of, yet it is happing in the “world” of my fursona)
 So much for my own background story and motivation….
This idea excally came out of the movie “the running man” when in the beginning the collars are being shown in action, preventing prisoners from escape and later on being a problem when they needed to disable the “sonic deadline” before they could run away. However I wanted mine to be a lot nicer and have some real functionality and more in the animal spirit (and again!, no real explosives are used, I like my head for some reason…)
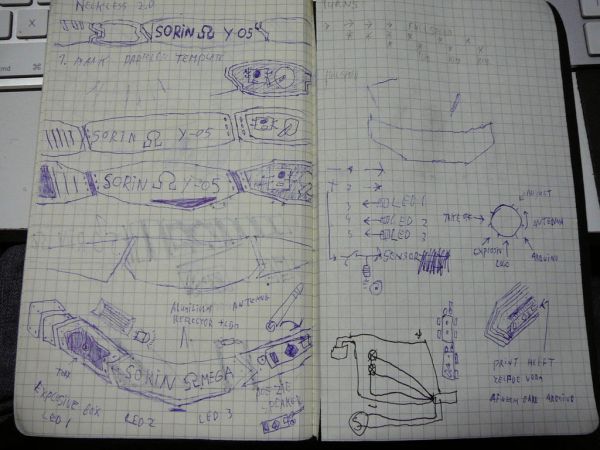
Step 1: Working out a design
Alright, some basic things about the design:
1. needs to pretty (of course)
2. practical
3 save (apart from the fact that it should explode)
Before I started this project I actually wanted to buy one of those “sportdog Tek 1.0” collars, they have very nice design features but we’re to expensive. (still I really love to have one) After some idea’s, sketches and thinking about all the technical things as far as I could, I worked out the end result in a Cad program called “Cambam” a very easy to to use Cad program for Cnc machines. (they have a nice website you can check out) The basics measurements came from the strap and quick release I bought earlier on a random website which I compared first to collars in pet shops.
Aluminium came from no other then broken Apple computer display’s and bottomcases from the aluminium models. (current models) I can easily get these since some of them are being thrown away after replacement here in the workshop. Talk about recycle…
Step 2: The metal pieces
This is one step not anyone can do without a cnc machine…
Although you can do this step with a figure-saw, the results are never gonna be that precise as with a real cnc machine.
I used a Proxxon MF70 modified into a mini cnc machine to cut out all the parts.
(the MF 70 cnc kit works really well with Cambam and Mach3 software for those interested in cnc)
And shapes can be created in a lot of materials, the plastic pieces for the battery case and middle piece we’re also cut with this machine. Learning this stuff is not really that difficult, I did not know a thing about cnc and this is just only my 3rd project on it.
Thank you youtube and everyone for the Cnc lessons on there it caan really help people!)
After the thicker and thinner aluminium parts were cut, I bend them into shape with a pvc tube and my own hands.
Carefully, with some protection against scrates and such…
You can see the basic idea coming together in one of the photo’s.
Step 3: Bending plexiglass
After cutting the plastic pieces with the cnc machine, I needed to bend them in the right shape so it will fit nicer on your neck.
(I forgot to tell you that this will go on a fursuit not a real human neck so that is why the size is so much bigger, but I will wear it on my own neck to)
Plexiglass react’s really well to heat by not melting but becoming more flexible, and can be easily be bend in the right shape.
And when you let it cool down again it will keep that shape without any problem.
I used a bit of metal to keep the heat from my heat-gun away from my desk, and oven gloves to hold the hot plexiglass while it was cooling down. Heat up the piece slowly and bend it the way you want it. Don’t “force” the heat on it or you will burn the plastic.
It may take a couple of times and sometimes you only need to heat a part of it to get it right…
Its finding out while fabricating on this one. (Oh, and keep other stuff well away from the heat gun)
Step 4: Battery Case
A difficult part that needed a lot of attention:
This battery case has a antenna on his side and keeps 2 times 2 battery cells (each 3volts 230 ma) a total of 6 volt’s 930ma. (should be 10 hours of fun)
First sticking all the parts together with tape to keep them together, then drill a small hole all the way through all the layers for the screws to keep it together.
I used a little proxxon hand tool for this job on slow rpm to prevent heat, after that the threads in the base plate could be made.
By heating up the plastic in the previous step the holes for the battery cells, “warped” a bit. Now the battery’s wont fit anymore and needed to be sanded down a bit to make them fit again. The cover will be the ground or negative when put together. The positive side will be explained in the next photo.
The metal strip you see here was heated to the point I could press it straight trough the plastic to the other side. I needed to heat up the metal and plastic multiple times before I could do this. The wires come trough holes that I drilled in there, one hole exactly runs like a L shape going down to the base plate making contact there. (ground) The benefit of seeing trough material is that you can see how you need to adjust your drill while drilling to get the L shape right.
Step 5: Middle section
Alright, some big things needed to be done here:
1. With a special drill (on top of the photo) I made space to lower the screw-head into the aluminum front.
2. Holes needed to be made (I used a proxxon multi-tool) and wirethreads needed to be made to keep it all in place later on.
3. The gaps didn’t line up right since everything was bend later on, so I filed them down until they all lined up as they should.
(just do this slow and keep checking your work)
4. I used a sanding machine to sand everything flat and made it look like one piece.
5. Slowly drilled holes in the side and glued the led’s in the holes.
I also sanded down the surface to let it reflect more of the yellow / red light.
6. Already cut the wires to the correct length and soldered them, I used lots of glue to cover up the contacts, later on the wires will
be painted black.
Step 6: Collar band
The quick release was sawed on with a sawing-machine and some black wire. (unfortunately I do not have photo’s of that)
After all the aluminum parts were cut out, I started to saw them on the black strap with needle and wire.
The tiny holes only allowed for 10 rounds of wire before the needle couldn’t be pushed trough anymore.
Keeping everything together the first few rounds is the most difficult part of this and I needed to redo some parts again in the end. (otherwise it wouldn’t line up correctly)
The last photo shows the wires behind the battery case, I made some room in the back of the battery case to make room for the wires so the hole part would close without gaps.
For more detail: Track-and-explode wolf collar…