
Summary of Time Sensing Bracelet using arduino
The Time Sensing Bracelet is a fun fabric potentiometer project where users select time of day by touching specific wrist positions. It utilizes Eeonyx piezo-resistive fabric, conductive materials, and an Arduino to create an interactive wearable. Although the prototype faced challenges with pressure sensitivity and unstable wire contacts, the article outlines the necessary materials and steps to build this unique device using sewing, fusing, and electronics assembly techniques.
Parts used in the Time Sensing Bracelet:
- Eeonyx piezo-resistive SL-PA coated fabric RL-4-139-4
- Conductive thread
- Neoprene
- Stretch conductive fabric
- Fusible interfacing
- Male and female headers
- Ribbon cable with min. 8 wires
- Solderable Perfboard with copper line pattern
- Arduino USB board
- Velcro
- Regular thread
The Time Sensing Bracelet is a fabric potentiometer. You select your desired time of day by making contact in the corresponding position on your wrist – where your watch would normally be.
There is no point to it but fun.
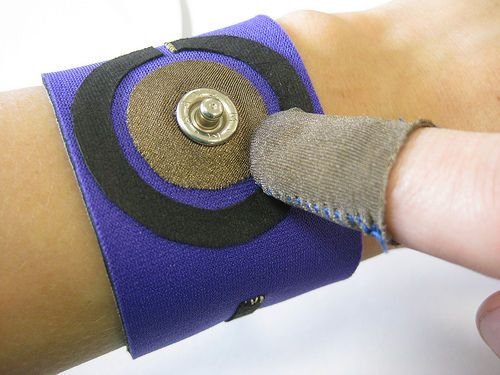
Update: Using some wire wrapped around the central popper to make contact with the resistive ring (circular potentiometer). Unfortunately (though cool too) the Eexonyx fabric is pressure sensitive, thus its resistance varies also on the pressure applied, not only on the position of contact.
Plus, the contact between the wire and Eeonyx is not stable enough. But this is a design issue that can be solved:-)
Step 1: Materials and Tools
- Eeonyx piezo-resistive SL-PA coated fabric RL-4-139-4 from http://www.eeonyx.com
also see http://cnmat.berkeley.edu/resource/eontex_conductive_fabric
- Conductive thread from http://members.shaw.ca/ubik/thread/use.html
also see http://cnmat.berkeley.edu/resource/conductive_thread
- Neoprene from www.sedochemicals.com
- Stretch conductive fabric from http://www.lessemf.com
also see http://cnmat.berkeley.edu/resource/stretch_conductive_fabric
- Fusible interfacing from local fabric store or
also see http://www.shoppellon.com
- Male and female headers from Sparkfun http://www.sparkfun.com/
- Ribbon cable with min. 8 wires
- Solderable Perfboard with copper line pattern from All Electronics http://www.allelectronics.com/
- Arduino USB board from Sparkfun http://www.sparkfun.com/
- Velcro
- Regular thread
TOOLS
- Fabric scissors
- Sewing needle
- Iron
- Soldering station (iron, helping hands, solder)
- Knife for cutting perfboard
- File for filing edges of perfboard
- Wire cutters and strippers
- Pliers
SOFTWARE
- Arduino software free for download from http://www.arduino.cc/
- Processing software free for download from http://processing.org/
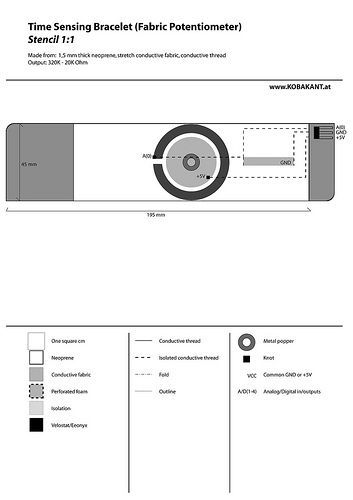
Step 2: Trace and cut stencils
Print out the stencil (see illustration) and trace it to a piece of neoprene. Trace the circle onto a piece of stretch conductive fabric that has fusible interfacing adhered to one side. Trace the disconnected ring and the small rectangle to a piece of Eeonyx fabric that has fusible interfacing adhered to one side.
Cut out all the pieces
Step 3: Fusing
Lay the circle, ring and rectangle into place and fuse with an iron.
!Careful: the Eeonyx fabric will stick to your iron, be sure to put a piece of wax paper in between.
For more detail: Time Sensing Bracelet
- What is the primary function of the Time Sensing Bracelet?
The bracelet allows users to select their desired time of day by making contact at corresponding positions on their wrist. - How is contact made with the resistive ring in the update?
Contact is made using some wire wrapped around the central popper. - Does the resistance vary only on position?
No, the Eeonyx fabric is pressure sensitive so its resistance varies also on the pressure applied, not only on the position of contact. - What issue was found with the contact between the wire and Eeonyx?
The contact between the wire and Eeonyx is not stable enough. - What material is used for the circular potentiometer component?
Eeonyx piezo-resistive SL-PA coated fabric is used for the circular potentiometer component. - Can the design issues mentioned be solved?
Yes, the article states that the design issue can be solved. - What software is required for this project?
The project requires Arduino software and Processing software. - What tool must be placed between the iron and Eeonyx fabric?
A piece of wax paper must be put in between to prevent the Eeonyx fabric from sticking to the iron. - Where can one source the conductive thread mentioned?
Conductive thread can be sourced from http://members.shaw.ca/ubik/thread/use.html or cnmat.berkeley.edu. - What is the purpose of the fusible interfacing in this project?
The fusible interfacing is adhered to the stretch conductive fabric and Eeonyx fabric before tracing and cutting stencils.
