In this post, we will discuss The-Party-Box-Basic-(Spin-Your-Disco-Ball-and-More): This is the quick, easy to throw together party accessory you didn’t know you needed. I’ve made it on 2 occasions for house parties when the urge strikes to make something. Luckily for you all, this time I kept it so I can show you how it’s done 🙂
You will need:
- Arduino Power source – Battery bank + USB cable is ideal, or just a (probably very long) USB cable plugged into any powered USB port
- Arduino
- Continuously rotational servo *
- Disco Ball
- Breadboards and jumper cables (I’ll be using a proto shield because I have it on hand, but you can easily do this without)
- Firefly string (because normal wires/string just aren’t as cool)
- Cable ties/rubberbands/dental floss/whatever-you-have-on-hand if you got to do this on the fly and have the other ingredients lying around.
The other type of servo can be made continuously rotational by hacking the potentiometer. I did this the first time and it worked, but obviously, a normal continuously rotational one would be preferable. If you only have a motor, you could use PWM from the Arduino to achieve similar results.
Optionally you may want individually addressable LED strips (maybe WS2812), other LEDs, lasers or whatever additions you may wish to add on.
One day, I’ll create the Party Box 9000. The plug and play advanced version I’ve got envisioned. Maybe I’ll make it in time for the upcoming Mozamboogy party.
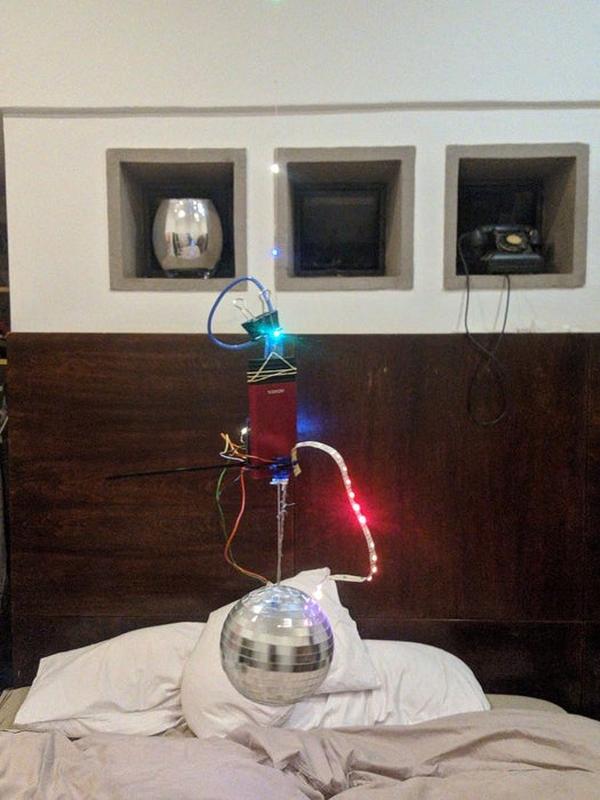
The focus of your assembly should be on weight distribution:
Your disco ball is heavy and if you are creating a setup like mine, you will need to distribute the weight as centrally as possible.
So, from beneath your battery bank, you will want the center of your servo to be roughly centered.
The Arduino will be cable tied (or attached through other means) to the battery bank (if it is made of a conductive material, you may wish to put a piece of plastic between it and the battery bank to insulate it and prevent shorts or another weird behavior), and the breadboard too. In this version I made, I used the proto shield and breadboard so everything is cable tied to the one side of the battery bank. It’s all light enough that it didn’t make much of a difference with regards to weight distribution.
To prevent the servo from slipping down, I have attached it to the horizontal cable tie with a wire tie thing, but you can use cable ties or whatever, or some mirror tape and secure it using the cable tie that holds your Arduino on.
If your disco ball is larger/heavier, you may wish to cable tie both horizontally and vertically, although, for me, this wasn’t necessary.
A short USB cable is recommended for best aesthetics.
Connect the firefly string to the 5v and ground, (creating a 5v and GND rail on the breadboard if you need to. I did because my firefly wire was previously soldered onto header pins from last time – If you don’t have a proto shield and are just using a breadboard, you will want to do this too)
Firefly string is obviously not a necessity, but if you can, it beats using string or something to hang your device. Since I have some, I consider it a necessity
The Party Box – Basic (Spin Your Disco Ball and More) – Step 2: Additional Components
Downfacing lighting – I’ve added one (but add as many as you would like I say!) bright whites LED facing downwards towards the disco ball. I put a 330ohm resistor between the 5v and a breadboard rail, and then the LED between that and GND and pointed it downwards. It would be great to have a bright ring of these – make one. I shall not because it’s getting late and I have things to do tomorrow. I want to publish this tonight – I may be repurposing components tomorrow.
Individually addressable LEDs (WS2812B) – I’ve added a strip of individually addressable LEDs that are rather short in this example (because I have used most of them elsewhere) but you can make your strip pretty long – just adjust the code accordingly. I’ve done a couple of meters in the past of 60 LEDs per meter. Apparently capping off around 512 pixels long, but I’ve not fact-checked this.
Laser – I had a laser that I’ve never tried on anything so I attached it to the 3.3v and GND and orientated it towards the disco ball too. It created little trails on the wall after reflecting off the disco ball.