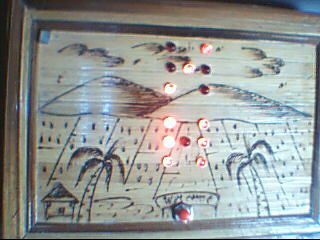
This was a fun project. Push the red button, watch the dice ” ROLL ” then stop on a random roll most every time.
The hart of this game is the ATMEL ATmega328P on a stand alone board. Powered by 4 AA NiMD batteries.
Can you find the SECRET SWITCH in the main picture? Where is the SECRET SWITCH?
The first person that answers the TEST question correctly will win a PRO 3 month subscription to Instructables.
This project was from 2 different places. The schematic from here and the code from there.
The blood and sweat from me.
I am not skilled enough yet to actually write code so Maewert was gracious and offered his code for this project. Also he took time to answer a lot of my coding questions.
Thanks Buddy.
Video Link. to YouTube to see this in action.
Step 1: Resources and Materials
Arduino on a Breadboard
http://itp.nyu.edu/physcomp/Tutorials/ArduinoBreadboard
http://itp.nyu.edu/physcomp/Tutorials/ArduinoBreadboard
http://itp.nyu.edu/physcomp/images/tutorials/Arduino-USB-BB-10.jpg
http://www.instructables.com/id/Arduino-eletronic-double-dice/
BOM:
- 1 ATMege328P-PU
- 1 28 Pin Socket
- 1 Perfboard
- 1 16 Mhz Crystal
- 2 22pF Capacitors
- 1 10K ohm Resistor
- 1 Tact Switch
- 1 NO Push Button
- 14 LED’s
- 14 220R Resistors
- 1 Reed Switch
- 1 Small Magnet
- 4 AA NiMD batteries
- 1 Battery Holder for the AA Batteries
- ? Various wires ect
- 1 Project Box
Step 2: Schematic
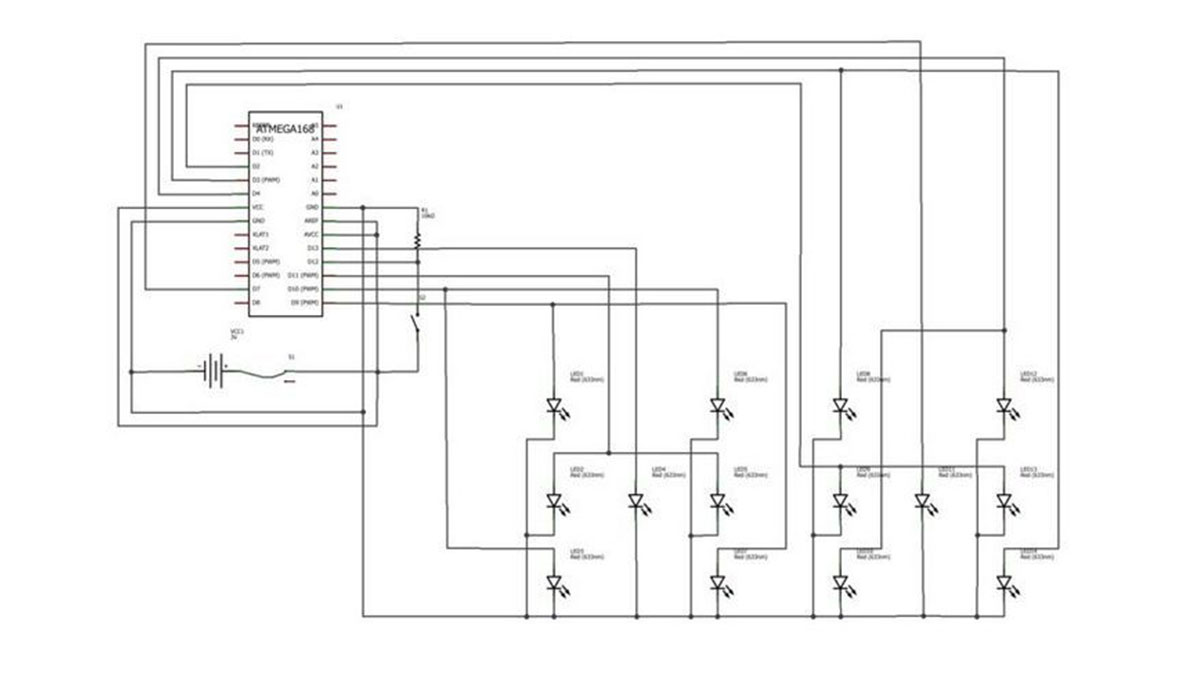
ATmega328P is really over kill for this little project. So i tried to burn a ATtiny2313 with this code using an Arduino as an ISP, not successful.Then i decided to to re burn the 328 bootloader with an 8 Mhz clock so as to use less components in the project. 8 Mhz would be just fine to use, the ATtiny 2313 runs at 8 Mhz anyway. Not successful.
So i am using a 328P at 16Mhz with an external crystal for this project.
FYI a ATmega328 is not supported by Arduino so make sure you get a ATmega328P or ATmega328P-PU.
Step 3: The Box
I have had it for several years so it is a little rough from ware.
Measures 5″ tall. 7 1/2 ” wide. 5 1/2 ” deep.
I believe i paid $1.16 US money.
Step 4: Prepare the Box
Lay the template on you box where you see fit. I put mine direct in the upper center. Left room the the Dice Roll switch at the bottom of the LED’s.
Step 5: The Build, LED’s
I put all the cathodes to the outside so i could bend them flat to each side. Then i cut the cathodes and the 220R resistors very short.
Soldered the resistors from the cathodes to the ” flat wire “. The flat wire is used for making custom Nicd battery packs so it conducts and solders very well. The two center LED’s i had to make the resistors L shaped to fit well to the ground strap.
The LED’s are wired; Bottom Left to Top Right together. Bottom Right to Top Left together. Left Center and Right Center together, then Center is all by itself. That gives 4 connections per dice. The 4 wires per Dice go to the ATmega 328P, plus ground. 9 wires we need to run to the 328P.
AA NiMD batteries
Battery Holder for the AA Batteries
Various wires ect
Project Box
For more detail: Arduino Double Dice Jewelry Box w/ Secret Switch