As per an assignment in my digital multi-media class, I’ve combined two Arduino-related tutorials into a functional object! The result is a pair of infinity mirrors that flash red and blue depending on minute fluctuations in ambient temperature.
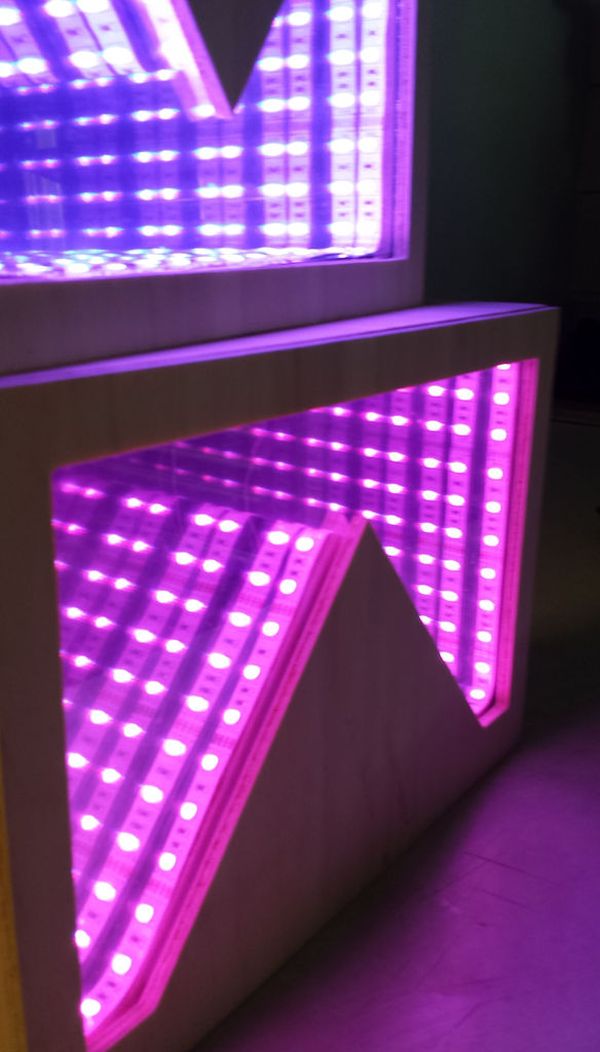 This is my first experience with Arduino, and my first attempt at building an electronic device from scratch—that is to say, there’s lots of rough edges and things I’d do differently if I were to approach this project again, but overall I’m happy with the outcome and think it looks hella sweet on my desk at home.
I would recommend reading the following three tutorials before you begin, as this one relies heavily on all of them.
http://www.instructables.com/id/Arduino-controlled-RGB-LED-Infinity-Mirror/ – Very thorough description of infinity mirror construction and the electronic components necessary to make the LED strips function. My project was largely inspired by this instructable, and the following tutorial will focus more on the implementation of the temperature sensor than the construction of an Arduino-controlled infinity mirror.
http://bildr.org/2011/07/ds18b20-arduino/ – The temperature sensor I used, as well as a much more concise code to operate it. My code is very similar, with only a few modifications so it can save the last two values and compare them.
http://learn.adafruit.com/rgb-led-strips/usage – This is the basic hardware configuration and code I used for my LED strips, only I doubled it in order to run two different strips from the same Arduino, and combined the code with the temperature sensor data.
Material List
– Arduino Uno, breadboard, and perforated board for later stabilization.
– 22-gauge hook up wire in various colors (red and black for denoting power and ground, as well as blue and green for identifying the RGB LED pins would probably be ideal)
– 1 meter RGB LED strip (x2)
– N-Channel MOSFETS (x6)
-Barrel jack breadboard adapter
– 12V/5A power supply (I purchased one from ebay for ten bucks and had a lot of luck with it)
– DS18B20 One-wire Temperature Sensor (I recommend buying multiples–I had to manipulate the pins a lot and ultimately broke one off in the final stretch. Luckily I foresaw this situation and purchased a couple of them to begin with.)
– 4.7K Resistor
– Four-conductor hook up cable, for aesthetic purposes. I have two 2’ strands running from my mirrors to the arduino/power source, as opposed to eight lose wires.
– 2’ x 4’ sheet of ¼” whitewood board. The plywood core wasn’t ideal and stands out on the final product, but it was cheap and appropriate for this prototype.
– 12” mirror tiles (x2) The ones I found come in packs of six and are a little pricey, so any relative sized, cheap alternative works here.
– 11 ½” x 8” sheet of glass (x2)
– ½” foam sheet, for padding the inside edges of the box so the LED strips are readily visible from any angle and form the desired shape. (This was the faster, more readily available option and by far not the best one. I’d rather gather the appropriate measurements and cut this out of a half inch piece of wood.)
– Mirrored window tint, for the two-way mirror.
– Electrical tape, black masking tape, and possibly heat shrink tubes if you want something with more permanence, although I didn’t use them in this project.
– Hot glue for constructing the box and super glue for adhering the LED strip to the inside edges.
– Soldering iron and solder, if you intend to move the components from the breadboard to the perforated board. Otherwise you might be able to get away without them.
– Wire strippers
– Table saw
– Glass cutter and duckbill clamp or similar tool for applying even pressure to the glass and mirror in order to break it along the groove.
– CNC machine for cutting out the two lamp faces.
Step 1: Arranging the LED strips
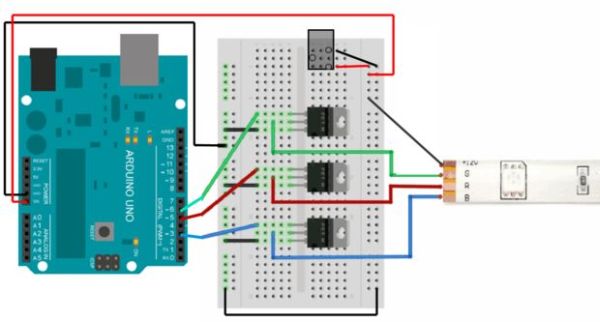
Adafruit does an amazing job of breaking down LED strip usage for newbies, and because I need a lot of hand holding I followed their diagram to the letter. The only marginally frustrating part for me was the MOSFETs, as I got the pins switched around several times while soldering components to the perforated board and nearly had an existential meltdown taking it all apart. Don’t do that.
Above is the Adafruit diagram, with some modifications as I chose to power my LED strips with an external barrel jack adapter. Once the power supply is hooked up to the rails on the breadboard and to the vin and ground pin on the Arduino, you can populate the board with your MOSFETs and follow the diagram above. Then, repeat it for the second LED strip.
(In reference to the MOSFET image, the upper pin leads to the pin on the Arduino, the middle one leads to the appropriate wire on the LED strip, and the bottom pin leads to ground.)
Step 2: One Wire Temperature Sensor + Code
I expected the sensor to be the most daunting aspect of this project, but this was one thing not dead-set on making me feel like a high-functioning caveman. The DS18S20 is extremely easy to hook up and the code I found on bildr was fairly easy for me to understand despite being processing illiterate.
I arranged the components on a breadboard following the diagram above, then I downloaded the zip file found here (http://bildr.org/2011/07/ds18b20-arduino/) and followed the two step process necessary to print the temperature data to the serial monitor. Because I provide the modified sensor code below, however, all you need to do place the “One Wire” folder into the Arduino library and you should be good to go.
To achieve the LED fade, I needed to store the last two values for comparison, and to do that I made a copy of the getTemp() function, renamed it, and called the two functions in tandem with a delay in between. The finished code(with LED pins assigned and fade established) is not as optimal as it could be, however it seems to function flawlessly.
Also note what pins the colors are assigned to, and make sure this is reflected on the breadboard.
#define REDPIN1 10
#define GREENPIN1 9
#define BLUEPIN1 11
#define REDPIN2 5
#define GREENPIN2 6
#define BLUEPIN2 3
#define FADESPEED 8 // make this higher to slow down
#include <OneWire.h>
float tempData[1];
float tempDataPrev[1];
int DS18S20_Pin = 2; //DS18S20 Signal pin on digital 2
//Temperature chip i/o
OneWire ds(DS18S20_Pin); // on digital pin 2
void setup(void) {
Serial.begin(9600);
pinMode(REDPIN1, OUTPUT);
pinMode(GREENPIN1, OUTPUT);
pinMode(BLUEPIN1, OUTPUT);
pinMode(REDPIN2, OUTPUT);
pinMode(GREENPIN2, OUTPUT);
pinMode(BLUEPIN2, OUTPUT);
}
//Violet value 200, 0, 255
//Red value 255, 0, 0
//Blue Value 0, 0, 255
void loop(void) {
float temperature = getTemp();
delay(1000);
float temperaturePrev = getTempPrev();
int i;
int r1, g1, b1;
int r2, g2, b2;
for(int i = 0; i < 1; i++){
tempDataPrev[i] = temperaturePrev;}
for(int i = 0; i < 1; i++){
tempData[i] = temperature;}
analogWrite(BLUEPIN1, 255);
analogWrite(REDPIN1, 255);
analogWrite(GREENPIN1, 0);
analogWrite(BLUEPIN2, 255);
analogWrite(REDPIN2, 255);
analogWrite(GREENPIN2, 0);
if (tempDataPrev[0] == tempData[0]){
//initial values
analogWrite(BLUEPIN1, 255);
analogWrite(REDPIN1, 255);
analogWrite(GREENPIN1, 0);
analogWrite(BLUEPIN2, 255);
analogWrite(REDPIN2, 255);
analogWrite(GREENPIN2, 0);
}
if (tempDataPrev[0] < tempData[0]){
analogWrite(BLUEPIN2, 255);
analogWrite(REDPIN2, 255);
analogWrite(GREENPIN2, 0);
//from violet to blue to violet
for (r1 = 255; r1 > 0; r1–){
analogWrite(REDPIN1, r1);
delay(FADESPEED);}
for (r1 = 0; r1 < 256; r1++) {
analogWrite(REDPIN1, r1);
delay(FADESPEED);}
}
if (tempDataPrev[0] > tempData[0]){
analogWrite(BLUEPIN1, 255);
analogWrite(REDPIN1, 255);
analogWrite(GREENPIN1, 0);
//from violet to red to violet
for (b2 = 255; b2 > 0; b2–){
analogWrite(BLUEPIN2, b2);
delay(FADESPEED);}
for (b2 = 0; b2 < 256; b2++){
analogWrite(BLUEPIN2, b2);
delay(FADESPEED);}
} }
float getTempPrev(){
//returns the temperature from one DS18S20 in DEG Celsius
byte data[12];
byte addr[8];
if ( !ds.search(addr)) {
//no more sensors on chain, reset search
ds.reset_search();
return -1000;
}
if ( OneWire::crc8( addr, 7) != addr[7]) {
Serial.println(“CRC is not valid!”);
return -1000;
}
if ( addr[0] != 0x10 && addr[0] != 0x28) {
Serial.print(“Device is not recognized”);
return -1000;
}
ds.reset();
ds.select(addr);
ds.write(0x44,1); // start conversion, with parasite power on at the end
byte present = ds.reset();
ds.select(addr);
ds.write(0xBE); // Read Scratchpad
for (int i = 0; i < 9; i++) { // we need 9 bytes
data[i] = ds.read();
}
ds.reset_search();
byte MSB = data[1];
byte LSB = data[0];
float tempRead = ((MSB << 8) | LSB); //using two’s compliment
float TemperatureSum = tempRead / 16;
return TemperatureSum;
}
float getTemp(){
//returns the temperature from one DS18S20 in DEG Celsius
delay(2000);
byte data[12];
byte addr[8];
if ( !ds.search(addr)) {
//no more sensors on chain, reset search
ds.reset_search();
return -1000;
}
if ( OneWire::crc8( addr, 7) != addr[7]) {
Serial.println(“CRC is not valid!”);
return -1000;
}
if ( addr[0] != 0x10 && addr[0] != 0x28) {
Serial.print(“Device is not recognized”);
return -1000;
}
ds.reset();
ds.select(addr);
ds.write(0x44,1); // start conversion, with parasite power on at the end
byte present = ds.reset();
ds.select(addr);
ds.write(0xBE); // Read Scratchpad
for (int i = 0; i < 9; i++) { // we need 9 bytes
data[i] = ds.read();
}
ds.reset_search();
byte MSB = data[1];
byte LSB = data[0];
float tempRead = ((MSB << 8) | LSB); //using two’s compliment
float TemperatureSum = tempRead / 16;
return TemperatureSum;
}
For more detail: Temperature-Sensitive Infinity Mirro