I love LED and stars, and after saw another instructables about star constellation and some mood lighting that was very inspired and I decided I wanted to take that idea and want to create some mood lighting with some skies component such as stars, and cloud, for the bonus there will be some effect for rain and thunder. I’m so excited about this project because this is for my own bedroom decoration.
Okay let’s get started!
Please vote for me for Make it Glow Contest, Thank you 🙂
This is the video of my Star Constellations – Sky on the Wall.
(change the quality for a better view)
Step 1: Parts and tools
Here is all you will need:
(1) Arduino UNO R3
(20 plus) LEDs Super Bright (white, red, green, blue, yellow, RGB flash)
(13) 100 ohm / 220 ohm resistors
(1) Recycled paperboard
(1) IR Receiver
(1) Optical Fibers
(1) 9V battery
(1) IR-Remote
(1) on-off switch
(4) Old-broken CD
(1) Unused CD case
– Fishing line
– Breadboard
– Shrink tubing
– Copper Metal Foil Tape
– Rainbow wire
– Male header extended
– Cotton
– Transparent Plastic Sheet
Optional :
– some knickknacks
– nut and bolts
– Acrylic paint color
Tools :
– Soldering iron
– Solder
– Mini drill
– Pliers
– Cutter
– PVC Glue
– Hot Glue
– Helping hands (if you don’t have it, you can build it from my helping hands instructable)
Step 2: Planning

#1 Cloud = Rain Cloud
#2 Cloud = Thunder Cloud
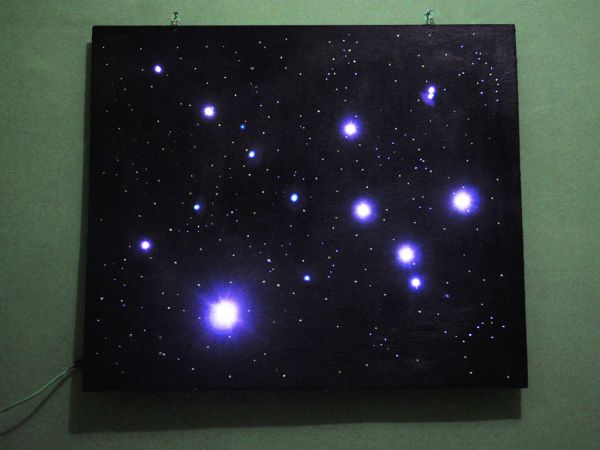
You can print the space image from google, but I choose to paint it on my board.
For the star constellation, you can choose the stars as you want. For my main star was my own horoscope, Aries.
Step 3: The Circuit
Let’s build it on breadboard first. First, lets put the components on a breadboard so we could see how it worked and how to fit it onto the perfboard. The circuit diagram was made with Fritzing.
IR Receiver that I used is TSOP 1736, the pin already on image attached. And for setting your IR remote you can go to Enjoying Electronics’s ible’ How to Use IR Remotes with Arduino to learn it. And trust me, it’s really easy to follow.
How many LEDs do you want to make this project, is depend on your decide.
Here the list of the LEDs in this project :
Star Constellation
1) 3 white LEDs (group 1)
2) 4 white LEDs (group2)
3) 3 white LEDs (group 3)
#1 Cloud (Rain Cloud)
1) 1 blue 1 white LED (for the cloud)
2) 4 white LEDs (for rain effect)
3) 1 RGB flash (for rainbow effect)
#2 Cloud (Thunder Cloud)
1) 1 orange 1 white LED (for the sunny cloud)
2) 1 red 1 blue LED (for gloomy effect)
3) 1 red 1 orange LED (for thunder light)
Additional LEDs for fiber optic
1) 6 white LEDs
Pin connections:
Star group 1 Digital Pin 2
Star group 2 Digital Pin 3
Star group 3 Digital Pin 4
Blue-white Digital Pin 5
White-white Digital Pin 6
RGB Digital Pin 7
White-orange Digital Pin 8
Red-blue Digital Pin 9
Red-orange Digital Pin 10
IR Receiver Digital Pin 11
Test everything out and make sure that you’re circuit is going to work before you start soldering.
Step 4: The Code
Upload the code into your Arduino. And don’t forget to change the result.valuewith your own number. If you still don’t get it how to set your IR remote please go to this ible’ How to use IR Remotes with Arduino by Enjoying Electronics. It’s really helpfull and really easy to follow.
change the code (result.value == ……………..) with your remote number.
You can change the code and make another combination of the LED as you like.
And you can use TV remotes, DVD remote, Car MP3 remotes, all remote will work.
For more detail: Sky on the Wall (Mood Lighting-IR remote)