Summary of Dual Axis Tracker V2.0
Summary: This article describes a redesigned open-source dual-axis solar tracker meant as an educational hobby project. Improvements include a custom Arduino shield, sensor holder PCB, lighter laser-cut wood parts, and plug-and-play wiring. The write-up covers tracker types, parts, PCB prep, kit availability, and assembly guidance, with links to code, hardware files, and a project video.
Parts used in the Dual Axis Tracker:
- Screw Drivers
- Computer
- Laser Cutter or CNC Router (optional)
- Arduino Uno
- Solar Tracker Shield (with Pin Headers and 10,000 ohm Resistors)
- Sensor Holder PCB (with Pin Headers and Light Detecting Resistors)
- Female to Female Jumper Cables
- 2 x 9G Metal Gear Servos
- Laser Cut or CNC Wooden Parts
- 4 x M3 Screws and Nuts (~14-16 mm length)
- 4 x Size 2 Wood Screws (~1/4 inch) or M1 Screws
- 21 x 8-32 Screws (1/2 inch length)
- 1 x 8-32 Screw (3/4 inch)
- 1 x 8-32 Screw (2.5 inches) and optional nut
- 24 x 8-32 Nuts
- 4 x Rubber Feet
- Optional: Solar Cell (6V 200mA)
- Optional: LED Volt Meter
- Optional: Wire for connections
Way back in the year 2015 we designed a Simple Dual Axis Tracker for use as a fun student or hobby project. It was small, noisy, a little complicated, and provoked a lot of really weird community comments. That being said, three and a half years later we’re still getting emails and phone calls from people all over the world wanting to build their own.
Due to the success of our original project post, youtube video, and the kits we were selling we received a wide range of feedback from a wide range of users. Most of it good, some of it annoying, and quite a few that were along the lines of “wiring this thing up is really darn complicated so please spend an hour on the phone with us to figure it out.” With that in mind we spent several months redesigning the project from the ground up to make it a much more streamlined and easy activity.
In this write up you’ll find information about our upgrades, how solar trackers work, a parts list, links to our Open Source hardware, Open Source code, and links to where you can buy many of these things.
Full Disclosure: We do sell this project and all the parts as an educational kit. You don’t need to buy anything from us to make this project. In fact you can use all our resources to get your own PCBs made up, laser cut your own wood at a local Maker Space or University, or even just use a bunch of cardboard and hot glue to create your own awesome creation. This is an Open Source project through and through.
Give Aways: We’re trying something new in 2019. Follow us on instructables, facebook, Instagram, and or youtube for a chance to win some free parts (US Residents only). Just like and comment on our postings and videos for this project and we’ll pick some winners over the next month. We’ll give away a couple batches of PCBs and a couple of few kits.
Step 1: Why Solar Trackers?
Solar Panels are everywhere. They’re inexpensive, readily available, and very easy to use. There are tens thousands of small scale solar panel projects found all over youtube and DIY websites.
Most people probably have a couple of larger scale solar setups in their neighborhood thanks to the proliferation of Solar Group Buys and government incentives. In the vast majority of these setups solar panels are fixed onto the roof of a building pointing 45 degrees South (when in the Northern Hemisphere). Fixed solar setups are by far the most simple way of powering a home or building as the require very little maintenance and upkeep. We frequently tell people who contact us that it’s much more cost effective to NOT build a solar tracker for your home but instead just add more solar panels to your array.
However, the most efficient way of gathering energy from a single panel is via a solar tracker. This allows the solar panel to be in the optimal position all day long which increases the energy generation by over 20%. This kind of system is perfect for buildings or facilities that don’t have a lot of flat roof space or situations where solar energy is inconsistant.
We’re going to demo an Active Solar Tracker that moves on both an X and Y axis. This kind of system uses a micro controller, or well designed analogue circuit, and sensors to keep the solar panel in the right position. While this does make for a really slick demo that you can show off using a flashlight in a classroom, it also uses a lot of power and has many moving parts.
A Date Based Tracker or Scheduled Tracker uses date and time information to follow a set path every day since the movement of sun is 100% predictable. One such example of this is the project by Instructable user pdaniel7 and it uses two servos in a novel design to very efficiently track the sun. The key to this type of design is making sure the software is set up to be most efficient for your exact location.
A Person Powered Tracker is one that is powered by people. This can range from something as simple as a person changing the angle of their solar panels a couple of times a year to putting a panel on a rotating platform attached to a weighted pulley that is reset each morning. For instance a local farmer we know has several solar panels mounted on PVC pipes in his yard. Every month he slightly changed the position and angle of them. It’s very simple and helps gain him a few more amps of energy out of his system.
Step 2: Upgrades to the Original Design
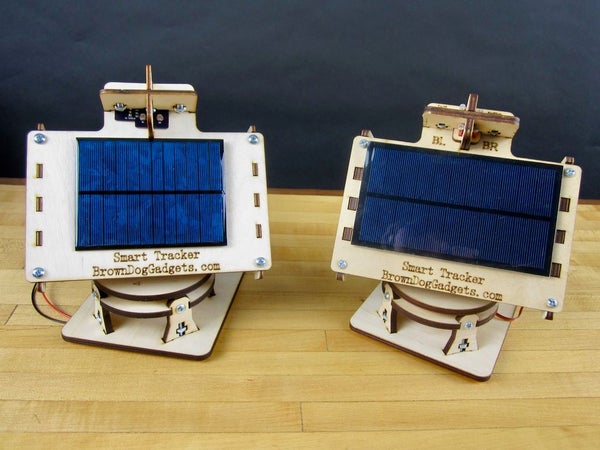
Our original version was more concerned with physical mechanics than it was about electronics and this proved to be its biggest downfall. When we started redesigning this project we made the decision to change our wiring from a ‘bundle of wires’ approach to an easy ‘plug and play’ approach since our audience tended to be students.
The first thing we did was create a custom Arduino Shield for plugging in the servos and sensors. The original design used a generic Arduino Sensor Shield that worked well for the Servos but not well for the Sensors. Our Shield is nothing special overall and it was by far the most simple aspect to design. (We’ve also used it for other projects where we needed to plug in a simple sensor and a servo.)
To keep the sensors in place we designed a very simple sensor holder that could easily screw down to the wood. A set of pin headers then allowed us to connect the sensor PCB to the shield with female jumpers. Trouble shooting this setup is far easier than our original ‘bundle of wires’ or a breadboard.
Lastly we went over our design and changed quite a bit of the wood from quarter inch to eighth inch to cut down on weight. While we never had any reports of people having issues with their 9G Servos burning out the less weight they were moving the better. This also cut down on cost and shipping weights for us since we tend to ship a lot of kits internationally.
Step 3: Parts Needed
To build this project you’re going to need the following items:
Tools:
- Screw Drivers
- Computer
- Laser Cutter or CNC Router if you’re cutting out the parts yourself
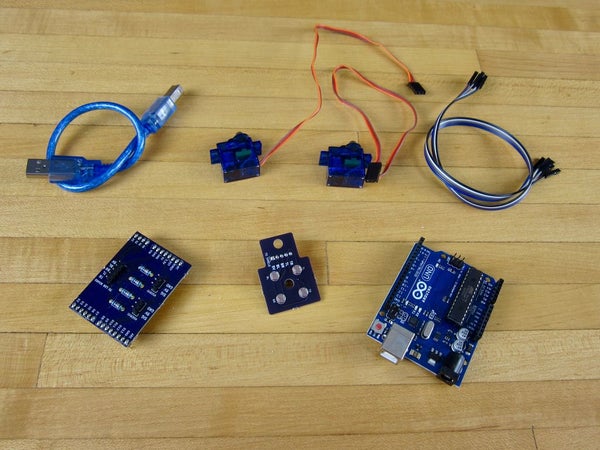
Electronics:
- Arduino Uno
- Solar Tracker Shield (Pin Headers and 10,000 ohm Resistors)
- Sensor Holder PCB (Pin Headers and Light Detecting Resistors)
- Female to Female Jumper Cables
- 2 x 9G Sized Metal Gear Servos
Hardware:
- Laser Cut or CNC Wooden Parts
- 4 x M3 Screws + Nuts in around 14-16mm length
- 4 x Size 2 Wood Screws at a 1/4th inch length, or some M1 Screws of similar length
- 21 x 8-32 Screws at 1/2 inch length
- 1 x 8-32 at 3/4th inch
- 1 x 8-32 Screw at 2.5 inches in length, and an optional nut
- 24 x 8-32 Nuts
- 4 x Rubber Feet
Optional:
- Solar Cell (6V 200mA is what we use)
- LED Volt Meter
- Wire to connect the two together
Most of these parts are pretty easy to find. If you want to get your own PCBs made up you can do so through OSHPark.com or other PCB services. Make sure you get Metal Gear 9G Servos for the extra torc they provide.
Lastly, we do in fact make and sell a kit for this that includes everything. We also sell just the wooden parts and just the electronics as we received a lot of requests for option. Our kits are already soldered up, include all the parts you’d need to build this project, and we provide customer support.
Aaaaaaaaaand before we start getting lots of angry weird comments from people, this is a 100% Open Source project. Feel free to make your own using our directions.
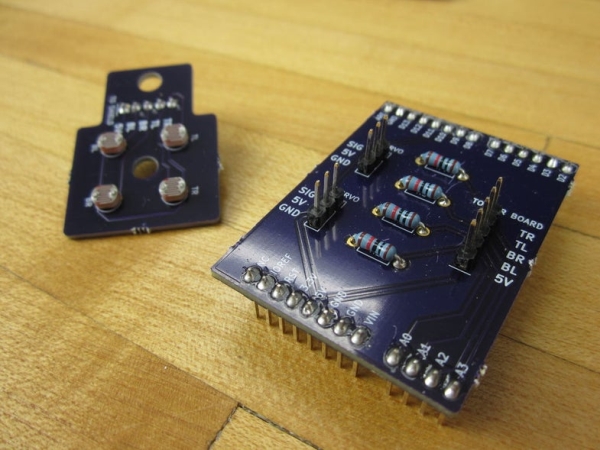
Step 4: Preparing the PCBs
If you’re using our kits or parts the two PCBs will already be soldered for you.
If you want to get your own made up you can find our PCB files on our GitHub Repo and then use a service such as OSHPark to get some PCBs made up. You’ll also need some 10,000 Ohm Resistors, Pin Headers, and Light Detecting Resistors to populate the boards.
In general this is pretty easy through hole soldering. Be sure to use a soldering iron with an appropriate tip on the end.
Shield Soldering: Solder the Servo and Sensor Pin Headers facing Up and the Arduino connecting pin headers facing down.
Sensor Soldering: Light Detecting Resistors face Up, Pin Headers face down.
We also have a PCB designed that uses an Arduino Nano, but it’s untested. If someone does make one of these we’d love to see it in action!
Source: Dual Axis Tracker V2.0
- What is the Dual Axis Tracker project about?
It is an open-source educational dual-axis solar tracker redesigned for easier plug-and-play assembly using an Arduino shield, sensor PCB, servos, and laser-cut parts. - Can I build this without buying the kit?
Yes, the project is fully open source and you can source parts, get PCBs made, laser cut parts yourself, or use cardboard and hot glue. - What electronics are required?
The project uses an Arduino Uno, a Solar Tracker Shield with 10,000 ohm resistors, a Sensor Holder PCB with light detecting resistors, jumper cables, and two 9G metal gear servos. - Do I need special tools to make the wooden parts?
A laser cutter or CNC router is recommended if cutting your own wooden parts, but alternatives like cardboard can be used for prototyping. - How are the PCBs prepared?
Populate boards with 10,000 ohm resistors, pin headers, and light detecting resistors; solder servo and sensor pin headers up on the shield and Arduino headers down. - Are kits soldered and ready to use?
The article states kits are sold pre-soldered and include all parts and customer support. - What upgrades were made from the original design?
Upgrades include a custom Arduino shield for plug-and-play, a simple sensor holder PCB, lighter 1/8 inch wood parts, and simplified wiring. - Is there an Arduino Nano PCB option?
Yes, there is a PCB designed for an Arduino Nano but it is untested according to the article.