
Summary of SIMPLE DRAM TESTER BUILT WITH SPARE PARTS
This article describes a DIY DRAM tester built by Jan Beta using an Arduino and spare parts to identify faulty memory chips in vintage computers. The device supports 4164 and 41256 DRAM chips, commonly found in systems like the Apple II, Commodore 64, ZX Spectrum, and Amiga. It operates via a ZIF socket and reset switch, indicating results with green (good) or red (bad) LEDs. While it effectively detects dead chips, occasional false passes may occur.
Parts used in the DRAM Tester:
- Arduino
- Electronic components
- ZIF socket
- Reset switch
- LEDs (green and red)
Some of the most popular vintage computers are now more than forty years old, and their memory just ain’t how it used to be. Identifying bad memory chips can quickly become a chore, so [Jan Beta] spent some time putting together a cheap DRAM tester out of spare parts.
This little tester can be used with 4164 and 41256 DRAM memory chips. 4164 DRAM was used in several popular home computers throughout the 1970s and 1980s, including the Apple ][ series, Commodore 64, ZX Spectrum and many more. Likewise, the 41256 was used in the Commodore Amiga. These computers are incredibly popular in the vintage computing community, and its not uncommon to find bad memory in any of them.
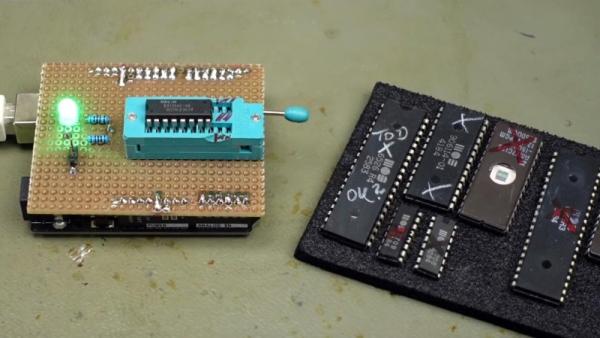
With an Arduino at its core, this DRAM tester uses the most basic of electronic components, and any modest tinkerer should have pretty much everything in stock. The original project can be found here, including the Arduino code. Just pop the suspect chip into the ZIF socket, hit the reset switch, and wait for the LED – green is good, and red means it’s toast.
It’s a great sanity check for when you’re neck deep in suspect DRAM. A failed test is a sure sign that the chip is bad, however the tester does occasionally report a false pass. Not every issue can be identified with such a simple tester, however it’s great at weeding out the chips that are definitely dead.
If you’re not short on cash, then the Chip Tester Pro may be more to your liking, however it’s hard to beat the simplicity and thriftiness of building your own simple tester from spare parts. If you’re a little more adventurous, this in-circuit debugger could come in handy.
Source: SIMPLE DRAM TESTER BUILT WITH SPARE PARTS
- What vintage computers use the supported DRAM chips?
The 4164 chip was used in the Apple ][ series, Commodore 64, and ZX Spectrum, while the 41256 was used in the Commodore Amiga. - How does the tester indicate if a chip is good or bad?
A green LED means the chip is good, and a red LED means it is bad. - Can this tester be used on 41256 DRAM chips?
Yes, the tester can be used with both 4164 and 41256 DRAM memory chips. - Does the tester guarantee that all bad chips will be identified?
No, the tester occasionally reports a false pass and cannot identify every issue. - Is there a commercial alternative mentioned for those not short on cash?
Yes, the Chip Tester Pro is suggested as an alternative for those willing to spend more money. - Where can the original project code be found?
The original project including the Arduino code can be found at the provided link in the article text.
