
Summary of SensoDuino: Turn Your Android Phone into a Wireless Sensors Hub for Arduino
SensoDuino is a free Android app that transforms a smartphone into a wireless sensor hub for Arduino projects. It captures data from built-in sensors like GPS, gyroscope, and accelerometer, then transmits this data via an HC-05 Bluetooth module to an Arduino Uno or PC. The app logs readings to a text file and allows users to control transmission frequency and logging settings. This setup eliminates the need for expensive physical shields or USB host hardware, offering a cost-effective solution for robotics, UAV guidance, and environmental monitoring.
Parts used in the SensoDuino Project:
- SensoDuino Android Application
- Android Mobile Device
- HC-05 Bluetooth Module (Breakout Board recommended)
- Arduino Uno Microcontroller
- Resistors (2K and 1K ohm) for voltage division
- Tera Term Software (for Windows debugging)
UPDATES
- Nov 23, 2013: SensoDuino 0.160 gets a face left.
- Nov 19. 2031: OPINION: The Amazing Synergy Between Arduino & Android.
- Nov 19, 2013: SensoDuino 0.159 is out. Android phone date (y,m,d) and time (h,m,s) are supported as sensors. Support for Android KitKat (4.4/API 19).

INTRODUCTION
Think of SensoDuino as having over a dozen virtual shields for your Arduino each providing a function or feature such as GSM, GPS, Gyro, etc but without having to stack or wire these components. SensoDuino is a free Android application that captures data from sensors built into your Android mobile device then transmits the data over the HC-05 Bluetooth module to Arduino Uno or any device with serial Bluetooth capabilities such as a Windows PC, Mac, or Bluetooth equipped microcontroller. SensoDuino also saves the captured data to a comma-delimited text file. This app has been tested and designed for the HC-05 Serial Bluetooth module. Other Bluetooth modules may or may not work. Please refer to comments by users who tried other Bluetooth modules with this app.
You can install SensoDuino from Google Play only.
https://play.google.com/store/apps/details?id=com.techbitar.android.sensoduino
You can control the frequency of sensor data reading, transmitting, and logging (subject to the specifications of the sensor vendor.) This is my second Android app for Arduino Uno. You might also be interested in my first app Andruino which is a simple 2-way Bluetooth-based Android controller for Arduino Uno.
SensoDuino eliminates the need for USB Host hardware for your phone or Arduino Uno. For Arduino Uno or microcontroller, you only need a $10 HC-05 Bluetooth module (or equivalent).
Save over $200 in sensors and parts for your Arduino Uno or microcontroller project, if you already have a mid-range Android device such as my Samsung Galaxy II Plus. See section titled: Android: A Capable Electronics DIY Platform.
SUPPORTED SENSORS
SensoDuino recognizes the following Android sensors: GPS, Orientation, Gravity, Rotation Vector, Gyroscope, Accelerometer, Linear Accelerometer, Magnetometer, Light Level, Audio Level, Proximity, Pressure, Temperature, and Relative Humidity.
Some software (virtual) sensors relay on the presence of hardware sensors to function. For example, the gravity sensor, linear acceleration sensor, and rotation vector sensor all of these software sensors relay on the presence of hardware gyro sensor on your Android device to function.
SensoDuino also features an Android sensor scanner that will list hardware and software sensors supported by your Android device as well as key sensor specifications such as max power consumption, resolution, vendor, etc. Some Android devices have duplicate sensors from different vendors. The Android SDK will return the default sensor.
FEATURES OVERVIEW
- Reads Android sensors.
- Saves sensor readings to comma-delimited text file.
- Transmits readings in ASCII comma-delimited format via Bluetooth.
- Lists your Android device’s built-in sensors both hardware and software (virtual sensors).
- Set speed of sensor data capturing, logging, and transmission from 100 milliseconds to 10 minutes (subject to sensor limits).
- Keeps track of accuracy for logged sensor readings and provide visual clues for inaccurate sensor data.
- Geo-tags sensor readings using your Android device GPS.
- Optimized for speed of operation and transmission.
- Keeps device awake to prevent loss of sensor data logging.
- Scan and list available sensors in your device and their specifications.
WHAT CAN YOU DO WITH SENSODUINO
With the help of Arduino or other microcontrollers, SensoDuino can be used in robotics and UAV guidance. Its support for 12 motion and environment sensors covers a wide range of sensory feedback. Also, SensoDuino can be used for logging. The ability to set the speed of logging from 10Hz to once every 10 minutes allows for high-speed as well as time-lapse logging of sensor readings.
PROJECTS BASED ON SENSODUINO
Bluetooth-controlled Pan/Tilt Servo Platform Using Android (SensoDuino) & Arduino
http://www.techbitar.com/bluetooth-controlled-pan-tilt-servo.html
IR Remote Control Station for SensoDuino
http://www.techbitar.com/universal-ir-remote-control-station-for-android.html
THANKS
Special thanks to colleagues from PIN13 Protospace who helped with testing, usability, guide review and proofreading. Mainly, I wish to thank Jafar Quttaineh for his detailed product testing and for his invaluable insights and feature suggestions. Also thanks to Mujahed Al-Tahle for his detailed analysis and testing of the product and guide.
PLEASE RATE ON GOOGLE PLAY
This is a free app and only through your ratings can I determine if it’s worth supporting or discontinuing.
Step 1: How to Use SensoDuino
SensoDuino is very simple to use. Basically you have rows of sensor names (number of sensors may change in the future). Each sensor has three checkboxes next to it labeled On, Tx, and Log:
- ON: The first checkbox turns the sensor On or Off which means SensoDuino is either reading this sensor or not.
- TX: The second checkbox when enabled, SensoDuino will transmit the associated sensor readings via Bluetooth to any paired and connected Bluetooth serial device.
- LOG: When the third checkbox is checked, the associated sensor readings are logged to a comma-delimited text file named “sensoduino.txt” in the root of your Android’s SD card.
SENSOR READING FREQUENCY
You can control the speed of sensor reading from the Preferences menu. You have a choice between 100 millisecond (10 Hz) to 10 minutes. The speed of the sensor is subject to the limits of the vendor specifications. Most GPS sensors today generate location data once per second (1 Hz). Some GPS modules generate location data 10 times per second (10 Hz). On the other side of the speed spectrum, some sensors generate readings over microseconds.
SENSOR SENSITIVITY
Motion sensors (gyro, accelerometer, magnetometer) are sensitive to environmental conditions such as presence of magnetic field or slight physical vibrations. So even when your phone is placed on a flat stationary surface, you will still see changes in sensor reading affecting mostly the least significant digits. The least significant digits of motion sensor readings may produce more data than you need for your application. Your application requirements should determine how many digits will be truncated or kept.
POWER DRAIN
SensoDuino is a power-hungry app. Between active sensors, Bluetooth transmission, logging to device storage, and keeping your device awake so as not to interrupt sensor readings, you are bound to drain your battery.
For prolonged use of SensoDuino, an additional power source should be considered either in the form of power brick, solar/wind energy, or power outlet if one is available.
There are many tips on the web on how to conserve your mobile device’s battery power that could extend your SensoDuino logging time significantly.
For example, enabling Airplane Mode on you device can save battery power. Different vendors use different names for Airplane Mode such as In-Flight Mode.
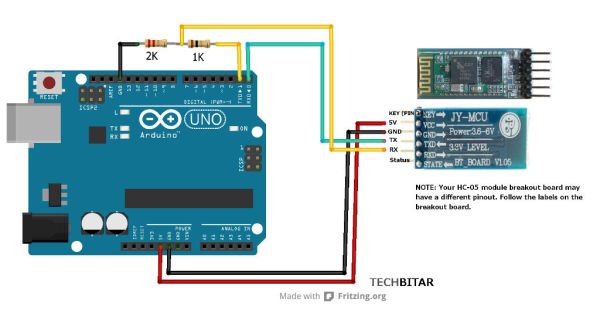
Step 2: Wiring the Arduino to the HC-05 Bluetooth
To take advantage of SensoDuino out of the box, you don’t need anything. You can start logging sensor readings to a text file then process the logged data with myriad graphing and data analysis tools. But if you see the added value in wirelessly transmitting sensor readings over Bluetooth to a microcontroller or PC, you should get the HC-05 Bluetooth serial module.
The HC-05 package comes in two flavors, SMD and breakout board versions. Both can be purchased for less than $10 from ebay. I strongly recommend buying the HC-05 with the breakout board to avoid unnecessary soldering and debugging headaches and to take advantage of useful features included with the breakout board such a status LED that blinks in patterns to show if the HC-05 is paired, connected, in command mode, or not even powered.
CONVERTING 5V TO 3.3V
The breakout board has a 3.3V regulator which can convert Arduino’s incoming 5V power but you still have to drop the Arduino’s 5V pins down to 3.3V. The simplest way is a voltage divider from two resistors but you can use a level shifter such as the CD4050 level shifter IC.
I use 2K & 1K resistors as voltage divider to drop the Arduino’s 5V TX pin to 3.3V, which is the operating voltage of the HC-05 pins. This is to protect the HC-05 3.3V RX pin. On the other hand, the Arduino 5V RX pin can handle the 3.3V sent from the HC-05 TX pin. Even if the HC-05 works without the voltage divider, there’s no telling for how long.
UPLOADING ARDUINO SKETCHES
TO UPLOAD A SKETCH TO ARDUINO YOU MAY HAVE TO REMOVE THE POWER FROM THE HC-05 MODULE TO AVOID ANY CONFLICT OVER SERIAL. Alternatively, you can wire the HC-05’s TX/RX to different Arduino pins supported by Arduino’s SoftwareSerial library.
Step 3: Transmitting from SensoDuino to Arduino
NOTE: I have published a project that demonstrates how to make use of this Arduino sketch to process sensor data transmitted by SensoDuino. The project employs the Accelerometer sensor on the Android device to control the angles of a pan/tilt servo platform.
SensoDuino can transmit sensor readings to an Arduino via the HC-05 Bluetooth module. Other comparable Bluetooth modules may work as-is or require changes to their default settings.
The attached Arduino sketch “sensoduino.ino” reads data transmitted by SensoDuino over Bluetooth then parses and converts this data from strings to numeric values ready for utilization in your Arduino application be it robotics control or UAV navigation or sensor logging.
The process of connecting SensoDuino to Arduino is simple.As with all Bluetooth communication you must pair your Android device with the HC-05 Bluetooth module attached to your Arduino. You only need to do the pairing once.
Please refer to previous step regarding how to resolve errors when uploading a sketch while your Arduino pins 0 and 1 are connected to the HC-05 Bluetooth module.
Step 4: Pairing and Establishing a Serial Connection between Windows 7 and SensoDuino
Pairing Bluetooth devices is a very basic task. On Windows 7 (or similar OS) opening serial over Bluetooth involves one additional step and that is assigning a virtual COM port to the Bluetooth connection between Windows and SensoDuino. More often than not, this is done behind the scenes and the user does not have to worry about it. But if you like to debug your Bluetooth connection to SensoDuino, you may need some basic details of what takes place when connecting serial over Bluetooth.
To simplify debugging the HC-05 Bluetooth connection, make sure SensoDuino is running with only one sensor enabled and transmitting (check Tx checkbox for that sensor) at slow speed preferably once per second.
For testing the Bluetooth connection between SensoDuino and Windows PC, I use Tera Term. You don’t have to but it’s a robust terminal emulation software that helps me test serial connections either Bluetooth or wired. You can download the latest Tera Term from here: http://ttssh2.sourceforge.jp/index.html.en
If you see garbage on the screen after you established a connection, match the baud rate for both Bluetooth devices.
The data you will see on the terminal emulator console may not be neat looking but it’s properly formatted for the attached C++ , C# and the Arduino skeletal programs to consume.
- Let’s start by establish a pairing between the Bluetooth on your Android device and your computer’s Bluetooth. Once you do this step successfully, we can move to the next stage.
- Check to make sure Bluetooth is set to Discoverable on your Android device.
- Check to make sure Bluetooth is enabled on your Android device.
- Run SensoDuino.
- To test the setup, enable the Orientation sensor and enable its Tx (transmit) checkbox and bring down the transmission rate to 1 per second, from the preferences menu.
For more detail: SensoDuino: Turn Your Android Phone into a Wireless Sensors Hub for Arduino
- How does SensoDuino transmit sensor data?
The app transmits sensor readings over an HC-05 Bluetooth module to an Arduino Uno or any device with serial Bluetooth capabilities. - What sensors are supported by SensoDuino?
It supports GPS, Orientation, Gravity, Rotation Vector, Gyroscope, Accelerometer, Linear Accelerometer, Magnetometer, Light Level, Audio Level, Proximity, Pressure, Temperature, and Relative Humidity. - Can I log sensor data without using Bluetooth?
Yes, you can start logging sensor readings directly to a comma-delimited text file named sensoduino.txt on your Android SD card without transmitting them. - What is the best way to connect the HC-05 to an Arduino TX pin?
You should use a voltage divider with 2K and 1K resistors to drop the Arduino's 5V TX pin to 3.3V to protect the HC-05 RX pin. - Does SensoDuino require USB Host hardware?
No, SensoDuino eliminates the need for USB Host hardware; it only requires an HC-05 Bluetooth module for connection. - How fast can SensoDuino read and transmit sensor data?
You can set the speed of sensor data reading, transmitting, and logging anywhere from 100 milliseconds to 10 minutes. - Why might motion sensor readings change even when the phone is stationary?
Motion sensors are sensitive to environmental conditions like magnetic fields or slight physical vibrations, affecting the least significant digits. - How can I save battery power while using SensoDuino?
Enabling Airplane Mode on your device can save battery power during prolonged use of the app.