LED cubes are true 3D displays that work by lighting up points in a 3D lattice of LEDs.
On the 3D display you can produce some truly mesmerizing animations. This Instructable will walk you through creating an LED cube for yourself that is completely self-contained and powered by an Arduino Mega. Once you have it programmed, all you have to do is plug it into the wall and it will display whatever you tell it to! This cube avoids the complication of multiplexers and instead uses an Arduino Mega to directly control transistor circuits.
Without further ado, here’s a video of the cube in action:
(Although there are limitations to taking a 2D video of a 3D display)
We’ll start by making the physical cube and then turn to programming it.
—————————————————————————————————————–
Besides being for fun, this project is an entry for the Make-to-Learn, Lighting, and Epilog Challenge V Contests. I would really appreciate your vote!
—————————————————————————————————————–
Below are my answers to the contest Make-to-Learn Youth Contest questions:
What did you make?
I built and programmed a 7x7x7 LED cube from scratch. The description above and the rest of the Instructable tell the story much better than is possible in the short answer to a question. Therefore, please refer to the rest of the Instructable for a more complete answer to this question.
How did you make it?
I was originally inspired by chr’s Instructable (here), which first introduced me to LED cubes and how neat they are. I wanted to make a LED cube that was self-contained–that you could just plug into the wall and have run–rather than one that requires input from a computer.
I co-opted the idea of using the legs of the LEDs to form the framework of the lattice that most other LED cubes use, but I came up with the rest of the physical and circuitry design on my own. I built and assembled the whole cube from scratch. Several of the routines that the cube runs were inspired by chr’s, but I wrote the code myself or in conjunction with teaching my cousin to program.
The only major change of plans I had while building the cube was to use an Arduino Mega instead of a Due. The Due has the advantage of a higher clock speed, but I realized that I needed 5V for the digital out pins to be able to fully switch the transistors in my circuit. Otherwise, the voltage drop across the LEDs would have been capped at 2.6V rather than the 3.3V they were rated to.
Where did you make it?
I did the majority of the work on this project in the lab and shop at my high school, as this was my second semester project for my Applied Science Research Class. We have a laser cutter in our school lab, which I used to cut out the acrylic box.
I did some of the soldering at home as well.
What did you learn?
A lot! I learned how to used Adobe Illustrator to create things with the laser cutter. In terms of electronics, I came to really understand how transistors work while working on this project, and it was by far the largest and most complex circuit I have ever designed. On the programming side, I learned how to use pointers and memory management to write the C++ code that controls the cube. It was neat to see a real-world application of polymorphism and to learn about the virtual keyword in C++.
More generally, this project taught me the value of building a smaller-scale prototype and the power of digital circuits coupled with a microprocessor.
My cousin was with me while I was programming the cube. He had no programming experience, but I taught him enough that with some help he was able to write two of the eight routines that are displayed on the cube. More on that in the programming section!
Step 1: Skills Required
The skills required for this project are actually pretty minimal; most can be learned along the way, especially given that you have plans to work off of.
That being said, you should really have some experience with basic electronics and also with soldering, since this project requires a lot of that.
My programs should work for you out of the box, but if you want to write your own display routines, some experience with object-oriented programming in C++ (Arduino) would be helpful.
Step 2: How it Works!
In its simplest form, an LED cube is a three dimensional array of lights in space, with each light either on or off at any given moment in time. To achieve complete control over those lights, each LED needs to appear to be controlled individually.
Doing this directly, however, is not feasible. If x is the number of LEDs on each side of the LED cube, we’d need x3 digital output ports to control each LED individually. This might work for smaller cubes, but for larger values of x, this quickly exceeds the number of ports directly available on any standard microcontroller. For this 7x7x7 cube, 343 ports would be needed.
This problem is commonly resolved by flickering through the layers of the LED cube quickly enough to create the illusion of being able to control every LED independently. Let’s look at how this would reduce the number of ports needed:
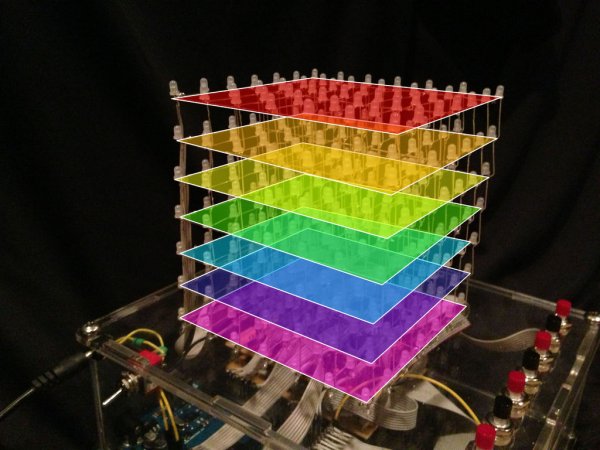
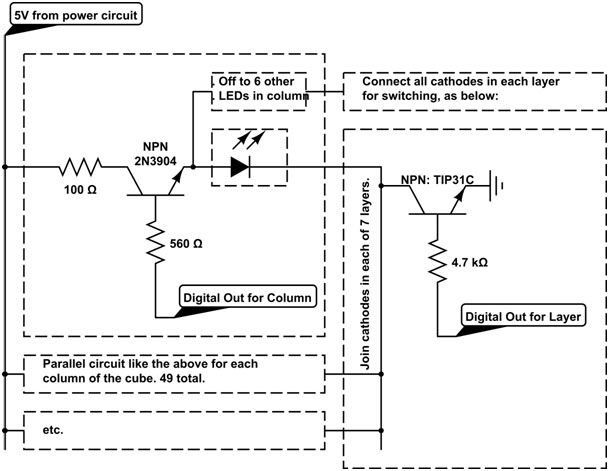
In each colored layer in the photo above, the cathode (to ground) leg of each LED is connected. The anode (voltage in) legs of all the LEDs in each column are also connected. Without going into details yet, assume that the microcontroller can connect and disconnect each column from power and each layer from ground.
To display something on the cube, we would first ground the red layer and apply voltage to the columns we want to turn on. Then we would disconnect everything and repeat the process for the orange layer, this time applying voltage only to the columns of the LEDs we want to light up in that layer.
By quickly flickering through the layers, every layer will appear to be lit at once. The flicker fusion threshold, the rate above which flickering lights appear constant, in humans is about 60Hz, so the cube needs to cycle through every layer at least 60 times per second.
Switching the LEDs in layers and columns makes larger cubes feasible. A total of x2 + x digital outputs are needed to control such a cube: x2 for the columns and x for the layers. Therefore, to build a 7x7x7 cube, 56 ports are needed, rather than 343. The Arduino Mega has 70 pins that can be used as digital I/O ports, leaving 14 ports open for external push button switches to switch the pattern being displayed on the cube.
Step 3: Tools
In order to do the electronics you will need:
- Good soldering iron
- Patience
- Wire stripper
- 2 Pairs of needle-nose pliers
- Eye protection, etc.
Alligator clips and a power supply are handy, as is an ohmmeter for checking connections.
I used a laser cutter to build my acrylic box and to make the template I used for soldering. I’m sure an inventive person could get by without, but the laser cutter was tremendously helpful.
Calipers are also helpful but not necessary.
As always, make sure you know how to safely use a tool before using it.
[box color=”#985D00″ bg=”#FFF8CB” font=”verdana” fontsize=”14 ” radius=”20 ” border=”#985D12″ float=”right” head=”Major Components in Project” headbg=”#FFEB70″ headcolor=”#985D00″]
Materials
You’ll need the following for this project:
1x Arduino Mega
–The brains of our project
1000x 3mm diffused blue LEDs
**Buy these off of eBay and make sure to get the diffused variety. They’ll be
much cheaper that way (~$25), and diffused LEDs have a much better
view angle than normal LEDs.
1x 5V Wall Wart power supply
–This will supply power to the project.
**eBay is a great place to get these. I got a 2A one, but 1A should work just
fine.
1x DC female power jack
–Get power from the wall wart
**Make sure the jack size matches the size of the jack on the power supply
you bought. Like here.
8x Momentary pushbutton switches
–User input to switch programs
**I got mine at RadioShack here.
1x Switch rated to at least 1A that mounts through a hole
–On/Off Switch
**I used a DPDT switch, but other kinds would work just fine.
2x Prototype Board
**Get the ones that have some holes already connected. It will save you a
ton of time. I got mine here.
~ Header pins
–For connecting PCBs and for connecting ribbon cable to the Arduino.
**Get a bunch of the male ones and some smaller sockets like those on
the Arduino.
6ft 7+ conductor ribbon cable
3ft 35+ conductor ribbon cable
1pkg Adhesive velcro
–Secure boards down inside box
53x 100Ω resistor
53x 560Ω resistor
9x 4.7kΩ resistor
8x 10kΩ resistor
9x TIP31C NPN power transistor
–For switching layers
53x 2N3904 NPN transistor
–For switching columns
~3ft 24 and 22 gauge insulated wire
1x Acrylic Sheet
–For case
4x 3″ by 1/8″ Stainless steel screws with acorn caps
–For case
1x 1/8″ Particle board
–For soldering template
1 ton Solder
1x Tube of epoxy
2x Male jumper wires
**Could substitute wire and header pins
The total cost should be somewhere around $150.
[/box]
For more detail: Self-Contained 7x7x7 LED Cube using Arduino


