Summary of Program your Arduino with an Android device
Summary: This Instructable explains how to program an Arduino using an Android device via USB-Host (OTG). It lists required materials and apps, shows wiring (USB-A to USB-B cable connected through an OTG host cable to the Android device), notes that the Arduino will power up from the device, and recommends ArduinoDroid or ArduinoCommander apps for uploading sketches.
Parts used in the Project:
- USB-A to USB-B cable
- USB-Host (OTG) cable
- Arduino board
- 1 LED (for testing)
- Android device with Android 4.0.0+ (or with host availability)
- ArduinoDroid app
- ArduinoCommander app
Hi,
in this Instructable I want to show you, how you can program your Arduino with your Android device. It is very simple and cheap. Also it allows us to program our Arduino where ever we want, this is usefull for permanently installed Arduino boards, like in light controllers…
So lets get started! 🙂
Step 1: Materials and Tools
Materials:
A USB-A to USB-B cable ( http://www.amazon.de/AmazonBasics-USB-2-0-Kabel-A-… )
A USB-Host cable (OTG cable) ( http://www.amazon.de/USB-OTG-Adapterkabel-Adapter-… )
An Arduino( http://de.farnell.com/ )
1 LED (for testing)
A Android device with Android 4.0.0+ (or with host aviability)
Software:
ArduinoDroid or
ArduinoCommander from the Google Play store
Step 2: The USB-Host cable
Such a USB-Host cable is basicaly just a USB cable, but just with a few changed resistors in the mikro USB plug. The internal resistors let the Android device activate the USB-Host mode, in this mode you can also use USB-Sticks or other usb applications on the device. That is very useful, now you could plug a usb-printer in.
The problem is now, that every USB device which you plug in, will now run on the energy of your device, what realy can bring the akku down.
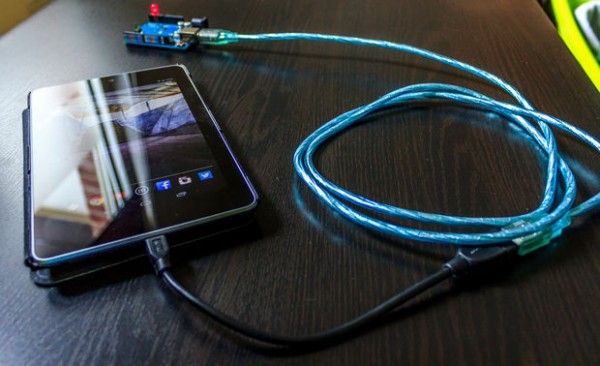
Step 3: Connections
This step is very simple and doesn´t require much text. Just plug the USB-A to USB-B cable into the female USB of the Host cable. Then plug the USB-B plug into the Arduino and the Mikro USB into the Android device.
Step 4: Arduino power up
Now it should look like the connections on the picture. Also your Arduino should now power up and load the last code you uploaded. On my Arduino was the Blink sketch. If it doesn´t power up, check connections.
Step 5: The apps
Now your Arduino is ready to get coded, but your Android device isnt…
Lets change that!
Currently there are 2 apps which allow us to work with our Arduino via the Host mode.
To get them we have to go to the Play Store, then type into the search bar “Arduino”. Now tap on “Apps”, now there should be only apps. We want the apps “ArduinoDroid” and “ArduinoCommander”. Install them and launch “ArduinoDroid”, it has to update the IDE, that will need some time. “ArduinoCommander” should be ready sofortly.
Note: We dont need both apps, i just want to show you both! 🙂
For more detail: Program your Arduino with an Android device
- What cables are needed to connect Arduino to Android?
A USB-A to USB-B cable and a USB-Host (OTG) cable are needed. - Can an Android device power the Arduino?
Yes, when in USB-Host mode the Android device supplies power and the Arduino should power up. - What Android version is required?
An Android device with Android 4.0.0+ or with host availability is required. - Which apps allow programming Arduino from Android?
The article mentions ArduinoDroid and ArduinoCommander as options. - Do I need both ArduinoDroid and ArduinoCommander?
No, you do not need both; either app can be used. - What should I do if the Arduino does not power up?
Check the connections between the USB-A to USB-B cable, the OTG host cable, and the Arduino. - Does the USB-Host mode consume Android battery?
Yes, USB devices plugged in will run on the Android device power and can drain the battery.