The project described here is a simple weather station that measures air temperature, humidity, and surface temperature of the ground below the weather station.
Practical concepts covered are:
- Powering your Phidget
- Battery power
- Solar power
Using the SBC
- Using analog sensors
- Using LEDs
- Using USB sensors
Data Logging
- Recording samples at a certain time
- Writing to a text file
- Writing to a removable USB key
- Using the SBC cron scheduler
- Using Phidgets with Python
Fixed Structures
- Weather resistance
- General planning and assembly
A project of this magnitude requires a time investment in addition to a monetary investment. Designing projects like these is hard but the reward is deep – and very real. A full, functional outdoor sensor system that you can build to whatever specifications you like… ask any hobbyist and you may see their eyes light up remembering their latest project. Building such things is a special kind of freedom!
A remote station project can monitor and log weather and other environmental conditions using Phidgets.
In this Instructable, I’ll describe the steps to get you started.
We start with all of the pieces (the Phidgets, the power supply, the main structure, and the code) and then put it all together at the end.
Step 1: Materials
Tools:
- Hammer
- Screwdrivers
- Computer with Phidgets drivers installed
Electronics:
- Phidgets SBC3
- Phidgets Temperature Sensor IR with 180cm Mini-USB cable
- Phidgets Humidity/Temperature Sensor
- UVC Compatible Webcam
- One 10mm green LED
- One 10mm red LED
- Three Phidgets sensor cables – 350cm
- WiFi dongle (or an ethernet connection for loading the program onto the SBC3 and monitor status)
- Two USB Keys
- tery post clamps and protectors
- 60-70 usable amp-hour lead acid battery
- Exterior grade power cable
Structural System:
- Station tripod
- Commercial lightweight tripod
- Extension masts
- Protective screen for temperature and humidity sensor (i.e. a Stephenson-type screen)
- Battery box to keep snow off the battery terminals
- Pelican 1200 waterproof case for the SBC
- Solar panel and SBC case mounting (metal frame or wide clamps with locks, with U-bolts)
- Three stakes and 3 meters of plastic coated galvanized guy wires (for stabilizing against wind) with bolts and clips (see picture)
- Miscellaneous hardware
- Zip ties for cable management
- Cold weather silicone caulk for sealing case wire holes
- Silica gel packets for desiccant within the Pelican/SBC case
- Penetrating oil (WD-40)
- Foam to pad the U-bolt ends from the solar panel
- Bolts and angle brackets for the Pelican case mounting
Step 2: Connecting The Phidgets
At the core of this weather logging station is the Phidgets Single Board Computer (SBC3). If you’ve never used an SBC, watch the getting started with SBC video so you understand the basics. The sensors and other attachments from Phidgets could include:
Phidgets SBC3
- Schedule the samples
- Split and provide power to devices
- Control the USB Phidget (IR sensor)
- Run the code
Phidgets Temperature Sensor IR
- Read surface temperature of ground, without touching it
- Provide ambient air temperature at board location
Phidgets Humidity/Temperature Sensor
- Measure ambient air temperature
- Measure ambient air humidity
UVC Compatible Webcam
- Taking pictures
One 10mm green LED One 10mm red LED
- Display status
Three Phidgets sensor cables – 350cm
- Allow for far sensor placement
Two USB Keys
- Data storage
Connect everything together as shown in the picture. If you decide to put sensors into different ports, be aware that you’ll have to change the programming.
SBC
The SBC has the ability to run both USB-based Phidgets (such as the 1045 – Phidget Temperature Sensor IR) and analog-based Phidgets (such as the 1125 – Humidity/Temperature Sensor). But there are a variety of different environmental sensors that you could use on your system. The included Phidget Interface Kit 8/8/8 on board the SBC can handle up to 8 analog sensors and 8 digital-in sensors, like switches.
Take note that the rated temperature range for the SBC is 0-70°C. You will also notice that it looks substantially colder in most of the pictures than 0°C! There are a few reasons for this. The first is that the SBC is being kept in a sealed container with some (admittedly minor) insulation. Also keep in mind that the SBC will generate heat just like any electronics that have power flowing through them; the SBC is essentially a 1W heater all by itself which, when inside the case, keeps the temperature up significantly above the outside temperature. That said the temperature inside the case is still below 0 on a fairly regular basis. This just goes to show you that the temperature range is not a hard limit and the board will function below it, however there are no guarantees at this point, the SBC could stop functioning at basically any time. It would start up again as the temperature increased but it is very likely that the board seizes up and remains inoperable for long periods of time if it is not being monitored. This was a risk we took and luckily we didn’t run into any issues. For the record the coldest temperatures we recorded during the operation of this weather station were between -10 and -15°C. I would not recommend attempting to run it in a colder environment than that without steps being taken to actively heat the board.
Using these components requires a bit of care, so the next sections give some suggestions on how to use and set up each Phidget.
Phidget Infrared Temperature Sensor (IR Sensor)
Measuring the temperature of the ground is useful for things such as highway temperature in the summer, or snow surface temperature in the winter. The IR board can face downward to do this without contacting the surface itself.
The IR board should be:
- Encased and sealed (such as with a Phidget enclosure and low-temperature caulk) against the weather
- Suspended at the right height for the sample size of ground needed (see the 1045 – PhidgetTemperatureSensor IR specifications for the degrees of view you have)
- Suspended far enough away from the station that it is measuring only ground, and not measuring the base of the station
- Reasonably protected from solar heating (having a large station arm above it and shading it will probably do it)
Note that you will need to calibrate the data received from this sensor. When you can control all of the variables around what you are using the IR board to measure, you can get very accurate measurements. But in the out-of-doors with a weather station, you will use the board temperature, any shaded temperatures you get from the second temperature sensor, and thermal measurement theory to correct the value the sensor receives. Error includes:
- Warming of the IR board itself (i.e. you may need corrections based on board temperature)
- Emissivity of your subject being less than 1.0 (for more information on emissivity, see the 1045 – PhidgetTemperatureSensor IR product page)
- Measurement of any reflected heat in addition to emitted heat (this also depends on the emissivity)
These concepts and terms should help you get started in your research on how to correct the data specific to your needs – or if you need to do so at all – but a full course in correction is beyond our scope here.
Phidget Temperature and Humidity Sensor
Temperature sensors need to be protected from heating by the sun. Both humidity and temperature sensors need to be protected from snow accumulating on them so that they can interact with the ambient air.
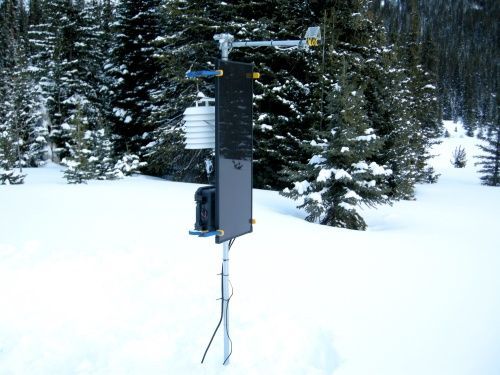
A standard, suspended, white plastic Stephenson-type shield can provide this kind of protection. Plastic ones are inexpensive, and available from specialized weather stores. You can see the shield in this picture:
For more detail: PhidgetSBC3 based solar-powered weather station