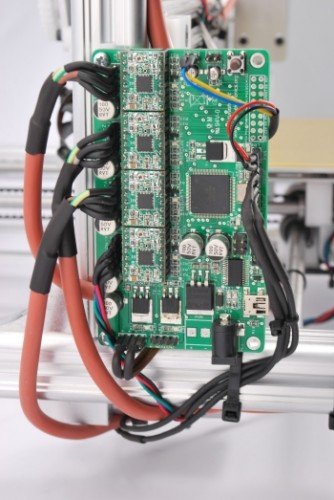
When we first released our 3D printer, we tried to use some parts that were already available and tested, in full respect of the open source philosophy. In particular, we decided to use the electronic card Sanguinololu. The “open” firmware we chose, the Marlin firmware by Erik van der Zalm, solved the biggest part of the computer interface issues. The Sanguinololu was great, but being innovators by vocation, we looked around testing new developments. The first improvement was about introducing a fan, capable of blowing cool air on the just deposed layers, while the second came from the Sanguinololu weaknesses in managing the heated plate. The first new feature is very useful because it allows you to cool the deposed material more quickly and makes it more viscous than the subsequent deposition, while the latter is for those who want to use the ABS and serves to prevent the deformation of the lower layers the piece.
Unfortunately with the original Sanguinololu card, which indeed sports a dedicated output for controlling a heating plate, we were able to control power heaters of quite limited power that couldn’t keep up with our requirements. In addition, the control outputs of the Sanguinololu (which is the classical RepRap board) are sufficient to check only the four bipolar stepper motors that drive the mechanics, the extruder heater, the heated plate, and two inputs to read the temperature.
Since we were looking for something more, we evaluated two possibilities: to design a board from scratch or try a customizable open source solution. Eventually we found an interesting starting point in an open source project, that of the RAMPS board. Amending and supplementing the RAMPS board schematics, we derived the unit described in this post.
We replaced the original microcontroller with a great Atmel ATmega 2560, that can accommodate more lines of code in the Flash and allows us to implement more features than those of a typical 3D printers control board. We also re-shared the design in open source, in full respect of the open source world rules.
Compared to other solutions available on the market, this solution allows those who know how to program the ATmega with the Arduino IDE to add functions and enhance the functionality by modifying the available source code: you’ll not feel limited by the scarcity of program memory that characterizes the micro (ATmega 644) available on the original Sanguinololu board.
Indeed, the ATmega2560 processor sports 256 KB of program memory with 16 MHz clock. Our board can be programmed directly from the Arduino IDE: a USB connection to connect via a standard miniUSB cable is available, and the same port allows PC control during prints.
Our board allows you to control a cooling fan: this is very useful since both the printing software Repetier host and the slicing software Slic3r include cooling management during extrusion phase: the fan is activated only when necessary, with a speed that is tuned on the characteristics of the printing layers.
The board also sports few LEDs connected to the stepper motors drivers, allowing you to check immediately whether the microcontroller commands are correctly given letting you check the operation status of the system in case of fault. Even MOSFETs that drive the extruder heater and the heated plate are matched with LEDs with the very same function. The same was done for the FT232RL that deals with the USB / serial conversion: it’s equipped with LEDs indicating information exchange with the PC.
Regarding the control of the stepper-motors: the default drivers configuration is 1/16 of a step: by cutting the three thin tracks on the bottom, those connecting two by two the jumpers’ pitches, you can solder the standard pin-strips to operate the manual selection of the steps through 2,54 mm jumpers. This operation can be made for one or more drivers depending on the needs.
Let’s see the circuit diagram that describes our unit.
The circuit may appear small but it is a little complex, given that counts a 100-pin microcontroller, four stepper motors drivers, three MOSFETs allowing us to drive two heaters (one is that heating of the plate and the other one heats the nozzle of the extruder) and a low tension fan, as well as a USB / serial converter to interface the ATmega with the computer and to a power supply stage, which completes the ensemble.
As said the microcontroller is loaded with “Marlin” firmware properly configured to drive the electronics
The drivers motors are produced on our own and can be found in the scheme as signed U4, U5, U6, U7. Each module is essentially an Allegro A4988, very versatile since it can be set to define both the direction of rotation of the motor shaft and the number of degrees that the rotor must complete after each command: we can decide whether when we provide a pulse, the module will rotate the shaft of 1, 1/2, 1/4, 1/8 or 1/16 of a step at a time, based on the accuracy that you want to get.
Each driver consists of a dual H-bridge managed by an electronic device that allows you to set the direction of rotation of the electromagnetic field and, then, of the stepper-motor shaft. Each time a pulse arrives on pin STEP (the minimum allowable is 1 µs), unless otherwise set, outputs 1A, 1B, 2A and 2B provide the pulses for controlling the displacement of the rotor unless the inputs MS1, MS2, MS3 are set differently.
Notice that the /STEP line of each controller is connected to an NPN transistor, which serves as a current amplifier to drive a LED, which will pulsate similarly to the corresponding command line of the microcontroller (PA4 for U4, PF6 for U5, PF0 for U6 and PL3 for U7) so that we monitor what happens. Thus, in the case that an engine does not rotate despite its related LED pulses, it means that the problem is within the driver or the motor, or in the wiring. It is understood that since the LED pulses at the same frequency of the control pulses, we can see it flashing only when the corresponding motor will run at very low speed, since already at 25 Hz, the human eye sees the diode always illuminated
For more detail: A new board for the 3Drag: there’s more than Sanguinololu


