Summary of MQ-2 Smoke Sensor Circuit Built with an Arduino
This article explains building a smoke detector using an Arduino and the MQ-2 sensor, which detects smoke and flammable gases via voltage output. The system triggers a buzzer when smoke levels exceed a set threshold. The project utilizes a pre-assembled MQ-2 board with three leads (Vcc, GND, Output) connected to the Arduino's 5V, GND, and analog pin A0 respectively.
Parts used in the Arduino Smoke Sensor Circuit:
- MQ-2 Smoke Sensor
- Arduino board
- Buzzer
In this project, we will go over how to build a smoke sensor circuit with an arduino board.
The smoke sensor we will use is the MQ-2. This is a sensor that is not only sensitive to smoke, but also to flammable gas.

The MQ-2 smoke sensor reports smoke by the voltage level that it outputs. The more smoke there is, the greater the voltage that it outputs. Conversely, the less smoke that it is exposed to, the less voltage it outputs.
The MQ-2 also has a built-in potentiometer to adjust the sensitivity to smoke. By adjusting the potentiometer, you can change how sensitive it is to smoke, so it’s a form of calibrating it to adjust how much voltage it will put out in relation to the smoke it is exposed to.
We will wire the MQ-2 to an arduino so that the arduino can read the amount of voltage output by the sensor and sound a buzzer if the sensor outputs a voltage above a certain threshold. This way, we will know that the sensor is detecting smoke and we will sound a buzzer alerting a person such as a homeowner to this fact.
Components Needed for Arduino Smoke Sensor Circuit
- MQ-2 Smoke Sensor
- Arduino board
- Buzzer
The MQ-2 can be obtained very cheaply, just a few bucks. A good place to look for it is on ebay, which always has auctions on them for the $2-$3 range.
Important, it is recommended that you do not obtain the standalone sensor but the whole MQ-2 board. This is because if you buy the standalone sensor, you will have to finish building the whole schematic before you can connect it to the arduino. So that less work is required for integrating this with the arduino, it is recommended that you buy the complete MQ-2 sensor circuit. This you can see below.
If you buy the complete board, there are 3 leads which need to be connected.
The 3 leads are Output, Vcc, and GND.
It’s very basic.
The gas sensor needs about 5 volts of power in order to operate. This is done by connecting 5 volts to Vcc and GND.
The Output pin gives out the voltage reading, which is proportional to the amount of smoke that the sensor is exposed to. Again, a high voltage output means the sensor is exposed to a lot of smoke. A low or 0 voltage output means the sensor is exposed to either little or no smoke.
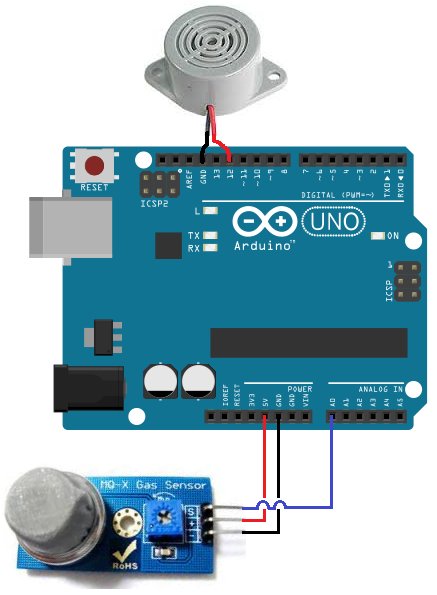
Arduino MQ-2 Smoke Sensor Circuit Schematic
The circuit we will build is shown below.
So to power the smoke sensor, we connect pin 2 of the smoke sensor to the 5V terminal of the arduino and terminal 3 to the GND terminal of the arduino. This gives the smoke sensor the 5 volts it needs to be powered.
The output of the sensor goes into analog pin A0 of the arduino. Through this connection, the arduino can read the analog voltage output from the sensor. The arduino board has a built-in analog-to-digital converter, so it is able to read analog values without any external ADC chip.
Depending on the value that the arduino reads determines the action that will occur with the circuit. We will make it in our code that if the sensor outputs a voltage above a certain threshold, the buzzer will go off, alerting a user that smoke has been detected.
These are all the physical connections in order for our circuit to work.
Fore more detail: MQ-2 Smoke Sensor Circuit Built with an Arduino
- What components are needed for the circuit?
The required components are an MQ-2 Smoke Sensor, an Arduino board, and a Buzzer. - How does the MQ-2 sensor report smoke levels?
The sensor reports smoke by outputting a voltage level that increases as smoke exposure increases. - Can I adjust the sensitivity of the MQ-2 sensor?
Yes, the sensor has a built-in potentiometer that allows you to calibrate its sensitivity to smoke. - Why is it recommended to buy the complete MQ-2 board instead of the standalone sensor?
Buying the complete board requires less work because the schematic is already built, unlike the standalone sensor. - What voltage does the gas sensor need to operate?
The gas sensor needs about 5 volts of power to operate. - Which Arduino pin connects to the sensor's Output lead?
The Output pin connects to analog pin A0 on the Arduino. - What action occurs if the sensor detects smoke above a threshold?
If the voltage exceeds a certain threshold, the buzzer will sound to alert the user. - Does the Arduino require an external ADC chip to read the sensor?
No, the Arduino board has a built-in analog-to-digital converter so no external chip is needed.