
Summary of Making an Alarm Clock That Asks Questions Randomly
This article describes a DIY smart alarm clock designed to prevent oversleeping by forcing users to answer random questions before the alarm stops. Using an Arduino UNO and various modules, the device plays annoying sounds and asks questions like "how many is one plus one." Users must correctly answer via speech recognition to silence it; incorrect answers or timeouts keep the noise going until the user is fully awake.
Parts used in Making an Alarm Clock That Asks Questions Randomly:
- Arduino UNO
- IO Expansion Board
- Speech Recognition Module
- Speech Synthesis Module
- DS3231M MEMS Precise RTC
- 7.4V Lipo 2500mAh Battery
- Digital Push Button (White)
- 8-Digital LED Segment Display Module
- I2C HUB
- Stereo Enclosed Speaker - 3W 8Ω
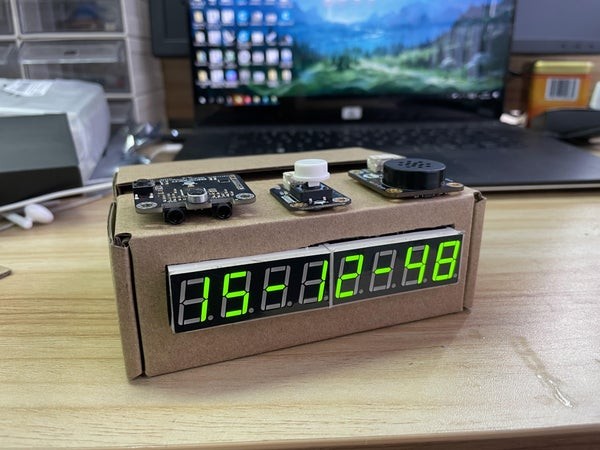
Do you usually have trouble getting up? Set more than a dozen alarm clocks in the morning, but still can’t wake up and turn them off in a daze. When you waking up and find out that you are late, and then you blame the alarm clock for not making any noise. In order to help me better complete my 996 workdays, a simple small alarm clock is specially made – an alarm clock that will randomly ask questions. Its unpleasant cry makes you sleepless; in addition, during the answering process, you must concentrate on listening to the question, otherwise, you will not be able to judge whether it is asking “how many is one plus one” or “How many words in the question of ‘how many is one plus one’” It is a home essential product, the initiator who forced you to the peak of life.
Supplies:
Speech Recognition ×1
7.4V Lipo 2500mAh Battery ×1
Digital Push Button (White) ×1
8-Digital LED Segment Display Module ×1
Stereo Enclosed Speaker – 3W 8Ω
Step 1: Design Idea
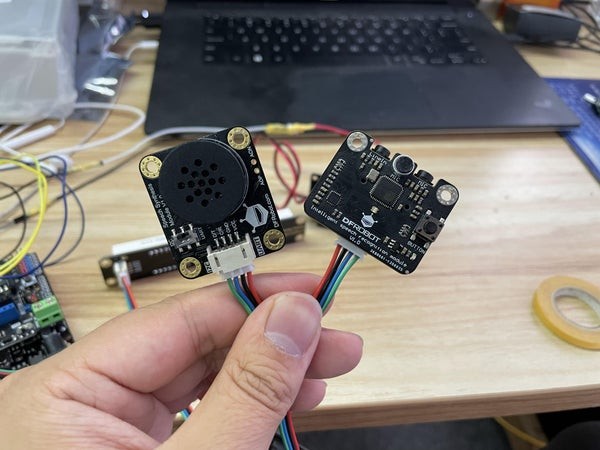
I got two very interesting small modules from DFRobot, one is the speech synthesis module and the other is the speech recognition module.
So I thought about making an alarm clock. I felt that it was really difficult for everyone to get up in the morning, and ordinary alarm clocks were full of cannon fodder. Then the idea of making a “real” alarm clock emerged. In fact, I found that when people wake up and after their mind become clear, they don’t want to sleep anymore. So whether it is an alarm clock with wheels running around or an alarm clock that slaps people, it is all about making people have a clear conscience. I will make a slightly gentler one here. An alarm clock with random questions. It will stop making noise if the answer is correct; if the answer is incorrect, it will keep annoying you.
Step 2: Start Making the Cover
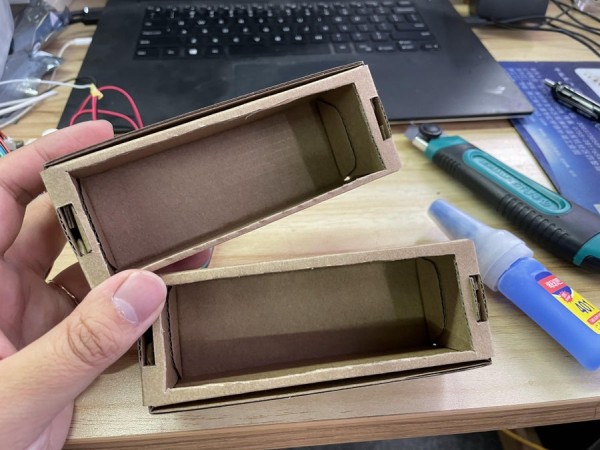
Find a suitable carton, I don’t have a suitable one here. So I use two small one and glued them together to make a big one.
Step 3: Connect Each Module As Follows
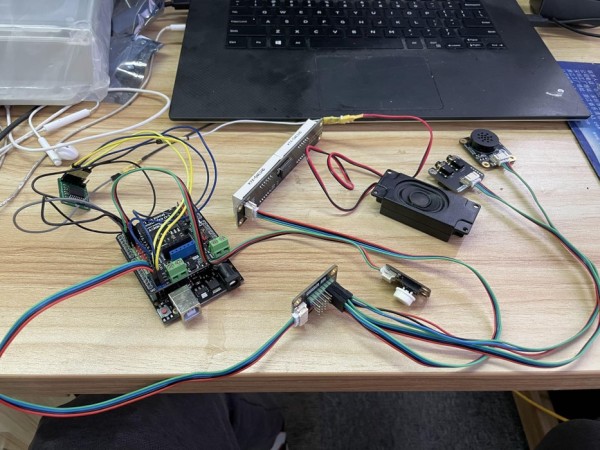
Clock Module → uno IIC
Clock Module INT Pin → uno D2
Speaker Red Wire → uno D3
Speaker Black Wire → uno GND
IIC Expansion Board → uno IIC
White Button → uno D4
Speech recognition, synthesis, LED segment code → IIC Expansion Board
Step 4: Refit the Cover and Assembly
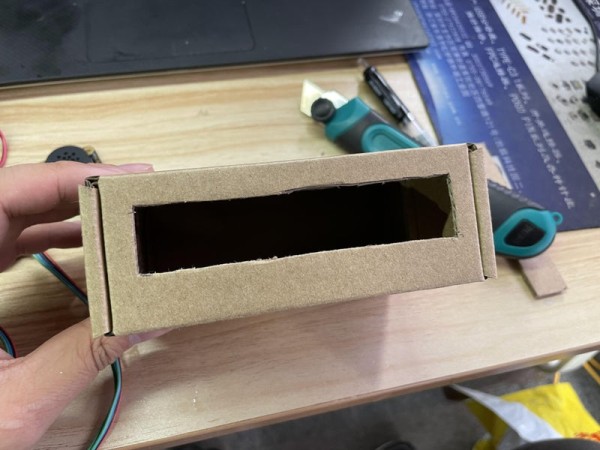
Make a hole for the LED segment screen, and the holes for the speaker and battery on the back of the box.
2. Use hot melt adhesives to glue all the modules on, and finally, put all the devices into the box.
Step 5: Programming
Install the library functions of each module, adjust the questions you want to ask and the time of the alarm setting, then burn the program into it.
/*!
     * @file setAlarmInterrupt.ino
     * @brief Set alarm, and use interrput pin to trigger it
     * @n Experiment phenomenon: set the alarm clock to trigger at a specified time
     * @n                        connect SQW pin with DIGITALPIN2
     * @n                        print information on serial port after the alarm clock is triggered.
     * @copyright   Copyright (c) 2010 DFRobot Co.Ltd (http://www.dfrobot.com)
     * @licence     The MIT License (MIT)
     * @author [LuoYufeng]([email protected])
     * @version  V0.1
     * @date  2019-08-19
     * @url https://github.com/DFRobot/DFRobot_DS3231M
     */
    #include "DFRobot_DS3231M.h"
    #include "DFRobot_SpeechSynthesis.h"
    #include "DFRobot_ASR.h"
    # include "DFRobot_LedDisplayModule.h"

    DFRobot_LedDisplayModule LED(Wire, 0xE0);
    DFRobot_SpeechSynthesis_I2C ss;
    DFRobot_ASR  asr;
    volatile  int8_t alarmFlag = 0;
    unsigned long timeout = 3000;
    unsigned long timelast = 0;
    unsigned long timenow = 0;
    unsigned char hourval =0;
    unsigned char   hourhigh = 0;
    unsigned char    hourlow = 0;
    unsigned char    minuteval = 0;
    unsigned char    minutehigh = 0;
    unsigned char    minutelow = 0;
    unsigned char    secondval = 0;
    unsigned char    secondhigh = 0;
    unsigned char    secondlow = 0;
    char str1[2];
    char str2[2];
    char str3[2];
    char str4[2];
    char str5[2];
    char str6[2];
    char str7[2];
    char str8[2];
    DFRobot_DS3231M rtc;

    void setup(void)
    {
        Serial.begin(9600);
        while(LED.begin8() != 0)
        {
          Serial.println("Initialization of the chip failed, please confirm that the chip connection is correct!");
          delay(1000);
        }

        ss.begin();
        /*Wait for the chip to be initialized completely, and then exit*/
        while(rtc.begin() != true){
            Serial.println("failed to init chip, please check if the chip connection is correct. ");
            delay(1000);
        }
        /*!
         *@brief Set the value of pin sqw
         *@param mode eDS3231M_OFF             = 0x01 // Not output square wave, enter interrupt mode
         *@n          eDS3231M_SquareWave_1Hz  = 0x00 // 1Hz square wave
         *@n          eDS3231M_SquareWave_1kHz = 0x08 // 1kHz square wave
         *@n          eDS3231M_SquareWave_4kHz = 0x10 // 4kHz square wave
         *@n          eDS3231M_SquareWave_8kHz = 0x18 // 8kHz square wave
         */
        rtc.writeSqwPinMode(eDS3231M_OFF);

        /*!
         *@brief enable Alarm1 interrupt
         */
        rtc.enAbleAlarm1Int();

        /*!
         *@brief disable Alarm1 interrupt
         */
        //rtc.disAbleAlarm1Int();

        /*!
         *@brief enable Alarm2 interrupt
         */
        //rtc.enAbleAlarm2Int();

        /*!
         *@brief disable Alarm2 interrupt
         */
        //rtc.disAbleAlarm2Int();
        //Alarm1
        rtc.setAlarm(eMinutesHoursDayMatch,/*date,0-30*/30,/*hour,1-12 in 12hours,0-23 in 24hours*/15,e24hours,
                    /*minute,0-59*/13,/*second,0-59, this argument doesn't work in Alarm2*/42);
        //Alarm2
        //rtc.setAlarm(eMinutesHoursDayMatch,/*date,0-30*/30,/*hour,1-12 in 12hours,0-23 in 24hours*/15,e24hours,
        //            /*minute,0-59*/13,/*second,0-59, this argument doesn't work in Alarm2*/42);
        if (rtc.lostPower()) {
            Serial.println("RTC lost power, lets set the time!");
            rtc.setYear(21);//Set year, default in the 21st century.
            rtc.setMonth(3);
            rtc.setDate(10);
            rtc.setHour(15,e24hours);
            rtc.setMinute(12);
            rtc.setSecond(45);
            rtc.adjust();
        }
        attachInterrupt(0, interrupt, FALLING);
        pinMode(3,OUTPUT);
        pinMode(4,INPUT);
        asr.begin(LOOP);
        asr.addCommand("san",3);

    }

    void loop() {
        /*!
         *@brief Judge if the alarm clock is triggered
         *@return true, triggered; false, not triggered
         */
        rtc.getNowTime();
        Serial.print(rtc.year(), DEC);
        Serial.print('/');
        Serial.print(rtc.month(), DEC);
        Serial.print('/');
        Serial.print(rtc.day(), DEC);
        Serial.print(" (");
        Serial.print(rtc.getDayOfTheWeek());
        Serial.print(") ");
        Serial.print(rtc.hour(), DEC);
        Serial.print(':');
        Serial.print(rtc.minute(), DEC);
        Serial.print(':');
        Serial.print(rtc.second(), DEC);
        Serial.print(' ');
        /*if rtc works in 24hours mode,this function doesn't print anything*/
        Serial.print(rtc.getAMorPM());
        Serial.println();
        hourval = rtc.hour();
        hourhigh = hourval/10;
        hourlow = hourval%10;
        minuteval = rtc.minute();
        minutehigh = minuteval/10;
        minutelow = minuteval%10;
        secondval = rtc.second();
        secondhigh = secondval/10;
        secondlow = secondval%10;
        sprintf(str1, "%d", hourhigh);
        sprintf(str2, "%d", hourlow);
        sprintf(str4, "%d", minutehigh);
        sprintf(str5, "%d", minutelow);
        sprintf(str7, "%d", secondhigh);
        sprintf(str8, "%d", secondlow);
        LED.setDisplayArea8(1,2,3,4,5,6,7,8);
        LED.print8(str1,str2,"-",str4,str5,"-",str7,str8);
        delay(500);
        if(alarmFlag == 1){

            Serial.println("Alarm clock is triggered.");
            delay(100);
            do{
            tone(3,400,2000);
            }while(!digitalRead(4));
            noTone(3);
            ss.speak("");
            delay(100);
            ss.speak("how many is one plus one");
            asr.start();
            timelast = millis();
            while(1)
            {
              if(asr.read() == 3){
              Serial.println("received'san',command flag'0'");
              rtc.clearAlarm();
              alarmFlag = 0;
              break;
              }
              timenow = millis();
              if((timenow - timelast) >= timeout){
                Serial.println("received'x',command flag'x'");
                break;
              }
            }

        }
        else
            delay(100);
        if (rtc.lostPower()) {
            Serial.println("RTC lost power, please reset the time!");
        }
    }

    void interrupt(){
      alarmFlag = 1;
    }
Source: Making an Alarm Clock That Asks Questions Randomly
-
How does this alarm clock stop making noise?
The noise stops only when the user provides the correct answer to the random question asked by the device. -
What happens if the user gives an incorrect answer?
If the answer is incorrect, the alarm clock will continue to annoy the user with noise. -
Can I change the questions asked by the clock?
Yes, you can adjust the questions you want to ask within the programming code. -
How is the time kept accurate for the alarm?
The project uses a DS3231M MEMS Precise RTC module which connects to the Arduino to set specific alarm times. -
What is the power source for this project?
The device is powered by a 7.4V Lipo 2500mAh Battery. -
How do I assemble the components inside the box?
You should use hot melt adhesives to glue all the modules onto the cover and cut holes for the screen, speaker, and battery. -
Which pin triggers the alarm interrupt on the Arduino?
The Clock Module INT Pin connects to digital pin D2 on the Arduino Uno to trigger the alarm interrupt. -
What command does the speech recognition module look for to stop the alarm?
The system listens for the command san which corresponds to the answer for one plus one.
