
Summary of Making a Better Mouse Trap Using Arduino
This article outlines a creative, automated mouse trap project called "The Den of Evil," designed to capture and elevate mice without harming them. Utilizing a Makerbot Replicator 2 for 3D printing, the project integrates an Arduino Uno with various sensors and motors to detect a mouse, close a gate, lift the enclosure, raise a moon prop, and simulate lightning. The author created this design to enter a 3D Design Contest, emphasizing the ability of 3D printing to bring unique concepts to life.
Parts used in the Den of Evil Mouse Trap:
- Makerbot Replicator 2
- Arduino Uno
- Mini Metal Gearmotor x2
- Small Servo x2
- Red LED x2
- White LED
- Photocell x3
- Push Button x2
- Transistor x2
- Potentiometer x2
- Diode x2
- 330 ohm Resistors
- 10K ohm Resistors
- Breadboard
- M/F Wires Pack
- M/M Wires Pack
- Jump Wire Pack
- Makerbot PLA filament
- Scotch Tape
- Fine Sand Paper
- Hair Clipper Oil
- Elastic Bands
- Dental Floss
- White Glue
- Xacto Knife
- Needle Nose Pliers
- Wire Strippers
There are a lot of things this world needs at the moment. One of them is a better mouse trap. Mice are getting smarter every day and if we’re not careful we’ll end up with Planet of the Mice. Luckily, with the help of a Makerbot Replicator 2 (its enormous 410 cubic inch build volume and 100 micron resolution, “100 microns!”) we can tackle this problem. And maybe even have a little fun doing it.
The concept is simple:
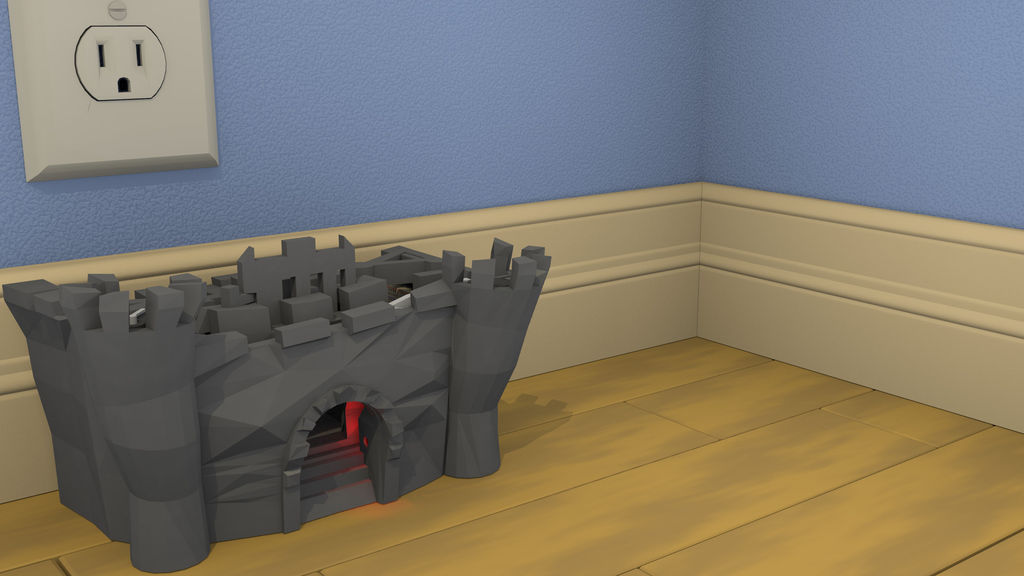
1 – We set up a real spooky-looking castle. If movies have taught us anything, it’s that a spooky house is simply irresistible to people. The louder you scream “DON’T GO IN!” at your TV, the more they want to go in. I don’t understand it, that’s just the way it is. Mice should be no different. We turn the house into a castle for good measure.
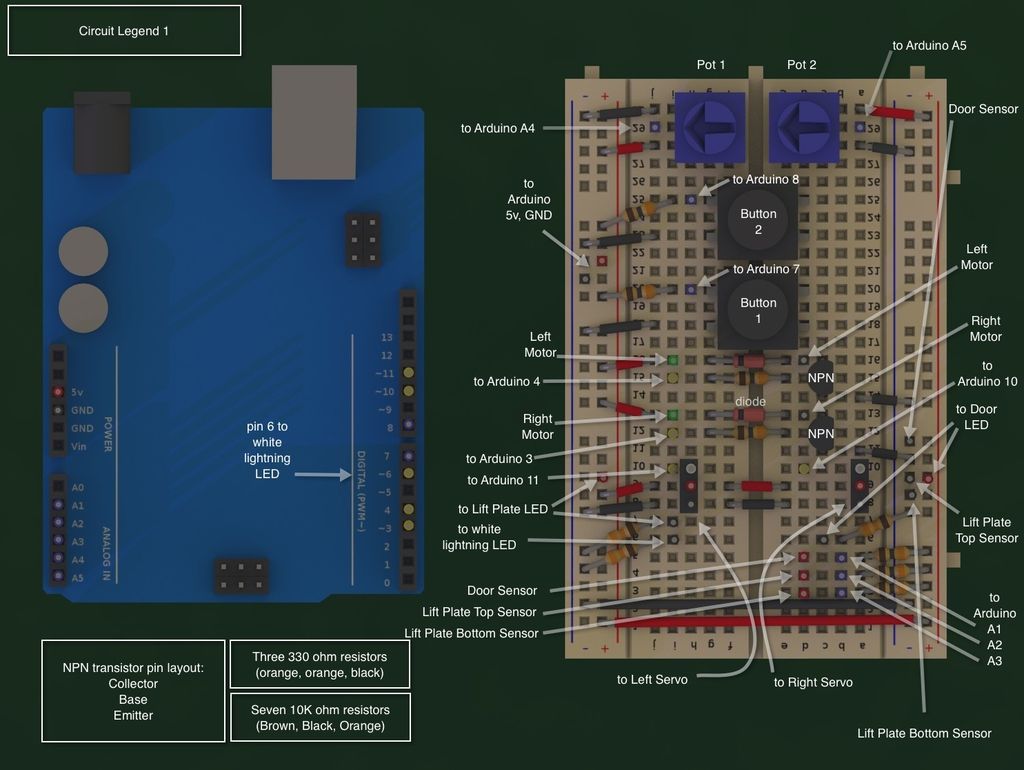
2 – Out with the old, in with the new. A loaded spring just doesn’t cut it anymore, we’re in the 21st century. We need to throw everything we’ve got at this mouse. That’s why this castle is loaded with an Arduino Uno. Yes that’s right, we’re talking a jaw dropping 20MHz of raw computational power, 32K of program space and so much more. The mouse doesn’t stand a chance.
3 – Hook up crazy sensors and motors into this digital brain to track the mouse’s every movement. (ok, so it’s a couple photocells and such, but it should work).
4 – When the mouse ventures into the den of evil we slam the gate shut, hoist the trembling mouse to the heavens while calling upon the gods to bring out the moon and some lightning. At this point the mouse will be so traumatized (in a good way) that it will bother you no further. No need to kill it, just send it on its way with a nod of the head and a tip of the hat.
That’s the plan.
The truth is, creating this design would not be possible without an affordable 3D printer (aka Replicator 2). 3D printing lets you efficiently explore the inefficient. The 3D printing revolution is not about printing what you normally buy, it’s about being able to create what doesn’t exist. As playful as this mouse trap is, I’d like to think it’s along that vein.
I don’t have a 3D printer, although I’ve been drooling over one for a long time. This Instructable is created to enter the 3D Design Contest at Instructables with the hopes of winning a Replicator 2. This is what I’d like to make if I had one. Voting for it would be much appreciated.
With that said, I’ve done my best to think through this entire project. I’ve modeled all components to scale and have confined them to a Replicator 2’s build volume. I’ve tested out the circuits and micro controller code to the best of my ability. I’ve sourced all electronic components from Sparkfun.com. This is a custom built rig (pulled from the depths of my brain) designed to fit together with exacting tolerances. If you’re looking for a bit of adventure, I think this Instructable is for you.
Step 1: Castle Rundown
Step 2: In More Practical Terms…
3) A motor is then activated which drives a set of gears. These gears drive a set of screw hoists on either side of the lift plate which lift the Den of Evil up into the sky (about 2 inches…). The lift plate has an attached LED. When this LED shines into the top lift plate sensor the motor is stopped.
4) At this point a second servo is activated which lifts an attached moon into the night sky.
5) To finish things off, a white (lightning) LED located in the left tower strobes to simulate a truly dark and stormy night.
At this point the Den of Evil can be removed from the lift plate and the mouse let on its merry way.
Two buttons are included to move the lift plate up and down. And two pots are included to trim the gate pin servo and adjust the photocell sensors bias.
Equipment:
-Computer
–Makerbot Replicator 2
Electronics:
–Arduino Uno
–Mini Metal Gearmotor x2
–Small Servo x2
–Red LED x2
–White LED
–Photocell x3
–Push Button x2
–Transistor x2
–Potentiometer x2
–Diode x2
–330 ohm Resistors
–10K ohm Resistors
–Breadboard
–M/F Wires Pack
–M/M Wires Pack
–Jump Wire Pack
(There’s a bit too man wires here, but it illustrates what you need: jump wires to keep the breadboard orderly; M/M and M/F wires)
Materials:
–Makerbot PLA filament (1 spool)
-Scotch Tape
-Fine Sand Paper
-Hair Clipper Oil
-Elastic Bands
-Dental Floss
-White Glue
Tools:
-Xacto Knife
-Needle Nose Pliers
-Wire Strippers
Step 3: Build Plate Legends
You will need to build three plates on your Replicator 2 using the supplied files. Use the corresponding build plate legends to reference all components while constructing. Note that the left/right convention is based on looking at the front/top view of the castle.
These build plates are release under the CC-BY 3.0 license.
- How does the system detect when a mouse enters the castle?
A photocell sensor on one side detects when a red LED on the opposite side is blocked by the mouse entering the doorway. - What happens immediately after the mouse is detected inside?
A servo activates to pull a string tied to the gate pin, releasing the gate and trapping the mouse in the Den of Evil. - How high does the motor lift the mouse enclosure?
The motor drives gears that operate screw hoists to lift the plate about 2 inches into the sky. - What signals the motor to stop lifting the plate?
The motor stops when an LED attached to the lift plate shines into a top lift plate sensor. - What additional visual effects are triggered after the lift is complete?
A second servo lifts an attached moon into the night sky, and a white LED strobes to simulate lightning. - Can the user manually control the lift plate movement?
Yes, two buttons are included specifically to move the lift plate up and down. - What components are used to adjust the gate pin servo and sensors?
Two potentiometers are included to trim the gate pin servo and adjust the photocell sensors bias. - Where did the author source all electronic components?
All electronic components were sourced from Sparkfun.com. - Why was the Makerbot Replicator 2 chosen for this project?
The printer's large build volume and resolution allowed the author to model and print custom components that fit together with exacting tolerances.