
Summary of Make your own smart watch
Retro Watch is an open-source DIY smart watch project combining an Arduino Pro Mini (3.3V) and an Android app, connected via Bluetooth. The guide describes the overall structure, required small, low-power modules—Arduino, Bluetooth HC-06, a 0.96" OLED display, and a LiPo battery—plus using a USB-to-UART adapter for programming. It targets hobbyists wanting a wrist-worn microcontroller device with simple input (one button) and Android-based notifications and RSS handling.
Parts used in the Retro Watch:
- Arduino Pro Mini 3.3V (ATmega328)
- USB to UART module
- Bluetooth module HC-06 (without interface board)
- 0.96 inch OLED display (I2C or SPI)
- 3.7V LiPo battery
- Button (single input)
Most IT companies participate in the race to grab people’s wrist. A smart watch becomes the most significant item in a wearable device category. You can easily find this mood in this link, there are tons of smart watches.
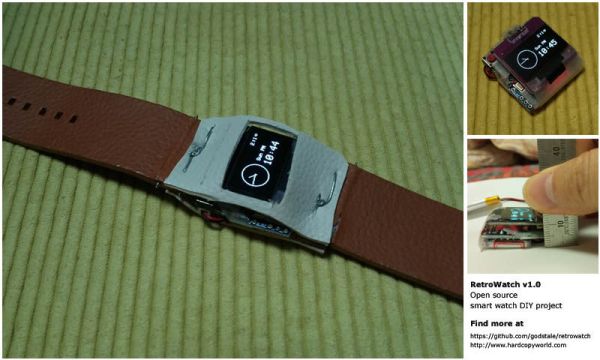
But here is a simple way to evaluate smart watch’s future on your own. Make it! With Arduino micro-processor and Android, I made a simple smart watch and named it “Retro Watch“. You can do this too!
Retro Watch is an open source project to let you make a smart watch based on Arduino and Android. This text explains about modules, blueprints, how to install and use the Arduino and the Android source codes step by step.
Step 1: Overall Structure
RetroWatch is a simple system that is used a hardware platform called Arduino, which is intended for artists, designers, and hobbyst, and an Android app. The overall structure is in the picture above.
Imagine a very small computer that you can wear on your wrist. Arduino board is a micro-processor and a storage, and there’s only one input method : a button. Bluetooth is to communicate with other devices, and the battery would be necessary for power. I’ll install an Android app for collecting or editing various RSS and system information and for notification on the Android device.
Step 2: Preparing for RetroWatch
You need to prepare modules as small as possible to wear the watch on your wrist. There may be tons of variations, but I chose parts that are commonly used and inexpensive.
Hardware parts for smart watch
Arduino micro-controller
I chose the smallest Arduino, Pro mini. Arduino Pro mini is a light version of UNO R3. It doesn’t have a USB interface chip in order to reduce the price and the size. There are two version depending on the operating voltage(3.3v/5v). And I used a 3.3v version, because the bluetooth and display that are connected with the board support 3.3v and the board goes well with the 3.7v LiPo battery. It runs at 8MHz and a 5v version at 16MHz, but 8MHz is enough. Overall, all you need to prepare are Arduino Pro Mini 3.3v and USB to UART module.
The main chip of the board, ATmega328, has only 2KBytes RAM, but ATmega128 has just 1KBytes, which is very limited to run my system. Most boards have ATmega328, but you have to make sure.
Bluetooth
One of most common bluetooth modules that you can get are HC-06 main module and the one with interface base board. The latter one has a reset button, the status LED, and it supports both operation voltage(3,3v/5v), so this one is more convenient but the size is rather big, the LED, which is not quite necessary drains the battery and a little more expensive. So I used a HC-06 without the interface board.
Display
To make a SMART WATCH, it would be necessary to find a small, low-power display. I’d given lots of thoughts, then I chose -.96’’ OLED Display. There are various sizes of the displays(0.96’’, 1.3’’, etc), it works on low-power, English font and the image out available, and it supports I2C, SPI, which makes easy to connect with Arduino.
For more detail: Make your own smart watch
- What is Retro Watch?
Retro Watch is an open source smart watch project using Arduino and an Android app. - Which Arduino board is used in Retro Watch?
The project uses Arduino Pro Mini 3.3V with the ATmega328. - Why choose the 3.3V version of Arduino Pro Mini?
Because the Bluetooth and display support 3.3V and it pairs well with a 3.7V LiPo battery. - Which Bluetooth module is recommended?
The HC-06 module without an interface board is used in the project. - Which display is used for the Retro Watch?
A 0.96 inch OLED display is chosen for low power, English font support, and I2C or SPI connectivity. - What input method does the watch use?
The watch uses a single button as the only input method. - What is needed to program the Arduino Pro Mini?
A USB to UART module is required to upload code to the Pro Mini. - Why was ATmega328 chosen over ATmega128?
ATmega328 has 2KB RAM while ATmega128 has only 1KB, which is too limited for the system.
