Summary of Make Your Own GRBL CNC Pendant
Summary: This article shows how to build a handheld pendant for a DIY CNC running GRBL (v0.8+) to access handy commands like Cycle Start, Feed Hold, Soft Reset, and E-Stop. It covers required components, planning button layout and wiring to GRBL pinouts, drilling an enclosure, mounting parts, soldering connections into a terminal block, and final assembly tips.
Parts used in the GRBL CNC Pendant:
- Soldering iron and supplies
- 10-wire ribbon cable
- Serial port connectors (one male, one female)
- Serial cable
- Arcade machine buttons (3: Green, Yellow, Blue)
- Switches (2)
- Mushroom style E-Stop button
- Screw terminal block
- Aluminum enclosure
- Drill press with step drill
Although these commands are accessible via the terminal, I decided that I really wanted to have a nice pendant with easy to use buttons – and maybe a few extra buttons for future development! So grab your soldering iron and lets get to work!
 Remove these ads by Signing Up
Step 1: Components
What You Need:
– Soldering Iron/Supplies
– 10 wire Ribbon Cable
– (2) serial port connectors (one male, one female)
– serial cable
– (3) arcade machine buttons. I like Green, Yellow and Blue
– (2) switches
– Mushroom style E-Stop button (Mine came from ZenToolworks.com)
– Screw terminal block (I don’t recommend the white, “European Style” blocks because they don’t work well with small wires)
– Aluminum Enclosure
– Drill press with Step Drill (Amazon has step drills for $cheap$)
Here is a link to my Sparkfun wishlist:
https://www.sparkfun.com/wish_lists/55422
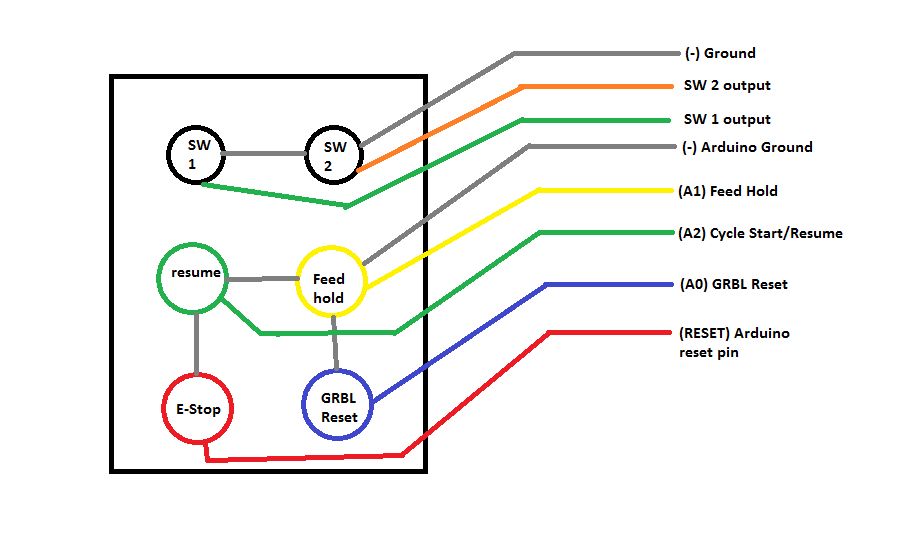
Step 2: Plan
If you are interested in the GRBL pinout for other projects, check out this link: https://github.com/grbl/grbl/wiki/Connecting-Grbl
Once I figured out where I wanted everything, I used my step drill to drill some some big holes. 1-1/4″ to be exact, my drill press really struggled, so be careful! Once the holes were drilled, I tested the fit of the buttons (to make sure they were not too tall) and checked the location of my terminal block. When I was sure that everything was in a good place, I glued in the terminal block and went to soldering….
Step 3: Soldering
Carefully start soldering the buttons together, be sure to double and triple check your diagram! Write lots of notes about what wires go to what pins on the serial connector. If you solder the wrong pin, it can be tough to figure out why your pendant isn’t working. Once everything is hooked up, carefully close the box. I had to wiggle stuff around to get it to fit correctly and had a lot of trouble with wires escaping the terminal block.
For more detail: Make Your Own GRBL CNC Pendant
- What commands from GRBL v0.8 are useful for a pendant?
Cycle Start, Feed Hold, and Soft Reset are useful commands mentioned in the article. - Can I access Cycle Start and Feed Hold without a pendant?
Yes, these commands are accessible via the terminal, but the pendant provides easier physical access. - What components do I need to build this pendant?
The article lists soldering supplies, 10-wire ribbon cable, serial connectors and cable, three arcade buttons, two switches, an E-Stop, a screw terminal block, an aluminum enclosure, and a drill press with a step drill. - How should I plan the wiring layout?
The article describes sketching the button layout and wiring: Cycle Start, Feed Hold, Reset, and E-Stop share Arduino Ground, while the two switches are on their own circuit, all tied into a terminal block to exit via the serial connector. - What connector did the author use to exit the pendant enclosure?
The author used a serial connector to exit the enclosure and noted Sparkfun had suitable plugs. - How large were the holes drilled for the buttons?
The article states 1-1/4 inch holes were used for the buttons. - What should I be careful about when soldering?
The article advises double and triple checking the wiring diagram and writing notes about which wires go to which serial connector pins, because mis-soldering can be hard to diagnose. - Did the author recommend a specific style of terminal block?
The author recommended a screw terminal block and did not recommend white European style blocks because they don't work well with small wires.