Summary of LittleGoal: World Cup Match Notifier using Arduino
This article describes "littleGoal," a DIY World Cup notifier built at the Taipei Hackerspace. It uses littleBits modules and an Arduino to monitor game events, triggering servo-waved flags and an electroluminescent "GOAL!" sign. The project emphasizes quick assembly using foam boards, bamboo chopsticks, and printed flags, powered by a 9V battery or wall plug via a Raspberry Pi for internet connectivity.
Parts used in the littleGoal:
- 1 × Arduino at Heart module
- 1 × power module
- 2 × servo module
- 1 × light wire module
- 1 × fork module or split module (optional)
- 1 × buzzer module (optional)
- Wire modules
- Foam board base
- Bamboo chopsticks
- Paper for flags
- Pieces of strings
- Raspberry Pi
- Micro USB cable
- 9V battery or 9V wall plug
Can’t watch the World Cup football games, but want to know when important game events (ie. goals) happen? Then littleGoal is for you!
The littleGoal setup will monitor the game’s progress, and alert you via vigorous flag-waving and a photogenic Goal! sign when anything of importance happens during your World Cup game.
It is intended to be quickly assembled, minimalistic, and pretty much ready to use for your next game!
Step 1: Ingredients
What’s needed?
- littleBits
- 1 × Arduino at Heart module
- 1 × power module
- 2 × servo module
- 1 × light wire module
- 1 × fork module or split module (optional)
- 1 × buzzer module (optional)
- some wire modules (optional)
- board (foam, plastic, wooden…)
- paper for the flags
- pieces of strings
- internet enabled computer (here we use a Raspberry Pi)
- Micro USB cable to connect the computer and Arduino
The wire modules make it easier to place the relevant pieces, while the fork+buzzer is only needed if you want sound effects as well besides the light effects.
The little bit parts were all included in the single littleBits Deluxe Kit, except for the Arduino module.
The power is originally provided by a 9V battery. Servos use quite a bit of power, though, so I ended up adding a 9V wall plug that fit the same power module to make sure the Arduino doesn’t go under voltage and restart on me…
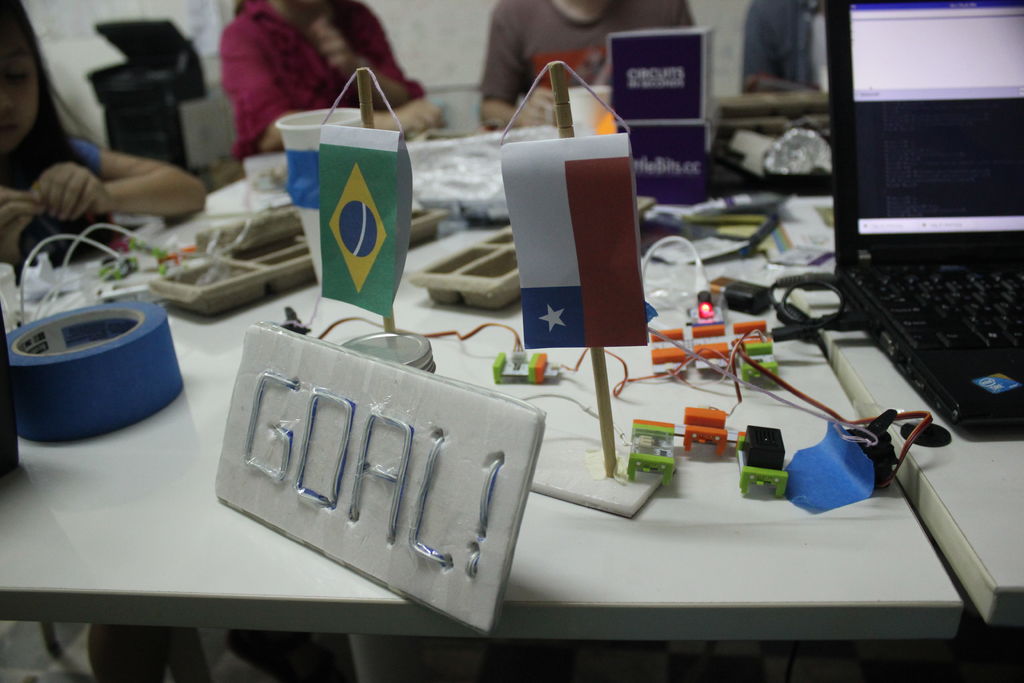
Step 2: Mechanical setup
The major part of the mechanical setup concerns the way the team flags are hung up and waved by the servo modules. Tried to make it as simple as possible, and can use whatever you find around you.
Here in Taiwan we have a lot of spare bamboo chopsticks, and those are great for scaffolding. The first step was cutting in the top of the chopsticks so that a string can be hung from there without dropping (making the flagpost). I used a wood saw, but anything is good that makes a little groove on the top.
The post base is a foam board, just made a hole, and secured (hm, not very securely) the sticks with tape. If you have better idea, please do that, this was a quick and dirty way. The two posts are some 20cm apart, something convenient.
We’ve printed the flags in colour. Got the SVG (vector graphics) files from Wikimedia and used Inkscape to arrange them. The printed size is 8cm on the long edge, but could use whatever fits your setup. Might need some playing around with the image files. I got lucky that the person on the team taking care of the flag arrangement knew what she was doing. 🙂 Double-side printing, cut and fold.
Strings taped in the inside of the flags to hang them. A string is then taped to the bottom part of the flag and tied to the servo. Pulling on the bottom allows bigger (more exaggerated) movements for the flag when pulled.
The strings can be simply tied to one of the servo‘s holes (the servo comes with a few different moving pieces, this was the default piece, good enough. The servo control should be switched to “turn” mode.

Step 3: The GOAL! lights
The remaining main part is the GOAL! sign. Fortunately we already had some experience with electroluminescent wire from the Cool Neon Build Night (here’s our music controlled Hack sign and galloping horse), and knew how to make something cool relatively quickly.
- Use a board that you can easily modify, but it’s still sturdy enough (we had a piece of display foam board)
- you can design your text by first outlining with a marker pen.
- can make holes in the board to hide the wire behind the board to have breaks in the text, eg. between letters
- tape it down to the board to secure it on the front
- when testing, you might need to turn down the light a bit, EL wires are not that bright…
We had enough remaining wire to have an outline to the board’s edge too, it made it even more sign-y.
Mentioned in the ingredients part that it’s optional to add a buzzer module. This is especially nice if you are a fan of vuvuzela from the last World Cup! Since all the games are after midnight here in Taiwan, and the walls are very thin, I chose to remove it, but in testing it worked very nice!
For more detail: LittleGoal: World Cup Match Notifier using Arduino
- What is the main purpose of the littleGoal project?
To monitor World Cup games and alert users via flag-waving and a lighted GOAL sign when important events occur. - How are the team flags mechanically waved?
Servo modules pull strings tied to the bottom of paper flags attached to bamboo chopstick posts. - What power source is recommended to prevent voltage drops?
A 9V wall plug that fits the power module is recommended because servos use significant power. - Can sound effects be added to the system?
Yes, a buzzer module can be added optionally, though it was removed in this build due to thin walls. - What material was used to construct the flagposts?
Spare bamboo chopsticks were cut at the top to create grooves for hanging the flags. - How is the electroluminescent wire installed on the sign?
The wire is taped to the front of a sturdy display foam board, with holes made to hide wire behind breaks in the text. - What computer is used to connect to the Arduino module?
An internet-enabled computer, specifically a Raspberry Pi in this case, connects via a Micro USB cable. - Is the fork module required for the basic setup?
No, the fork module or split module is listed as optional in the ingredients list.