Summary of Lilypad Arduino Rocket Ship Cape
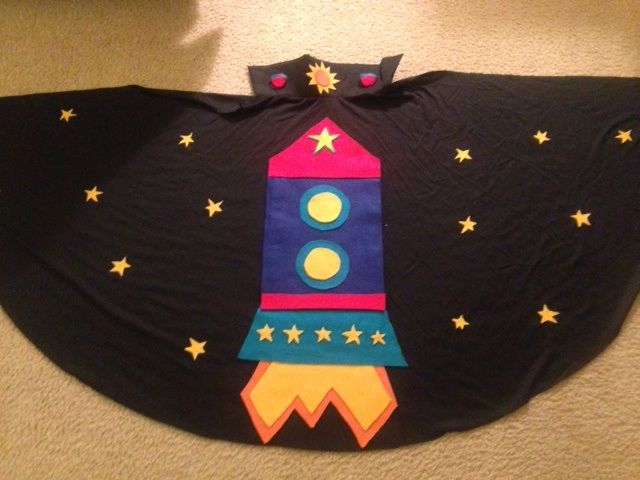
This article guides readers through creating a light-up and sound-playing rocket ship cape using the LilyPad Arduino board for a Children and Technology course. The project involves sewing felt components, connecting electronic parts like LEDs and a buzzer to the development board, and programming the device via the Arduino IDE to produce visual and audio effects.
Parts used in the Rocket Ship Cape:
- Felt (red, blue, yellow, teal, orange)
- Extra felt for back of project
- Sewing needle
- Felt glue
- Velcro
- Scissors
- Child's cape
- Protosnap LilyPad Development Board
- Conductive thread
- LilyPad FTDI basic
- Mini-USB cable
- 5 white LEDs
- RGB LED
- Buzzer
Step 1: Step One: Materials
Felt (one square each): red, blue, yellow, teal, orange
Extra felt for back of project (approximately two squares)
Sewing needle
Felt glue
Velcro
Scissors
Child’s cape
Electronics Materials:
Protosnap LilyPad Development Board – https://www.sparkfun.com/products/11262
This board should come with: Conductive thread, LilyPad FTDI basic
Mini-USB cable
Software:
FTDI driver (http://arduino.cc/en/main/software)
Arduino IDE (http://arduino.cc/en/main/software)
Step 2: Step Two: Planning
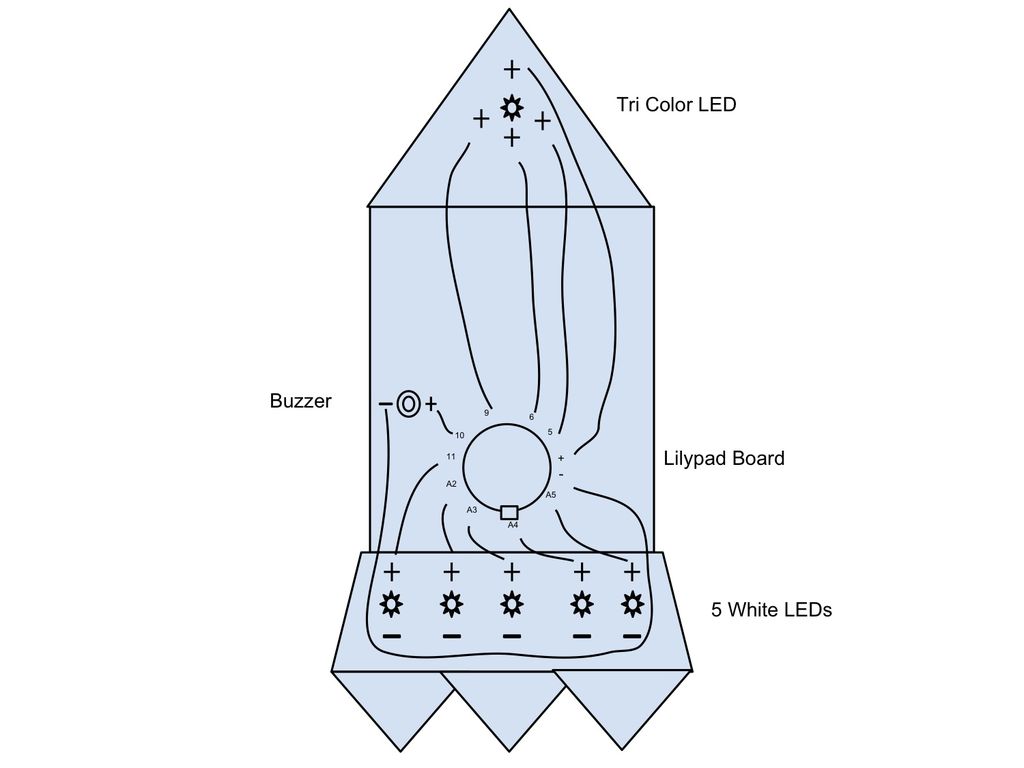
The first step is to plan your project and map out your circuit diagram. When you sew with conductive thread, you need to make sure the positive and negative stitches do not cross, so this planning stage is vital to the functionality of your project! You will be connecting all of the negative pins to the “-” pin on your board and the positive pins of the LEDs and buzzer to their own pins. The positive pin at the top of the tri-color LED should be connected to the “+” pin on the Lilypad. See my diagram for more details on the recommended connections
Step 3: Step Three: Piece together rocket ship
- What software is required to program the LilyPad board?
You need the FTDI driver and the Arduino IDE. - Can I use other sensors besides the ones listed in the example?
Yes, you can explore the vibrating motor, light sensor, switch, button, or touch sensor. - How should I connect the positive and negative pins during planning?
All negative pins must connect to the "-" pin on the board, while positive pins of LEDs and the buzzer connect to their own specific pins. - Which color LEDs are included with the Protosnap LilyPad Development Board?
The board comes with 5 white LEDs and one RGB LED. - Is it better to sew or glue the felt pieces together?
You can use felt glue, but sewing them creates a more durable project. - What programming language is used for the Arduino code?
The code for the Arduino is written in the programming language C. - Why is the planning stage vital for this project?
Planning ensures that positive and negative stitches do not cross when sewing with conductive thread. - Where can I find examples of how to modify the code?
You can easily find examples of different ways to modify the code through Google.