I am taking a Children and Technology course for my MLS this semester, and one of our assignments is to create a toy using the LilyPad Arduino development board. The LilyPad Arduino is used to create e-textiles that you can program to do various things. In this instructable, I will walk you through the process of creating a rocket ship cape that lights up and plays a scale.

Step 1: Step One: Materials
Sewing Materials:
Felt (one square each): red, blue, yellow, teal, orange
Extra felt for back of project (approximately two squares)
Sewing needle
Felt glue
Velcro
Scissors
Child’s cape
Electronics Materials:
Protosnap LilyPad Development Board – https://www.sparkfun.com/products/11262
This board should come with: Conductive thread, LilyPad FTDI basic
Mini-USB cable
Software:
FTDI driver (http://arduino.cc/en/main/software)
Arduino IDE (http://arduino.cc/en/main/software)

Step 2: Step Two: Planning
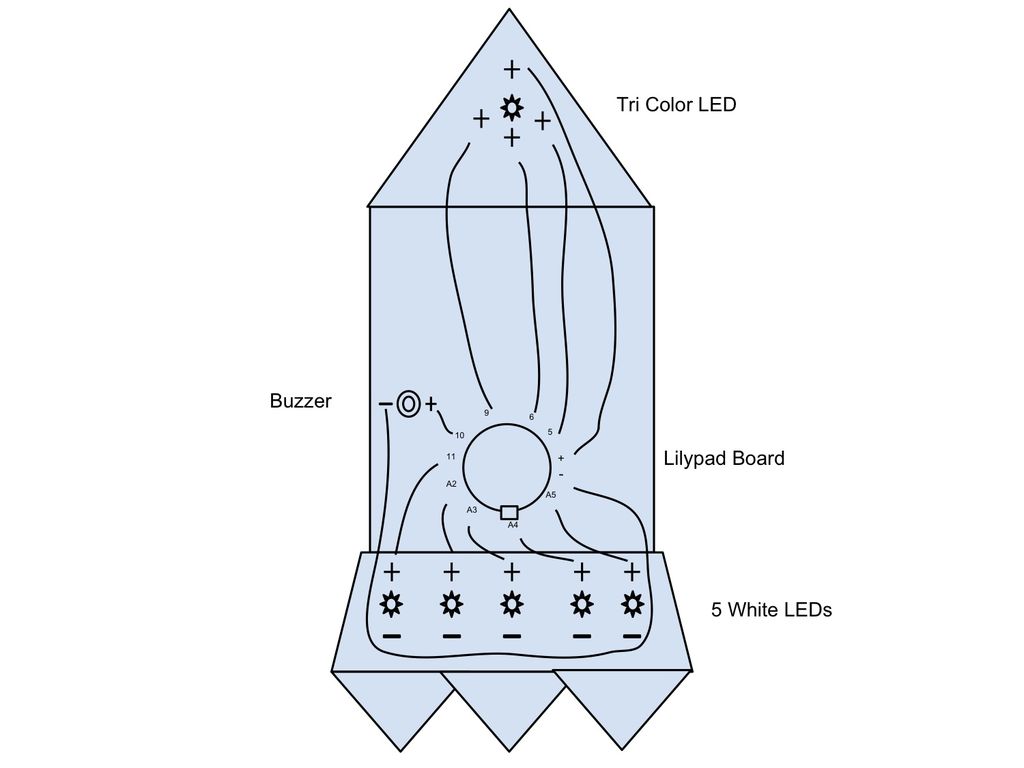
When you get your lilypad development board, download the arduino and driver software and experiment with what the board can do. I decided to use the 5 white LEDs, the RGB LED, and the buzzer, but if you want to get more creative you can explore the vibrating motor, light sensor, switch, button, or touch sensor. Play around with the most basic preloaded code, “Blink,” to make sure the connections between the hardware and computer are working. The code for the arduino is written in the programming language C, and you can easily find examples of different ways to modify the code through Google.
The first step is to plan your project and map out your circuit diagram. When you sew with conductive thread, you need to make sure the positive and negative stitches do not cross, so this planning stage is vital to the functionality of your project! You will be connecting all of the negative pins to the “-” pin on your board and the positive pins of the LEDs and buzzer to their own pins. The positive pin at the top of the tri-color LED should be connected to the “+” pin on the Lilypad. See my diagram for more details on the recommended connections
Step 3: Step Three: Piece together rocket ship
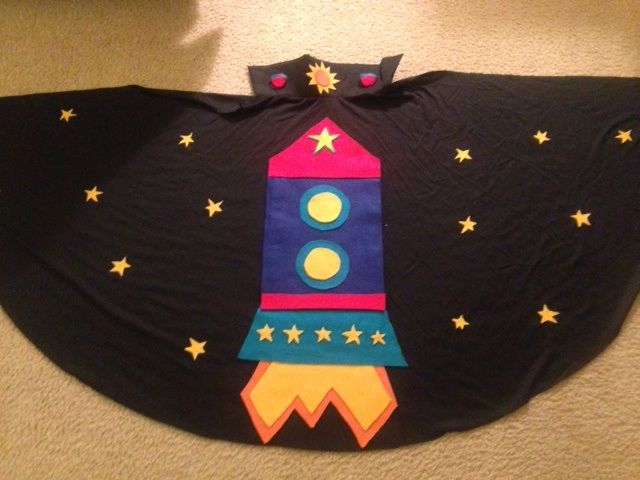
Now you can start to put together your rocket ship. My rocket ship was inspired by
this design on etsy. I cut a red triangle for the top, a navy rectangle for the body, a flared teal rectangle for the base, and orange and yellow flames for the bottom. I also cut out layered yellow and teal circles for windows and stars to cover the LEDs (don’t put these on yet!). I then used felt glue to stick all the pieces together, although you could sew them if you wanted a more durable project. I wanted my project to look handmade, so I free-handed the outline and the stars, but you could certainly trace these more precisely if you are going for a more polished look.