Summary of Let Your Plant Talk
This tutorial demonstrates creating a plant monitoring system using an Arduino Nano and XOD visual programming. The project integrates three sensors (LDR, Capacitive Moisture, DHT22) to detect environmental conditions. Based on predefined thresholds, the system triggers a YX5300 MP3 module to play specific alarm messages generated via Amazon Polly. Users prepare SD cards with indexed audio files and wire components to communicate via software serial UART without writing traditional code.
Parts used in the Plant Talk Project:
- Arduino Nano
- YX5300 Catalex Serial MP3 Module
- Capacitive Soil Moisture Sensor V1.2
- DHT22 Temperature and humidity sensor
- LDR Sensor
- 10 KOhm Resistor
- Breadboard
- Wires
- Speaker with AUX input
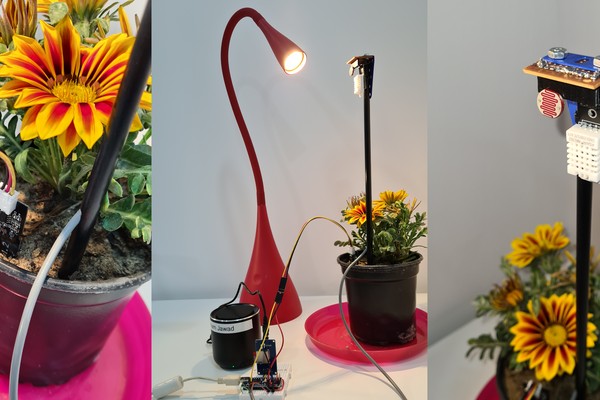
In Today’s Tutorial, we will learn how to make our plant talk using Arduino nano with the MP3 player module.
Basically, we will connect 3 sensors to the Arduino module:
LDR Sensor.
Capacitive Moisture sensor.
DHT22 Temperature and humidity sensor.
We will read the sensors values in Arduino and define the limits for each sensor and based on these limits, Arduino will send the command to the MP3 module to play a specific alarm.
In this tutorial we will not write any Code scripts, instead of that, we will use XOD ide software.
If you are not familiar with XOD, XOD is a free open-source and powerful visual programming software for microcontrollers. It uses a graphical interface that represents hardware and computing elements as nodes that can be wired together to allow data flow between the objects.
You can download the software from the link below:
Step 1: List of Materials
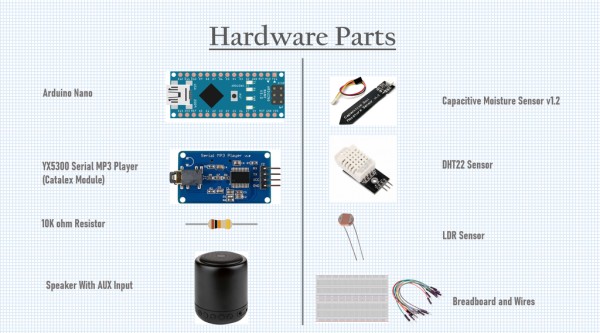
Hardware Parts:
1-Arduino Nano.
2-YX5300 Catalex Serial MP3 Module.
3-Capacitive Soil Moisture Sensor V1.2
4-DHT22.
5-LDR.
6-10 KOhm Resistor.
7-Breadboard.
8-Wires.
9-Speaker with AUX input.
Step 2: Circuit Diagram
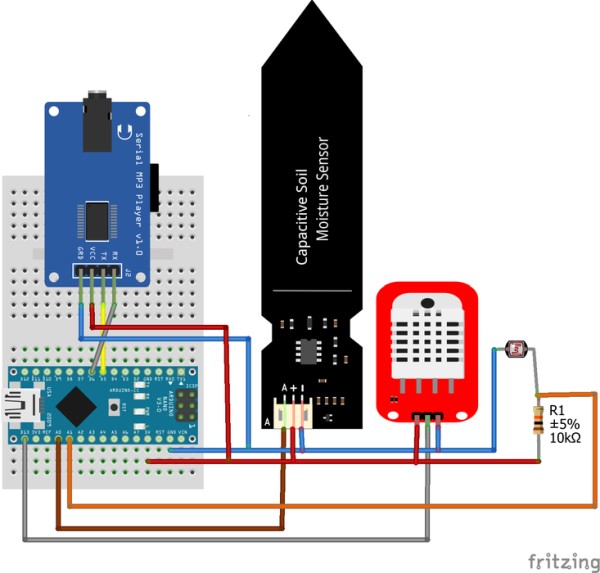
For wiring connections
The communication between the Arduino and MP3 module will be done through the software serial UART.
Pin D5 in Arduino will be defined as a software RX and connected to the TX pin of the MP3 Module.
Pin D6 in Arduino will be defined as a software TX and connected to the RX pin of the MP3 Module.
Moisture sensor –>A0
LDR Sensor –>A1
DHT22 –> D13
All the VCC connected to 5 volts and the Gnd to the ground.
I connect all my sensors on the breadboard first to test them, After that, I solder them to the PCB board.
Step 3: Preparing the SD Card
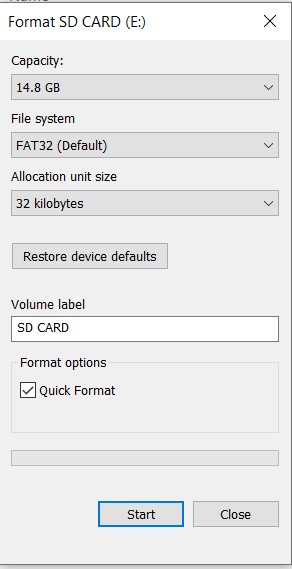
1-Format the Micro SD or Mirco SDHC card as FAT16 or FAT32.
2-Create folder “01” and “02”.
3-Copy the MP3 files to the folder “01” .Make sure to copy the files one by one and put a note for yourself indicate which one you copied first. The MP3 module will not depend on the file name to select the file. I will depend on the indexing, so the first song you copied will be number 1,2nd the song will be number two, and so on.
4-Plugin the micro SD card into the TF card socket on the Serial MP3 Player.
Step 4: Generating MP3 Files
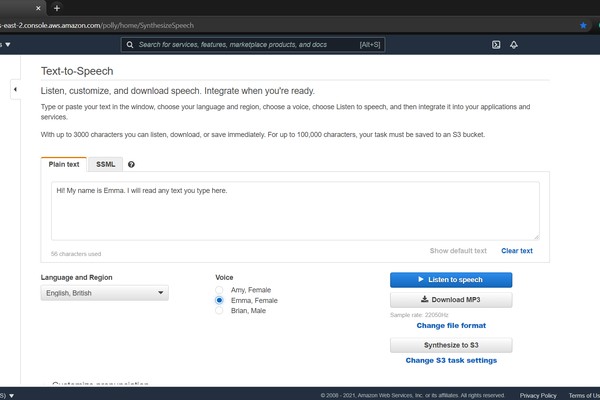
I used Amazon Polly Text to Speach to generate MP3 files.
You need to register first to use this service.
The MP3 files in this tutorial are attached.
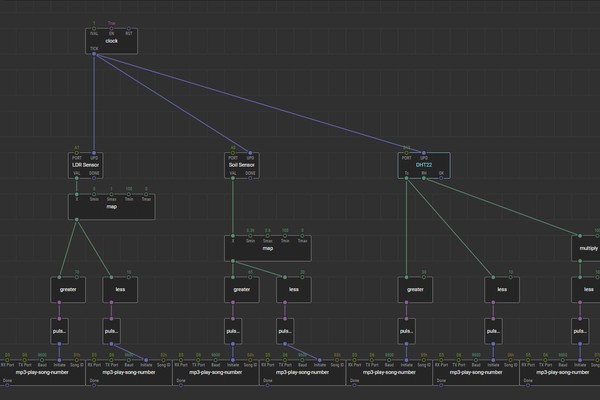
Step 5: Coding With XOD
Follow the steps in the Video.
1-Add MP3 library
Go To file –>Add library–>Search for Catalex-MP3–>Download
2-Add Watch Node Press “I” or double click anywhere –>Search for Clock –>Select Clock Node.
Clock Node will send a pulse every one second based on IVAL value.
3-Add Analog-Sensor Node.
Change the Port to A1 (The LDR sensor connected to pin A1).
4-Add another Analog-Sensor Node.
The Soil sensor is connected to this node on port A0.
5-Add DHT2x Node.
Change the Port to D13 (The DHT-22 Sensor connected to Pin D13).
6-Change the descriptions of these nodes to reflect the hardware connected to these pins.
7-Add Map Node.
The map Node is used to change the range of the sensor.
The LDR sensor range =0-1 Smin-Smax, This range will be changed to 100-0 Tmin-Tmax.
In the same way, configure the map node for the soil sensor 0.39-0.6 Smin-Smax
change to 100-0 Tmin- Tmax.
8- Add greater node and less node from node search.
For the Greater node, the outputs true if `IN1` > `IN2`, and false otherwise.
For the Less node the outputs true if `IN1` < `IN2`, and false otherwise.
9-Add Pulse-On-True node.
10-Repeat same steps for the DHT22 node.
Mapping is not required for temperature pin Tc.
The range for Rh humidity =0-1, can be changed to 0-100 by linking the pin to the map or multiply node.
11-Add watch node to all sensors to monitor the value live from your PC.
This node is useful for troubleshooting, testing, and calibration. It can be removed once the test is finished.
12-Add MP3-Play-Song-Number node.
This node will play the mp3 file once it received a pulse on the initiate pin.
Pin D5 will be defined as a software RX and connected to the TX pin of the MP3 Module.
Pin D6 Will be defined as a software TX and connected to the RX pin of the MP3 Module.
Set Baudrate to 9600.
The first mp3 file copied to the SD card will be the song ID 1 and so on. it is not related to the file name,
So make sure to note the sequence of the files on the SD card.
13-Go to Deploy –>upload to Arduino.
Make sure to select the right hardware and port.
Make sure that debug after the upload is checked (the Watch node will not work if this box is left unchecked).
14-Once the upload is done successfully.
You can monitor the sensor’s values in the watch nodes. based on these values you can define the right
range and setpoint for your sensors.
Source: Let Your Plant Talk
- How does the Arduino communicate with the MP3 module?
The communication is done through software serial UART using Pin D5 as RX and Pin D6 as TX. - What software is used instead of writing code scripts?
XOD ide software is used for visual programming with a graphical interface. - How are MP3 files selected by the module?
The module depends on indexing order; the first song copied is number 1, regardless of file names. - Which pins are assigned to the sensors?
The moisture sensor connects to A0, the LDR to A1, and the DHT22 to D13. - What format must the SD card be?
The Micro SD or Micro SDHC card must be formatted as FAT16 or FAT32. - Can I monitor sensor values live?
Yes, you can use Watch nodes to monitor values live from your PC during testing. - What service was used to generate the MP3 files?
Amazon Polly Text to Speech was used to generate the MP3 files. - What happens if debug after upload is unchecked?
The Watch node will not work if the debug box is left unchecked after uploading.