Summary of LASER Maze – Halloween Haunted House using arduino
The LASER Maze was a 2011 garage haunted-house game using Arduino and Processing: players press start, watch an intro, then dodge low-mounted lasers to reach candy; breaking a beam triggers alarms, a flashing police light, and scoring; final time and score display when finished. The system used laser pointers, CDS light sensors, an Arduino to read sensors and buttons and drive a servo beacon, and Processing on a laptop to control game states and the outside monitor.
Parts used in the LASER Maze:
- a garage
- a laptop
- Arduino Duemilanove with USB cord
- 4 green Lasers
- 4 CDS cells (Light Dependent Resistors)
- 4 1K resistors
- 3 push buttons (arcade style buttons)
- 1 breadboard
- 1 servo
- 1 surge protector with switch
- 1 red beacon light
- 1 1000W fog machine
- phone cord long enough to run to your sensors
- electrical tape
- cardboard TP tubes
- soldering iron with solder
- velum paper or other semi transparent paper
The LASER Maze was our Processing and Arduino powered garage haunted house for 2011. A monitor sits outside of the garage, displaying “PRESS START.” After the button is pressed, an intro video plays that instructs you to dodge the lasers and get your candy in the back of the garage. Whenever you break a laser beam, an alarm sounds, a police light flashes, and a point is added to your score. When you make it back out, you press the stop button to see your final time and score.

We kept all of the lasers very low to the ground to avoid everyone’s eyes. Future versions may turn the lasers off for a short time when they are broken for an added layer of safety.
We also made a couple of flashing signs out of red and white blinking bicycle lights. The house is at the end of a cul-de-sac, so we had to advertise to attract more attention.
Here is Alice in Wonderland with her pirate and gremlin friends navigating the maze.
Step 1: Parts List
The parts list:
a garage
a laptop
Arduino Duemilanove with USB cord
4 green Lasers ($7.54 each at Amazon)
4 CDS cells ($0.50 each at Electronic Goldmine)
4 1K resistors
3 push buttons (arcade style buttons)
1 breadboard
1 servo
1 surge protector with switch
1 red beacon light
1 1000W fog machine
phone cord long enough to run to your sensors (cheap at the thrift store)
You will also need electrical tape, cardboard TP tubes, soldering iron with soldier, velum paper or some other semi transparent paper, and possibly some other small items.
Step 2: Overview – How it all Works
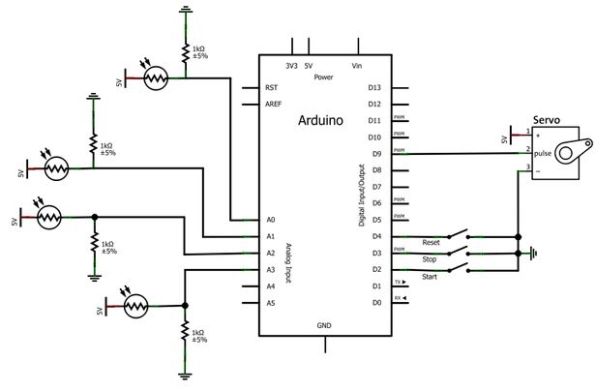
he 4 green lasers are lined along one side of the garage, all wired in parallel to 3 D cell batteries. They are not connected to the Arduino in any way. On the opposite side of the garage, there are 4 CDS cells(Light Dependent Resisters) inside of cardboard tubes. The CDS cells detect the laser light, and the tube helps filter out other unwanted light from strobe lights.
The Arduino is programmed to watch the CDS cells, and the stop, start, and reset buttons. The Arduino sends 4 signals back to the Processing code on the laptop: start, stop, alarm, or reset. The Arduino also powers a servo that turns on a spinning red light when the alarm is set off.
The Processing code accepts the signals from the Arduino, and displays the state of the game on the monitor outside. The Processing code has 5 different states: PRESS START > Intro Video > 3, 2, 1, GO > Active Game (show time and score) > Display Final Score. The Processing code starts and stops the game, and increments the score as it receives the signals from the Arduino.
The music playing in the background is just shuffling on the computer, it is not connected to Processing or Arduino.
Step 3: The Floorplan
The garage was laid out so that guests would have to cross the laser beams as many times as possible. Only 4 laser pointers were used, but the trick-or-treaters had to dodge laser beams 16 times.
The yellow lines in the picture show where we built cardboard or caution tape walls. The caution tape made a clear path for people while still allowing the lasers to pass through to the sensors on the opposite wall.
The air mask in the picture is an air compressor with a blower attachment pointing through the mouth of a skull mask. The blower handle was tied to a string and run through some pulleys so we could scare kids from a distance while they collected their candy.
Step 4: The Processing Code
- How do players start the LASER Maze?
Players press the start button outside, which triggers the intro video and begins the game sequence. - How are laser breaks detected?
Four CDS cells (light dependent resistors) inside cardboard tubes detect the laser light; breaking a beam changes the CDS readings for the Arduino to register. - Does the Arduino control the lasers?
No, the lasers are powered by D cell batteries and are not connected to the Arduino. - What happens when a laser beam is broken?
An alarm sounds, a police-style red beacon flashes via a servo, and the player's score is incremented. - How does the Processing program interact with the Arduino?
Processing receives serial commands from the Arduino (start, stop, alarm, reset) and updates the display and game state accordingly. - How many lasers and sensors are used?
Four green laser pointers are used with four corresponding CDS cells as sensors. - How does the game display final results?
When players press the stop button after exiting, Processing displays the final time and score on the monitor. - How are false triggers from strobe lights reduced?
CDS cells are placed inside cardboard tubes to filter out unwanted light from strobes and ambient sources. - How is the garage layout designed to increase beam crossings?
Cardboard and caution tape walls create a winding path so trick-or-treaters cross the four laser beams multiple times (16 crossings total). - Is the background music controlled by Processing or Arduino?
No, the background music is just shuffled on the computer separately and is not controlled by Processing or the Arduino.