Summary of Knife Sharpening Angle Coach With Bluetooth & Arduino
Precision sharpening skills aren't developed overnight! This project uses an Adafruit Feather 32u4 Bluetooth microcontroller and a BNO055 absolute orientation IMU to monitor knife angle (yaw) while sharpening, sending the measured angle over BLE to a mobile device. The guide covers Arduino board setup, required libraries, optional breadboard prototyping, code tweaks to send only the relevant angle (normalized to positive values), and physical assembly with magnets and waterproof covering to mount the sensor parallel to the blade.
Parts used in the Knife Sharpening Angle Coach:
- Adafruit Bluefruit Feather 32u4 microcontroller
- BNO055 9-DOF absolute orientation IMU fusion breakout
- Small LiPo battery
- Small switch
- 5mm thick rare earth magnets x2
- Thin gauge stranded wire (silicone coated)
- Solder and soldering iron (tool)
- Helping third hand tool (tool)
- Wire strippers (tool)
- Flush diagonal cutters (tool)
- Strong glue such as E6000 (tool)
- Rubber band or clamp (tool)
- Tape (tool)
- Water resistant covering (plastic bag, mint box, or 3D printed enclosure)
- Knife sharpening stone (and vessel to soak it)
- Dull kitchen knives (for sharpening)
Precision sharpening skills aren’t developed overnight! Here’s a high-tech way to monitor your knife angle during sharpening, with the help of an absolute orientation sensor and bluetooth microcontroller. This project is a collaboration with Alex French Guy Cooking!
This is an intermediate level Arduino project, so if you’re an ultra-beginner or a bit rusty, brush up with my free Arduino Class.
Pick up the following components (find them in an Adafruit wishlist or from Amazon affiliate links below):
- Adafruit Bluefruit Feather 32u4 microntroller
- BNO055 9-DOF absolute orientation IMU fusion breakout
- Small lipoly battery
- Small switch
- 5mm thick rare earth magnets x2
- Thin gauge stranded wire
Tools you’ll need:
- Soldering iron & solder
- Helping third hand tool
- Wire strippers
- Flush diagonal cutters
- Strong glue such as E6000
- Rubber band or clamp
- Tape
- Water resistant covering of some kind, like a plastic bag, mint box, or 3D printed enclosure
- Knife sharpening stone
- Vessel large enough to soak your stone
- Your dull kitchen knives
To keep up with what I’m working on, follow me on YouTube, Instagram, Twitter, Pinterest, and subscribe to my newsletter. As an Amazon Associate I earn from qualifying purchases you make using my affiliate links.
Step 1: Software & Configurations for Feather Bluefruit 32u4
Before you can communicate with your microcontroller, there are a few setup tasks, which we’ll walk you through here!
To program your Feather board from your computer, you’ll need to add the Adafruit boards package to your Arduino IDE software (not supported by default).
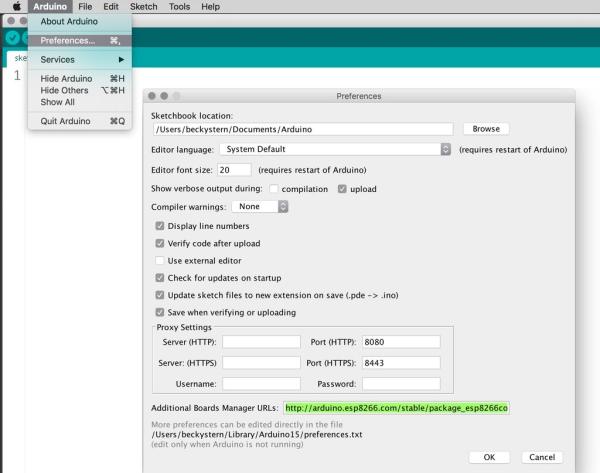
The first step of that process is providing a URL to the Additional Boards Manager. In the text box near the bottom of the Preferences window, paste in exactly this text:
https://adafruit.github.io/arduino-board-index/package_adafruit_index.json
If the box was not blank when you opened the Preferences window, you may have some other boards already installed. If that’s the case, append the text box’s contents with the above URL, using a comma to separate multiple URLs. Click OK to close the Preferences window and save changes.
Navigate to the menu item Tools-> Board:(board name)-> Boards Manager. Allow a moment for the boards manager to download its index, then start typing “adafruit” into the search bar.
When you see “Adafruit AVR Boards by Adafruit,” you can stop typing in the search and click “Install” to get the latest boards package installed inside your Arduino application. Plug in your Feather. On Windows, you will also have to install a driver.
As with all microcontroller projects, be sure you’re able to program the Blink sample code to your board before proceeding. Open the sketch from File->Examples->01.Basics->Blink, or copy the following into an empty sketch:
void setup() {
  // initialize digital pin LED_BUILTIN as an output.
  pinMode(LED_BUILTIN, OUTPUT);
}

void loop() {
  digitalWrite(LED_BUILTIN, HIGH);   // turn the LED on (HIGH is the voltage level)
  delay(1000);                       // wait for a second
  digitalWrite(LED_BUILTIN, LOW);    // turn the LED off by making the voltage LOW
  delay(1000);                       // wait for a second
}
Under Tools->Board:, select Adafruit Feather 32u4. After plugging in your Feather Bluefruit, you should see it appear under Tools->Port:. If none of your ports are labeled, try unplugging your board, checking
the Ports menu, then replugging your board and checking the Ports menu again. Whichever port name disappears then reappears is likely to be your Arduino board. On Windows your port will likely be called “COM3” (or higher numbers) and on OS X it’s likely to be something like “/dev/cu.usbmodem1461” (with different numbers in place of those shown).
Now click the Upload button (right-facing arrow) to transfer the Blink example code to the Arduino board.
You’ll also need the following libraries, available by searching the Library Manager (Sketch->Include Library->Manage Libraries…) or download and install the old-fashioned way:
To receive and display sensor values from your circuit over bluetooth, you’ll need a mobile device running the Bluefruit LE Connect app for iOS or Android.
Step 2: Build Breadboard Prototype (Optional)
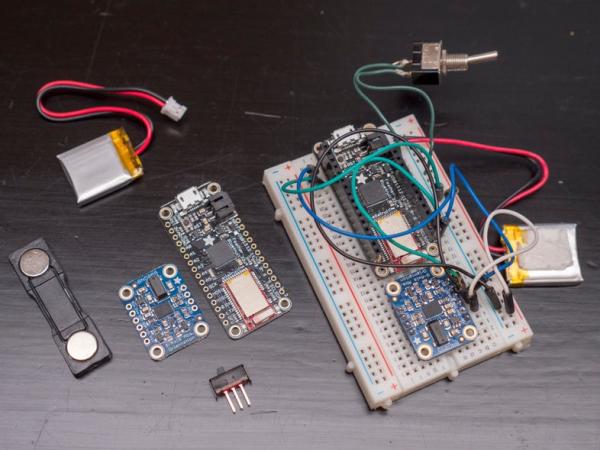
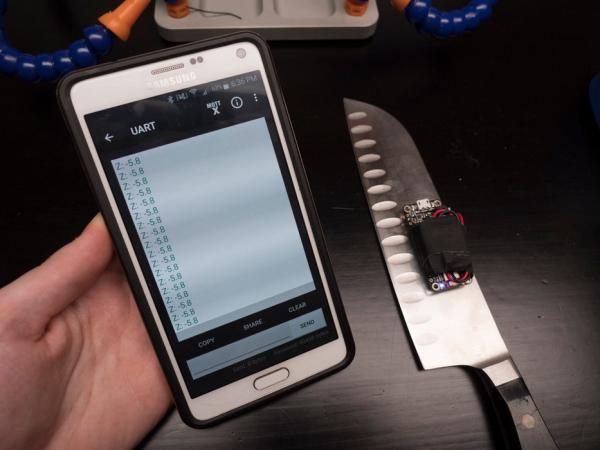
I always like to build a breadboard prototype of my circuits before I commit to the final assembly, but then again I make things like this more than most folks and generally have two of everything. This particular project’s parts are a bit pricey, and not easy to convert from breadboard-friendly to free-wire compatible, plus the circuit doesn’t have that many connections– so I think you’ll probably do fine assembling it straight away. This time, you can learn vicariously from my breadboard experience. For example, I learned that the relevant axis to monitor for this project is Z (yaw) for the desired orientation of the sensor (skinny to line up with the Feather, which will run longways along the knife blade).
Step 3: Arduino Code
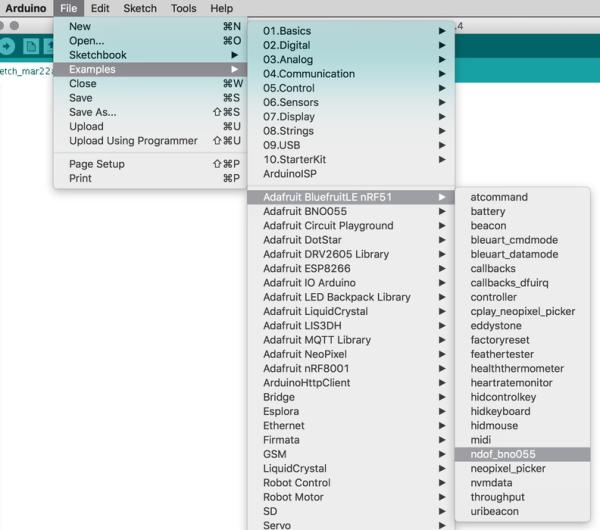
The code for this project is very barely modified from one of the bluetooth library’s examples, accessible under File->Examples->Adafruit BluefruitLE nRF51->ndof_bno055. If it does not appear in your Arduino menus, then you do not have the library installed correctly, and you should go back to the setup step.
The changes we made simplify what’s sent to the mobile device to just the desired angle (UART is sorta slow so there’s no reason to send extra data), and massage that number to always be positive, even if you flip the device upside down.
    // Send abbreviated integer data out over BLE UART
    ble.print("AT+BLEUARTTX=");
    //ble.print("X: ");
    //ble.print(euler.x(), 1);
    //ble.print(" Y: ");
    //ble.print(euler.y(), 1);
    //ble.print(" Z: ");
    if (euler.z() > 90.0){
      ble.println((180-euler.z()), 1);
    } else if(euler.z() < -90.0){
      ble.println((180+euler.z()), 1);
    }else{
      ble.println(euler.z(), 1);
    }
Our version also abstracts the bluetooth configuration into its own file in the same sketch folder (matter of preference), and comments out the following line right at the beginning of the setup:
while (!Serial);
which interfered with the device’s ability to send data without being connected over USB.
To get the code for this project, download and unzip the file attached to this step and upload it to your Feather Bluefruit 32u4 using your Arduino software. If you’re having trouble uploading, revisit the setup step to get your board settings and libraries in order.
If you’d rather avoid bluetooth altogether, you could swap the microcontroller for a Feather 32u4 Proto, and use the Adafruit BNO055 Arduino library sample code as a starting point.
Step 4: Assemble Circuit
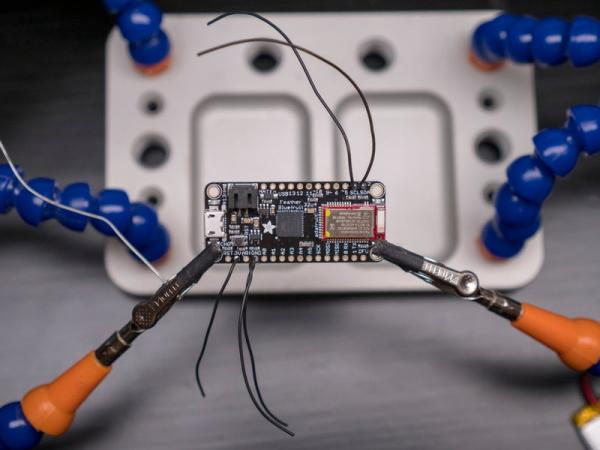
Strip and tin the ends of some small gauge silicone coated stranded wire. The tinned ends should fit through the tiny holes on the Feather without catching any strands or scrunching, which could cause a short circuit that doesn’t function.
Solder the wires to the microcontroller, switch, and the sensor according to the circuit diagram. Note that two wires need to go to ground, and it’s easier to connect them both at the same time.
To keep the sensor parallel to the blade, I mounted it on the underside of the microcontroller board with a small piece of flat double-stick tape, and used thick neodymium magnets as standoffs on either end of the Feather. The sensor board is 4mm tall, and my magnets are 5mm tall. For now, just tape the magnets in place.
Source: Knife Sharpening Angle Coach With Bluetooth & Arduino
- What microcontroller is used in this project?
The project uses an Adafruit Bluefruit Feather 32u4 microcontroller. - What sensor measures the knife angle?
The project uses a BNO055 9-DOF absolute orientation IMU fusion breakout to measure angle. - How is the angle data transmitted to a mobile device?
Angle data is sent over Bluetooth Low Energy using the Bluefruit LE UART to the Bluefruit LE Connect app. - Which axis of the sensor is relevant for monitoring the sharpening angle?
The Z axis (yaw) is the relevant axis for the desired orientation. - Do I need to install additional Arduino board support to program the Feather?
Yes, add the Adafruit boards package URL to the Additional Boards Manager and install Adafruit AVR Boards via the Boards Manager. - Which libraries are required for the project?
The required libraries are Adafruit Unified Sensor, Adafruit BNO055, and Adafruit BluefruitLE nRF51. - Can I avoid using Bluetooth in this project?
Yes, you can swap to a Feather 32u4 Proto and use the Adafruit BNO055 Arduino library sample code to avoid Bluetooth. - How is the sensor mounted parallel to the knife blade?
The sensor is mounted on the underside of the Feather with double-stick tape and thick neodymium magnets used as standoffs. - What code changes were made to the example sketch?
The code was simplified to send only the desired angle over BLE and to normalize the angle to always be positive even when flipped upside down.